Swapping engines in a 1992-2000 Honda Civic is a popular modification for car enthusiasts looking to boost performance or replace a worn-out engine. If you’re diving into an engine swap for your 1995 Honda Civic Ex Obd2, understanding the wiring is crucial for a successful and smooth process. While often referred to as OBD2 due to its model year falling within the OBD2 transition period, the 1995 Honda Civic EX is actually equipped with an OBD1 system. This guide will clarify the wiring complexities and provide a roadmap for various engine swaps, ensuring your project stays on track.
This article serves as your comprehensive wiring guide, drawing from expert knowledge to provide accurate information for your 1995 Honda Civic EX OBD2 engine swap. We will break down the common scenarios, focusing on both VTEC and non-VTEC engine swaps, and address the specifics of your OBD1 system.
Understanding OBD Systems for 1995 Honda Civics
Before we delve into the wiring specifics, it’s vital to clarify the On-Board Diagnostics (OBD) system in your 1995 Honda Civic EX. Despite the automotive industry’s shift towards OBD2 in the mid-1990s, the 1995 Honda Civic EX and many other models from this year still utilized the OBD1 system. This distinction is critical because OBD1 and OBD2 systems have different wiring configurations, ECU (Engine Control Unit) requirements, and sensor compatibility.
Incorrectly assuming your 1995 Civic EX is OBD2 can lead to significant wiring headaches and potential damage to your ECU or engine components. Therefore, always confirm your vehicle’s OBD system before starting any engine swap or wiring modifications. Visually, OBD1 systems typically have a 12-pin DLC (Data Link Connector), while OBD2 systems use a 16-pin connector.
OBD1 Engine Swaps into Your 1995 Honda Civic EX (OBD1)
Let’s explore the most common engine swap scenarios for your 1995 Honda Civic EX OBD2 (OBD1), starting with swaps that utilize OBD1 engines and ECUs.
D16Z6/D15B/Mini-Me Swaps with P28 ECU
The D16Z6 (VTEC) and D15B (JDM VTEC) engines are popular upgrades for non-VTEC Civic models. A “Mini-Me” swap typically involves adding a VTEC cylinder head (like the D16Z6 head) to a non-VTEC engine block. For these swaps, the P28 ECU (OBD1 VTEC ECU) is commonly used.
DX/LX – D15B7 (Non-VTEC)
If your 1995 Civic EX started as a DX or LX model with a D15B7 engine, you’ll need to wire up the VTEC solenoid and VTEC pressure switch to your P28 ECU. All other wiring should be plug and play.
CX – D15B8 (Non-VTEC)
Similar to the DX/LX, a CX model (D15B8) will also require wiring the VTEC solenoid and pressure switch for a VTEC swap with a P28 ECU. Additionally, if your CX model originally had a 1-wire O2 sensor, you’ll need to wire in the additional three O2 sensor connections as shown in Figure 1 to be compatible with the 4-wire O2 sensor system typically used with the P28 ECU.
VX – D15Z1 (VTEC-E)
For VX models (D15Z1), VTEC wiring is generally plug and play as the VX already has VTEC-E. However, if you’re using a chipped P28 ECU and want to eliminate the knock sensor and IAB (Intake Air Bypass) valve, you can bypass wiring these components. For VX models with a 7-wire O2 sensor, conversion to a 4-wire O2 sensor might be necessary, as detailed in the diagram linked in the original article (http://www.hybridautomotive.com/tech/o2/).
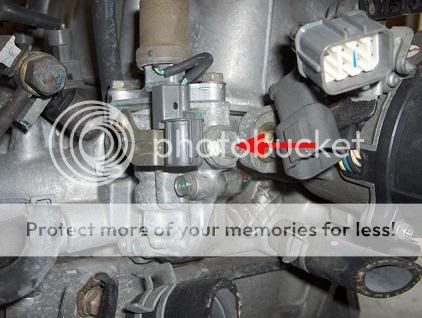 Figure 2 (JDM VTEC solenoid)
Note: If your JDM D15B engine lacks a VTEC pressure switch, you’ll need to install one. You can easily source a pressure switch from any 1990-2001 Honda/Acura vehicle.
B16A3/B17A/B18C1/B18C (OBD1 JDM) Swaps with Chipped P28/P30/P61/P72 ECU
Upgrading to a B-series engine like the B16A3, B17A, B18C1 (GSR), or JDM OBD1 B18C is a significant performance leap for your 1995 Honda Civic EX OBD2 (OBD1). These swaps often utilize chipped OBD1 ECUs such as P28, P30 (OBD1 VTEC ECU), P61 (OBD1 SiR ECU), or P72 (OBD1 GSR ECU).
EX/Si – D16Z6 (VTEC)
If your 1995 Civic EX is already an EX or Si model (originally equipped with a D16Z6), VTEC wiring will be plug and play. Knock sensor and IAB wiring (Figure 1) can be bypassed if you’re using a chipped P28 ECU and don’t intend to use these features. All other wiring should be straightforward.
DX/LX – D15B7 (Non-VTEC)
For DX/LX models (D15B7), you will need to wire VTEC as shown in Figure 1. Knock sensor and IAB wiring (Figure 1) can be skipped with a chipped P28 ECU. The rest of the wiring should be plug and play.
CX – D15B8 (Non-VTEC)
CX models (D15B8) require VTEC wiring (Figure 1) and potentially O2 sensor wiring if it’s a 1-wire system, as mentioned earlier. Knock sensor and IAB wiring are optional with a chipped P28 ECU.
VX – D15Z1 (VTEC-E)
VX models (D15Z1) can reuse their existing VTEC solenoid and pressure switch wiring. If converting a 7-wire O2 sensor system, refer to the previously mentioned diagram.
B18A/B (OBD1) Swaps in DX/CX/VX/EX with P74/P75 ECU or Chipped OBD1 ECUs
The B18A (LS) and B18B (LS) engines are another popular choice for OBD1 Civics. These swaps commonly use P74 or P75 ECUs (OBD1 non-VTEC ECUs) or chipped OBD1 ECUs for more tuning flexibility.
LX/DX/EX – D15B7/D16Z6 (Various)
For LX, DX, and EX models, B18A/B swaps are generally plug and play with P74/P75 ECUs or chipped OBD1 ECUs.
CX/VX – D15B8/D15Z1 (Various)
CX and VX models are also largely plug and play for B18A/B swaps. However, CX models with 1-wire O2 sensors will need the 4-wire conversion (Figure 1). VX models with 7-wire O2 sensors might require the 4-wire conversion as well.
OBD2 Engine Swaps into Your 1995 Honda Civic EX (OBD1) with OBD1 ECU
Swapping in a newer OBD2 engine into your 1995 Honda Civic EX OBD2 (OBD1) while retaining an OBD1 ECU is achievable but requires more attention to wiring and component compatibility.
D16Y8 (OBD2) Swap with P28 ECU
The D16Y8 (VTEC) engine from 1996-2000 Civics is a common OBD2 engine swap into older Civics. Using a P28 ECU (OBD1) with a D16Y8 requires several modifications:
EX/Si/VX – D16Z6/D15Z1 (Various)
These models are mostly plug and play for the basic engine functions. VTEC is plug and play. However, the knock sensor on the D16Y8 will not be used with the P28 ECU. The distributor from your original D16Z6/D15Z1 might not directly bolt onto the D16Y8 head perfectly. You can use it, but not all mounting points will align. To use the D16Y8 distributor, you’ll need an OBD2A or OBD2B to OBD1 adapter harness.
A crucial point is the Intake Air Temperature (IAT) sensor. The D16Y8 intake manifold does not have a provision for the IAT sensor. You’ll need to relocate your IAT sensor to the intake arm (Figure 3) or use a D16Z6/Z1 intake manifold, which bolts onto the D16Y8 head.
Reuse your D16Z6/Z1 injectors as the D16Y8 injectors have different connectors. For VX models, consider using EX/SI/DX injectors for similar flow rates to the D16Y8 injectors. Also, reuse your D16Z6/Z1 alternator as the D16Y8 alternator uses a different plug style. The Crankshaft Position Sensor (CKF) near the crank on the D16Y8 will not be used with the OBD1 ECU; simply secure it out of the way. For VX models, if you have a 5-wire O2 sensor, convert it to a 4-wire setup as previously mentioned.
LX/DX/CX – D15B7/D15B8 (Non-VTEC)
These models are also mostly plug and play. You will need to wire up the VTEC solenoid and pressure switch (Figure 1). Reuse your original DX/CX distributor as it will bolt up directly to the D16Y8 head. Similar to the EX/Si/VX, relocate the IAT sensor to the intake arm (Figure 3) or use your original CX/DX intake manifold. You can reuse your DX injectors as they have the same flow rate. For CX models, consider upgrading to EX/SI/DX injectors for better flow, similar to the D16Y8 injectors. Reuse your CX/DX alternator. The D16Y8 CKF sensor is not used.
B16A2/B18C1 (OBD2)/B18C5 Swaps with Chipped P28/P30/P72 ECU
Swapping in OBD2 B-series VTEC engines like the B16A2, B18C1 (GSR), or B18C5 (Type R) into your 1995 Honda Civic EX OBD2 (OBD1) with a chipped OBD1 ECU (P28, P30, P72) requires similar considerations as the D16Y8 swap.
EX/SI/VX – D16Z6/D15Z1 (Various)
Mostly plug and play, with VTEC being plug and play. The knock sensor on these OBD2 B-series engines won’t be used with a P28 ECU but will be functional with P30 or P72 ECUs. To use the OBD2 B-series distributor, you’ll need an OBD2A or OBD2B to OBD1 adapter harness. Relocate the IAT sensor to the intake arm. Reuse your original D16Z6 injectors. For VX models, consider EX/SI/DX injectors. You’ll need to use an OBD1 B-series alternator for plug-and-play compatibility. The CKF sensor is not used. For VX models, handle the 5-wire O2 sensor conversion if needed.
DX/CX – D15B7/D15B8 (Non-VTEC)
These are also mostly plug and play, requiring VTEC wiring (Figure 1). The knock sensor is not used with a P28 ECU but is functional with P30/P72. An OBD2 to OBD1 distributor adapter is needed for the OBD2 B-series distributor. Relocate the IAT sensor. Reuse DX injectors; for CX models, consider EX/SI/DX injectors as OBD2 injectors won’t directly plug into OBD1 harnesses. Use an OBD1 B-series alternator. The CKF sensor is not used. For 1-wire O2 CX models, convert to 4-wire using Figure 1.
B18B/B20B/Z (OBD2) Swaps with P75 ECU
Using a P75 ECU (OBD1 non-VTEC) with OBD2 B18B/B20B/Z engines in your 1995 Honda Civic EX OBD2 (OBD1) is another viable swap option.
EX/SI/VX/DX/CX – D16Z6/D15Z1/D15B7/D15B8 (Various)
These swaps are mostly plug and play. For the distributor, you can use an OBD1 B18 distributor for plug and play or an OBD2 LS distributor with an adapter harness. An OBD1 B-series alternator is needed for plug and play. For EX/SI/DX models, reuse your original injectors; for VX/CX, use EX/DX/SI injectors. The CKF sensor is not used. For 1-wire O2 CX models, use Figure 1 for 4-wire conversion. For VX 7-wire O2, use the previously mentioned conversion method.
Key Wiring Considerations
-
IAT Sensor Relocation: OBD2 intake manifolds often lack the IAT sensor port. Relocating it to the intake arm is a common solution (Figure 3).
-
Distributor Adapters: When using an OBD2 distributor with an OBD1 ECU, adapter harnesses are typically required.
-
Injector Clips: OBD2 injectors may have different clips. You might need to remove the injector “clips” for plug-and-play connection with OBD1 harnesses (Figure 10).
-
Alternator Compatibility: OBD2 alternators can have different plug styles. Using an OBD1 alternator or an OBD2-to-OBD1 adapter might be necessary.
-
O2 Sensor Wiring: VX models and some CX models may require O2 sensor wiring modifications to ensure compatibility with the swapped engine and ECU.
-
ECU Selection: Choosing the correct ECU is crucial. P28 is popular for VTEC swaps, while P75 is common for non-VTEC B-series swaps. Chipped ECUs offer tuning flexibility.
Conclusion
Successfully wiring an engine swap in your 1995 Honda Civic EX OBD2 (OBD1) requires careful planning and attention to detail. This guide provides a solid foundation for understanding the wiring nuances of common swaps. Remember to always double-check wiring diagrams, component compatibility, and consult with experienced professionals or online communities when needed. By understanding these key wiring aspects, you can confidently tackle your 1995 Honda Civic EX engine swap and enjoy the enhanced performance of your upgraded ride.
Figures Reference:
- Figure 1: OBD1 ECU Wiring (http://www.ff-squad.com/tech/wiring/wiring.92-95.jpg) & Pin Removal (http://www.ff-squad.com/tech/wiring/obd1.pin_removal.jpg)
- Figure 2: JDM VTEC Solenoid (http://i859.photobucket.com/albums/ab152/yebabee/vtec26on-1.jpg)
- Figure 3: OBD1 IAT Sensor in Intake Arm (https://honda-tech.com/forums/attachments/honda-civic-del-sol-1992-2000-1/451205d1501528094-92-00-honda-engine-swap-wiring-guide-vtec-non-vtec-7a89579e-37fd-47cf-9a9b-a87323CFBEE0_zpsc9jdxw68.jpg)
- Figure 10: Injector Clip Modification (http://ff-squad.com/tech/wiring/obd2-1injclip.jpg)