Diagnosing issues with your 2003 Honda Accord often starts with the On-Board Diagnostics II (OBD2) port. This crucial interface allows mechanics and car owners to read diagnostic trouble codes, providing insights into the health of your vehicle’s systems. However, if your OBD2 port isn’t working, a blown fuse might be the culprit. Locating the correct fuse is the first step in resolving this issue. This guide will help you pinpoint the 2003 Honda Accord Obd2 Fuse Location and understand the fuse box diagrams for your vehicle.
The 2003 Honda Accord utilizes two main fuse boxes: one under the hood and another inside the cabin. Understanding their locations and diagrams is essential for any electrical troubleshooting, including issues related to your OBD2 port.
The under-hood fuse box, usually situated near the battery and engine compartment, manages fuses for high-current systems. These typically include components like headlights, cooling fans, and the Anti-lock Braking System (ABS). While the under-hood fuse box is vital for many car functions, the OBD2 port fuse is more likely found in the interior fuse box.
The interior fuse box, usually located under the dashboard on the driver’s side, controls fuses for circuits within the car cabin. This is the primary location to investigate for the 2003 Honda Accord OBD2 fuse location. To find the specific fuse for your OBD2 port, you’ll need to consult the fuse box diagram, usually found on the inside of the fuse box cover.
Here are the details of both fuse boxes for your 2003 Honda Accord:
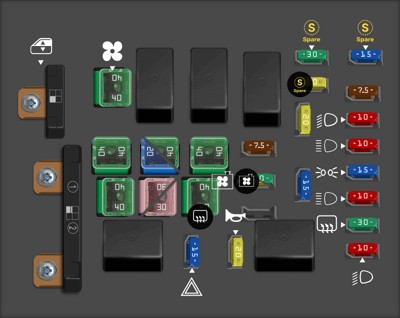
Under-hood Fuse Box Diagram and Fuse List
| Type | No. | Description |
|---|---|---|
| Fuse MINI 10A | 1 | Left Headlight Low |
| Fuse MINI 30A | 2 | Rear Defroster Coil |
| Fuse MINI 10A | 3 | Left Headlight Hi |
| Fuse MINI 15A | 4 | Small Light |
| Fuse MINI 10A | 5 | Right Headlight Hi |
| Fuse MINI 10A | 6 | Right Headlight Low |
| Fuse MINI 7.5A | 7 | Back Up |
| Fuse MINI 15A | 8 | FI ECU |
| Fuse MINI 20A | 9 | Condenser fan |
| Fuse MINI 20A | 11 | Cooling Fan |
| Fuse MINI 30A | 11 | Cooling Fan [6-cylinder models] |
| Fuse MINI 7.5A | 12 | MG. Clutch |
| Fuse MINI 20A | 13 | Horn, Stop |
| Fuse FMX/JCase 40A | 14 | Rear Defroster |
| Fuse FMX/JCase 40A | 15 | Back Up, ACC |
| Fuse MINI 15A | 16 | Hazard |
| Fuse FMX/JCase 30A | 17 | ABS Motor |
| Fuse FMX/JCase 30A | 17 | TCS Motor [6-cylinder models] |
| Fuse FMX/JCase 20A | 18 | ABS F/S |
| Fuse FMX/JCase 40A | 18 | TCS [6-cylinder models] |
| Fuse FMX/JCase 40A | 19 | Heated Seats |
| Fuse FMX/JCase 40A | 20 | Condenser Fan |
| Fuse FMX/JCase 40A | 21 | Heater Motor |
| Multi fuse block MUSB | 22 | Battery |
| Multi fuse block MUSB | 23 | +B IG1 Main // Power Window Main |
| Fuse MINI 30A | 24 | SPARE |
| Fuse MINI 15A | 25 | SPARE |
| Fuse MINI 20A | 26 | SPARE |
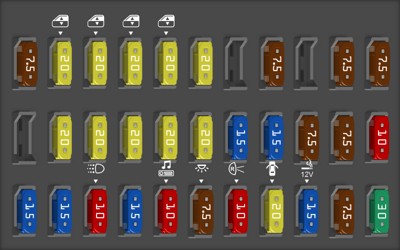
Interior Fuse Box Diagram and Fuse List
| Type | No. | Description |
|---|---|---|
| Fuse MINI 15A | 1 | Drive by Wire |
| Fuse MINI 15A | 2 | Ignition Coil |
| Fuse MINI 10A | 3 | Day Light [On Canadian models] |
| Fuse MINI 15A | 4 | Laf Heater |
| Fuse MINI 10A | 5 | Radio |
| Fuse MINI 7.5A | 6 | Interior Light |
| Fuse MINI 10A | 7 | Back-Up Lights |
| Fuse MINI 20A | 8 | Door Lock |
| Fuse MINI 15A | 9 | Front Accessory Sockets |
| Fuse MINI 7.5A | 10 | IG OPDS |
| Fuse MINI 30A | 11 | IG Wiper |
| Fuse MINI 20A | 13 | Passenger’s Power Seat Recline |
| Fuse MINI 20A | 14 | Driver’s Power Seat Slide |
| Fuse MINI 20A | 15 | Heated Seat |
| Fuse MINI 20A | 16 | Driver’s Power Seat Recline |
| Fuse MINI 15A | 18 | IG ACG |
| Fuse MINI 15A | 19 | IG Fuel Pump |
| Fuse MINI 7.5A | 20 | IG Washer |
| Fuse MINI 7.5A | 21 | IG Meter |
| Fuse MINI 10A | 22 | IG SRS |
| Fuse MINI 7.5A | 23 | IGP (PGM-FI ECU) |
| Fuse MINI 20A | 24 | Left Rear Power Window |
| Fuse MINI 20A | 25 | Right Rear Power Window |
| Fuse MINI 20A | 26 | Right Front Power Window |
| Fuse MINI 20A | 27 | Driver’s Power Window |
| Fuse MINI 20A | 28 | Moonroof |
| Fuse MINI 7.5A | 30 | IG HAC |
| Fuse MINI 7.5A | 32 | ACC |
| Fuse MINI 7.5A | 33 | HAC OP |
| Fuse MINI 20A | 17 | Passenger’s Power Seat Slide |
Identifying the OBD2 Fuse
While “OBD2” or “Diagnostic Port” might not be explicitly labeled on the fuse diagram, we can deduce the potential fuses. The OBD2 port needs power to operate, and it often shares a fuse with other systems.
Based on the interior fuse box diagram, fuses that could potentially be related to the OBD2 port include:
- Fuse #32 (ACC – 7.5A): “ACC” often stands for “Accessory,” and accessory circuits frequently power the OBD2 port. This is a strong candidate for the 2003 Honda Accord OBD2 fuse location.
- Fuse #7 (Back-Up Lights – 10A): Sometimes, the backup circuit can also power the OBD2 port.
- Fuse #15 (Front Accessory Sockets – 15A): If your OBD2 port shares power with the accessory sockets, this fuse could be relevant.
Troubleshooting Steps
- Locate the Interior Fuse Box: Refer to your Honda Accord owner’s manual for the precise location of the interior fuse box.
- Check the Fuse Diagram: Find the fuse diagram, usually on the inside cover of the fuse box.
- Inspect Potential Fuses: Examine fuses #32 (ACC), #7 (Back-Up Lights), and #15 (Front Accessory Sockets). Look for a broken filament inside the fuse, indicating a blown fuse.
- Test with a New Fuse: If you suspect a blown fuse, replace it with a fuse of the same amperage.
- Test the OBD2 Port: Use an OBD2 scanner to check if the port is now functioning.
Important Notes:
- Always replace a blown fuse with one of the same amperage rating to avoid damaging your vehicle’s electrical system.
- If the fuse blows again immediately after replacement, there may be a more serious underlying electrical issue that requires professional diagnosis.
- Consult your 2003 Honda Accord owner’s manual for the most accurate fuse locations and diagrams specific to your vehicle’s trim and options.
By following these steps and utilizing the fuse box diagrams, you should be able to effectively locate and check the 2003 Honda Accord OBD2 fuse location, resolving a common cause of OBD2 port malfunction.