Understanding your 2006 Chevrolet HHR’s fuse box is crucial for diagnosing and resolving electrical issues. This guide provides a detailed look at the fuse box locations and diagrams for your HHR, specifically focusing on fuses relevant to the OBD2 port and overall vehicle diagnostics.
The 2006 Chevy HHR is equipped with two distinct fuse boxes. Knowing their locations and the function of each fuse is essential for any HHR owner. Let’s explore each fuse box in detail.
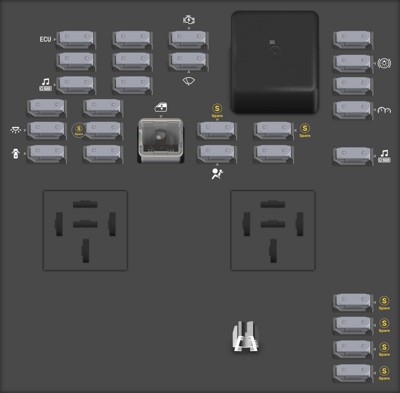
Floor Console Fuse Block Diagram
The primary fuse box in your 2006 HHR is located within the floor console. This fuse block houses fuses and relays that control numerous interior and convenience features of your vehicle.
Here’s a breakdown of the fuses and relays in the Floor Console Fuse Block:
| Number | Type | Description |
|---|---|---|
| 1 | Fuse puller | Fuse Puller |
| 2 | Fuse MINI | Spare |
| 3 | Fuse MINI | Spare |
| 4 | Fuse MINI | Spare |
| 5 | Fuse MINI | Spare |
| 6 | Fuse MINI | Amplifier |
| 7 | Fuse MINI | Cluster |
| 8 | Fuse MINI | Ignition Switch, PassKey |
| 9 | Fuse MINI | Stoplamp |
| 10 | Fuse MINI | Climate Control System, PassKey |
| 11 | Fuse MINI | Empty |
| 12 | Fuse MINI | Spare |
| 13 | Fuse MINI | Airbag |
| 14 | Fuse MINI | Spare |
| 15 | Fuse MINI | Wiper |
| 16 | Fuse MINI | Climate Control System, Ignition |
| 17 | Fuse MINI | Blank |
| 18 | Fuse MINI | Blank |
| 19 | Fuse MINI | Electric Power Steering, Steering Wheel Controls |
| 20 | Fuse MINI | Sunroof |
| 21 | Fuse MINI | Spare |
| 22 | Fuse MINI | Blank |
| 23 | Fuse MINI | Radio |
| 24 | Fuse MINI | Sensing and Diagnostic Module |
| 25 | Fuse MINI | Engine Control Module, Transmission Control Module |
| 26 | Fuse MINI | Door Locks |
| 27 | Fuse MINI | Interior Lamps |
| 28 | Fuse MINI | Blank |
| 29 | Fuse FMX/JCase | Power Windows |
| 30 | Relay | Climate Control System |
| 31 | Relay | Blank |
| 32 | Relay | Retained Accessory Power |
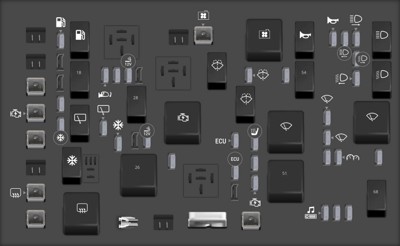
Engine Compartment Fuse Block Diagram
The second fuse box is located in the engine compartment. This fuse block primarily manages fuses and relays associated with critical engine and vehicle operational systems.
Here’s a detailed list of the fuses and relays in the Engine Compartment Fuse Block:
| Number | Type | Description |
|---|---|---|
| 1 | Fuse FMX/JCase | Electric Power Steering |
| 2 | Fuse FMX/JCase | Rear Defogger |
| 3 | Fuse FMX/JCase | Empty |
| 4 | Fuse FMX/JCase | Body Control Module 3 |
| 5 | Fuse FMX/JCase | Starting System |
| 6 | Fuse FMX/JCase | Body Control Module 2 |
| 7 | Fuse FMX/JCase | Empty |
| 8 | Fuse FMX/JCase | Empty |
| 9 | Fuse MINI | Air Conditioning Clutch Diode |
| 10 | Fuse MINI | Liftgate, Sunroof |
| 11 | Fuse MINI | Empty |
| 12 | Fuse MINI | Empty |
| 13 | Fuse MINI | Fuel Pump |
| 20 | Fuse MINI | Rear Wiper |
| 21 | Fuse MINI | Mirror |
| 22 | Fuse MINI | Air Conditioning |
| 23 | Fuse MINI | Heated Seats (Option) |
| 25 | Fuse puller | Fuse Puller |
| 27 | Fuse MINI | Empty |
| 29 | Fuse MINI | Cigarette Lighter |
| 30 | Fuse MINI | Power Outlet |
| 31 | Fuse MINI | Empty |
| 32 | Fuse FMX/JCase | Empty |
| 33 | Fuse MINI | Emissions |
| 36 | Fuse FMX/JCase | Empty |
| 37 | Circuit breaker MAXI | Power Seat (Option) |
| 40 | Fuse FMX/JCase | Cooling Fan |
| 41 | Fuse MINI | Empty |
| 42 | Fuse MINI | Engine Control Module |
| 43 | Fuse MINI | Engine Control Module, Transmission |
| 44 | Fuse FMX/JCase | Anti-lock Brake System (Option) |
| 45 | Fuse MINI | Injectors, Ignition Module |
| 46 | Fuse MINI | Park, Neutral |
| 47 | Fuse MINI | Heated Seat, Back-up Lamps |
| 49 | Fuse MINI | Windshield Washer Pump |
| 53 | Fuse MINI | Fog Lamps (Option) |
| 56 | Fuse MINI | Audio, OnStar |
| 57 | Fuse MINI | Anti-lock Brake System (Option) |
| 58 | Fuse MINI | Windshield Wiper Diode |
| 59 | Fuse MINI | Windshield Wiper |
| 60 | Fuse MINI | Horn |
| 61 | Fuse MINI | Anti-lock Brake System (Option) |
| 62 | Fuse MINI | Instrument Panel, Ignition |
| 63 | Fuse MINI | Driver’s Side High Beam |
| 64 | Fuse MINI | Canister Vent |
| 65 | Fuse MINI | Driver’s Side Low Beam |
| 66 | Fuse MINI | Passenger’s Side Low Beam |
| 67 | Fuse MINI | Passenger’s Side High Beam |
| 69 | Fuse MINI | Parking Lamps |
| 14 | Relay | Rear Defogger Relay |
| 15 | Relay | Air Conditioning Clutch |
| 16 | Relay | Empty |
| 17 | Relay | Rear Wiper |
| 18 | Relay | Liftgate Release |
| 19 | Relay | Fuel Pump |
| 24 | Relay | Empty |
| 26 | Relay | Powertrain |
| 28 | Relay | Empty |
| 34 | Relay | Starting System |
| 35 | Relay | Empty |
| 38 | Relay | Empty |
| 39 | Relay | Windshield Washer Pump |
| 48 | Relay | Rear Windshield Washer |
| 50 | Relay | Cooling Fan |
| 51 | Relay | Run, Crank |
| 52 | Relay | Windshield Wiper |
| 54 | Relay | Fog Lamps (Option) |
| 55 | Relay | Horn |
| 68 | Relay | Parking Lamps |
| 70 | Relay | Windshield Wipers |
| 71 | Relay | Headlamp Low Beam |
| 72 | Relay | Headlamp High Beam |
Locating the OBD2 Port Fuse in Your 2006 HHR
While there isn’t a fuse explicitly labeled “OBD2” or “Diagnostic Port,” the OBD2 port in your 2006 Chevy HHR needs power to function. The power for the OBD2 port is often linked to the cigarette lighter or auxiliary power outlet fuse.
For the 2006 HHR, fuses #29 (Cigarette Lighter) and #30 (Power Outlet) in the Engine Compartment Fuse Block are likely candidates to check if you are experiencing issues with your OBD2 port. If your OBD2 scanner is not powering on or communicating with your vehicle’s computer, inspect these fuses first. A blown fuse here can disable the power supply to your OBD2 port, preventing it from working correctly.
Steps to Check and Replace a Fuse:
- Turn off your vehicle and ensure the ignition is completely off.
- Locate the fuse box: Refer to the diagrams above to find the Floor Console Fuse Block and the Engine Compartment Fuse Block.
- Identify the suspect fuse: Based on the tables, locate fuse #29 or #30 in the Engine Compartment Fuse Block for OBD2 port power issues.
- Use the fuse puller: The fuse puller is usually located in one of the fuse boxes (often slot #1 in the Floor Console Fuse Block). Use it to gently remove the fuse.
- Inspect the fuse: Hold the fuse up to the light and check if the wire inside is broken or melted. If it is, the fuse is blown.
- Replace the fuse: Use a new fuse with the same amperage rating. You can find spare fuses in the fuse box itself (slots #2, #3, #4, #5, #12, #14, #21 in the Floor Console Fuse Block).
- Test: Turn your vehicle to the “ON” position and check if your OBD2 scanner now powers up and connects.
Important Notes:
- Always replace a blown fuse with one of the same amperage rating. Using a fuse with a higher rating can damage your vehicle’s electrical system.
- If the replacement fuse blows immediately or shortly after, there may be a more significant electrical problem. Consult a qualified mechanic to diagnose the issue.
- Refer to your 2006 Chevrolet HHR owner’s manual for the most accurate and up-to-date fuse information and locations, as diagrams and fuse assignments can sometimes vary.
By understanding the fuse box layout and knowing where to look for potential OBD2 port related fuses, you can effectively troubleshoot common electrical problems in your 2006 Chevy HHR. Remember to always prioritize safety and consult a professional if you are unsure about any electrical repairs.