The Tire Pressure Monitoring System (TPMS) is a crucial safety feature in modern vehicles, including the 2006 Honda Ridgeline. It continuously monitors tire pressure and alerts you to any significant drops, ensuring optimal safety and fuel efficiency. Understanding how this system works and knowing where to find your OBD2 port are essential for maintaining your vehicle. This guide will walk you through the TPMS of your 2006 Honda Ridgeline, including how to reset it and where to locate the OBD2 port for diagnostics.
Understanding the TPMS in Your 2006 Honda Ridgeline
Your 2006 Honda Ridgeline is equipped with a sophisticated TPMS that keeps a watchful eye on all four tires whenever the engine is running. This system is designed to detect when a tire’s pressure falls below 24 psi (168 kPa). If this occurs, the system promptly alerts you by activating the low pressure indicator, illuminating the corresponding tire indicator on your multi-information display, and storing a diagnostic trouble code (DTC) in the control unit.
Once the tire pressure is corrected and exceeds 29 psi (198 kPa), the TPMS control unit automatically turns off the warning indicators and stores any set DTCs. In situations where two or more tires are low on pressure, the low pressure indicator will illuminate briefly before the individual tire indicators, ensuring you are fully informed of the issue. The system is also intelligent enough to scan all four sensors to pinpoint the exact tire(s) with low pressure.
If the TPMS detects a system malfunction, the TPMS indicator will light up. In cases where both low tire pressure and a system problem are present, only the TPMS indicator will be activated. When a system issue is detected, the TPMS control unit will record a DTC and enter a fail-safe mode, which means it will not alert you to low tire pressures until the system issue is resolved. If the TPMS control unit loses power or fails, the TPMS indicator will illuminate, but no DTC will be stored.
Each tire pressure sensor is a self-contained unit integrating the tire valve stem, a pressure sensor, and a transmitter. This unit is securely attached to the inside of the wheel around the valve stem. To prevent signal interference from other vehicles, each sensor has a unique ID.
After the TPMS control unit learns and memorizes all sensor IDs, it exclusively responds to signals from these specific sensors. This ID memorization can occur automatically or manually. Initiators located in each wheel housing are wired to the control unit. Each time you turn the ignition to the ON position, the control unit requests sensor IDs from each initiator. The initiators then transmit these IDs, which the control unit receives and memorizes. This process allows the system to accurately identify each sensor’s location, even after tire rotations. This recurring ID confirmation ensures the system remains accurate and avoids confusion due to routine tire maintenance.
Locating the OBD2 Port on Your 2006 Honda Ridgeline
For diagnostics and resetting procedures, accessing the OBD2 port is essential. On your 2006 Honda Ridgeline, the OBD2 location is conveniently situated under the dashboard on the driver’s side. Specifically, you’ll find it to the left of the steering column. You may need to look under the dash, near the area where your knees would be while driving. It’s typically not hidden behind a panel but is openly accessible for easy connection to a scan tool.
[Image of OBD2 port location under the dashboard of a car, generic image for illustration, URL to be replaced with actual image if available]
Alt text: Location of the OBD2 port under the dashboard, commonly found on the driver’s side of a vehicle.
This standard 16-pin Data Link Connector (DLC) allows you to connect an OBD-II compatible scan tool or the Honda Diagnostic System (HDS) to read diagnostic trouble codes, monitor system parameters, and perform resets, including TPMS sensor ID memorization.
TPMS Warning Indicators Explained
Understanding the TPMS warning indicators is crucial for interpreting your 2006 Honda Ridgeline’s alerts. There are a few key indicators to be aware of:
- Low Tire Pressure Indicator (Tire Symbol): This light, often resembling a horseshoe shape with an exclamation point or a deflated tire icon, illuminates when one or more of your tires are significantly underinflated. Along with this, the specific tire(s) with low pressure will be indicated on the multi-information display.
- TPMS Indicator (TPMS Symbol): This indicator, often displaying the letters “TPMS,” lights up when the system detects a malfunction within the TPMS itself. This could be due to a sensor failure, control unit issue, or other system problems. If this light is on, the system may not be actively monitoring tire pressures.
It’s important to note that tire pressures naturally fluctuate with temperature changes. A temperature change of about 50 degrees Fahrenheit (10 degrees Celsius) can alter tire pressure by approximately 1.5 psi (10 kPa). This means that during colder weather, tire pressure may drop enough to trigger the low pressure indicator. Conversely, as temperatures rise, the light may turn off. If you experience intermittent warnings, especially with temperature changes, it’s advisable to manually check your tire pressures and adjust them as needed.
Note: If the ambient temperature drops to -40 degrees F (-40 degrees C) or below, the TPMS may not function reliably.
If the low tire pressure indicator and multi-information display indicators remain continuously lit due to low pressure, inflate your tires to the recommended pressure specified on the tire and loading information placard, usually located on the driver’s side doorjamb. The indicator light should turn off shortly after driving once the correct pressure is reached. If the warning lights persist, it indicates a problem within the TPMS requiring further diagnosis.
Resetting the TPMS System on Your 2006 Honda Ridgeline
Resetting the TPMS on your 2006 Honda Ridgeline is necessary when you rotate your tires or replace a tire pressure sensor. There are two primary methods for resetting the system and memorizing sensor IDs: automatic memorization and using the Honda Diagnostic System (HDS) or an OBD-II compatible scan tool.
Memorizing Sensor ID (Automatically)
This method is straightforward and typically used after tire rotation or sensor replacement.
- Drive: After rotating your tires or installing a new TPMS sensor, drive your 2006 Honda Ridgeline for at least 40 seconds at a speed of 15 mph (24 km/h) or greater. The system will automatically begin to memorize the sensor IDs.
- Confirmation: To verify successful memorization, reduce the tire pressure in all four tires below the recommended specification. Check that the four tire indicators illuminate on your dashboard. This confirms that the system is reading pressure from all sensors.
Memorizing Sensor ID (Using HDS or OBD-II Scan Tool)
If automatic memorization is unsuccessful or if you have replaced the TPMS control unit, you’ll need to use the Honda Diagnostic System (HDS) or an OBD-II compatible scan tool. This method requires accessing the OBD2 location on your 2006 Honda Ridgeline.
- Connect Scan Tool: With the ignition switched OFF, locate the OBD2 port under the dashboard on the driver’s side of your 2006 Honda Ridgeline. Connect your HDS or OBD-II scan tool to this port.
- Initiate Learning: Turn the ignition switch to the ON position (do not start the engine). Follow the prompts on your HDS or scan tool to initiate the TPMS sensor ID memorization process.
- Follow Screen Prompts: The scan tool will guide you through the steps to memorize the sensor IDs. If all IDs are successfully memorized, proceed to step 5. If the system fails to learn one or more IDs, continue to the next step.
- Troubleshooting (If Necessary): If sensor ID learning fails, clear any DTCs using the HDS or scan tool. With assistance, start the learning process again while driving the vehicle at a speed under 10 mph. This slower speed learning process can sometimes resolve issues with sensor ID acquisition. If problems persist, consult the service information for your 2006 Honda Ridgeline or seek professional assistance.
- Confirmation: After successful ID memorization, reduce the pressure in all four tires below the recommended level to ensure all tire indicators illuminate, confirming the system is functioning correctly.
TPMS Sensor Replacement Guide
Replacing a TPMS sensor requires careful demounting and mounting procedures to avoid damaging the new sensor or the wheel.
Caution: Always use proper tire changing equipment and follow the tire changer manufacturer’s instructions.
Demounting Procedure:
- Vehicle Preparation: Raise your 2006 Honda Ridgeline and securely support it with safety stands.
- Wheel Removal: Remove the wheel with the faulty sensor.
- Deflate Tire: Remove the tire valve cap and valve core, and completely deflate the tire.
- Remove Balance Weights: Remove any wheel balance weights.
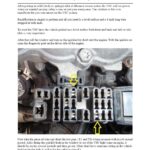
- Separate Tire Bead: Carefully demount the tire from the wheel using a tire changer. When using the bead breaker, position the wheel so the valve stem is approximately 90 degrees away from the bead breaker to avoid sensor damage. Position the tire machine and tire iron near the valve stem and ensure they move away from it as the machine operates. Demount the outside bead first.
[Image of tire demounting process on a tire changer, focusing on valve stem position, URL to be replaced with actual image if available]
Alt text: Tire demounting process on a tire changer, illustrating the correct positioning to protect the TPMS sensor near the valve stem.
- Remove Valve Stem Nut and Sensor: Remove and discard the valve stem nut. Then, carefully remove the tire pressure sensor and valve stem from the wheel.
- Dealing with Seized Nuts (If Necessary): If the valve stem nut is seized, apply rust penetrant and carefully remove it with pliers. If it remains stuck, slowly turn the valve stem counterclockwise until the sensor detaches. Discard the screw but keep the sensor if it’s being reused (though often replacement is recommended). Ensure the valve stem grommet is removed. In extreme cases where the valve stem is completely seized, carefully drill out the valve stem ball with an 11 mm drill bit to remove the valve stem, being cautious not to damage the wheel.
Installation Procedure:
Note: Always use a new valve stem, nut, and screw when installing a TPMS sensor.
- Assemble New Components: Assemble the new valve stem, screw, and sensor-transmitter unit.
- Clean Mating Surfaces: Clean the sensor and wheel mating surfaces to ensure a proper seal.
- Install Sensor: Install the tire pressure sensor onto the wheel and tighten the valve nut finger-tight, ensuring the sensor rests flush against the wheel.
[Image of TPMS sensor installation on a wheel, showing sensor position and valve stem, URL to be replaced with actual image if available]
Alt text: TPMS sensor being installed on a car wheel, highlighting the sensor’s placement and valve stem attachment.
- Final Torque: Tighten the valve nut to 35 in.-lbs. (4 N.m) while holding the sensor against the wheel. Observe the following precautions:
- Never reuse valve stem nuts that have been previously tightened to torque.
- Do not use air or electric impact tools for tightening.
- Over-tightening can damage the nut and sensor.
- A snapping or popping sound during tightening is normal.
- Ensure there is no gap between the sensor and the wheel.
- Mount Tire: Lubricate the tire bead and mount the tire back onto the wheel, ensuring proper alignment on the tire changer.
- Inflate Tire: Inflate the tire to 44 psi (300 kPa) to properly seat the tire bead. Then, adjust the tire pressure to the recommended level as indicated on the tire placard. Install the valve stem cap.
- Balance Wheel: Check and adjust the wheel balance.
- Reinstall Wheel: Reinstall the wheel onto your 2006 Honda Ridgeline.
- Lower Vehicle: Remove safety stands and lower the vehicle.
- Memorize Sensor IDs: Perform the TPMS sensor ID memorization procedure as described earlier (either automatic or using HDS/scan tool).
Torque Specifications for 2006 Honda Ridgeline TPMS
| Component | Torque |
|---|---|
| Wheel Nut (2006 Ridgeline) | 94 ft.-lbs. (127 N.m) |
| Tire Pressure Sensor Nut | 35 in.-lbs. (4 N.m) |
Important Notes on Torque:
- Always use a torque wrench to ensure accurate tightening.
- Never reuse tire pressure sensor nuts after they have been torqued.
- Do not use impact tools on sensor nuts.
- Ensure proper sensor seating against the wheel.
By understanding your 2006 Honda Ridgeline’s TPMS, knowing the 2006 Honda Ridgeline Obd2 Location, and following these procedures, you can effectively maintain your TPMS, ensuring safety and optimal vehicle performance. Always consult your vehicle’s service manual or a qualified technician for any complex issues.
Information for this article is based on Mitchell 1’s “Tire Pressure Monitoring Systems Guide”. For more detailed information, visit www.mitchell1.com.