For owners of the 2009 Toyota 4Runner, maintaining your vehicle’s health is paramount, and that includes keeping a close eye on the transmission fluid temperature. Unlike older models with a transmission dipstick, the 2009 4Runner features a sealed transmission, making fluid level checks a bit more complex. Ensuring the correct fluid level requires checking it when the transmission fluid temperature is within a specific range. For instance, the factory service manual for a 2007 4Runner with A750E and A750F transmissions specifies a temperature range of 115°F to 130°F for accurate checks. Always verify the specific temperature range for your 2009 Toyota 4Runner model before proceeding.
The crucial question then becomes: how do you accurately monitor the transmission fluid temperature on your 2009 Toyota 4Runner? While infrared thermometers offer a quick approach, their accuracy is often debated and not always reliable for precise measurements. Therefore, we will focus on two more dependable methods to monitor your 2009 Toyota 4Runner’s transmission temperature, with a particular emphasis on utilizing OBD2 software.
The Budget-Friendly Paperclip Trick for Transmission Temp Check
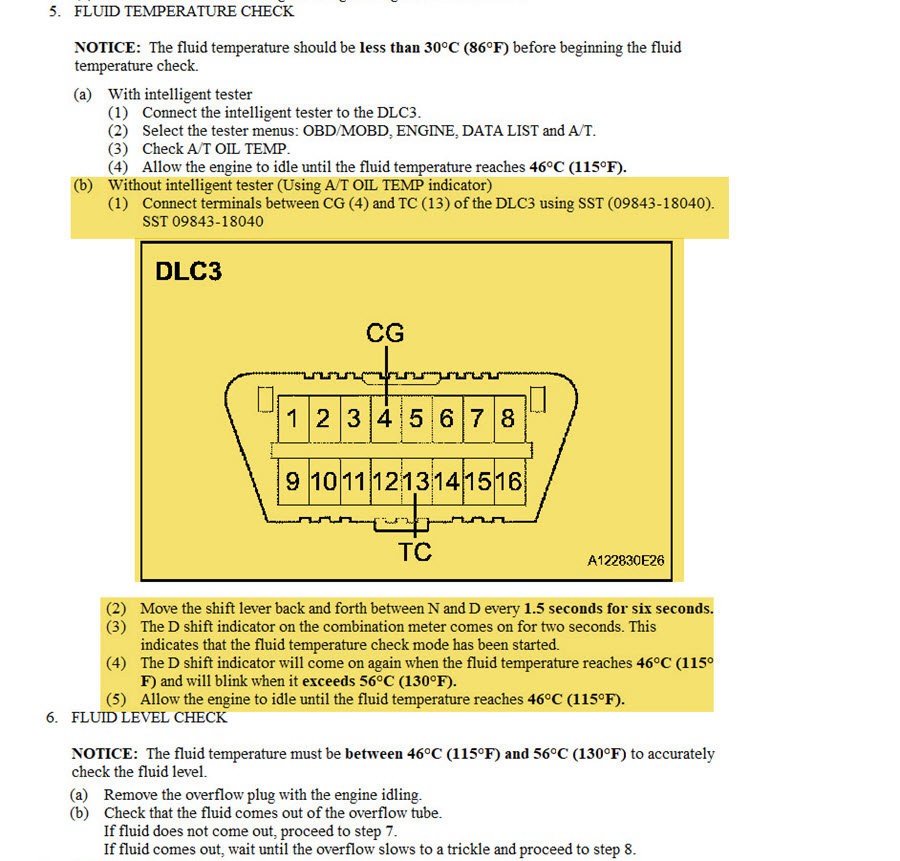
The most economical method, requiring just a simple paperclip, is detailed in the Toyota Factory Service Manual. This technique involves using a jumper wire or a paperclip to bridge terminals 4 and 13 within your 2009 Toyota 4Runner’s OBD port. It’s essential to begin this process with a cold transmission, as this method relies on observing dashboard indicator lights as the engine idles and the transmission fluid warms up. These lights will signal when the Transmission Temp Check Mode is initiated, when the fluid reaches the lower temperature limit of the check range, and finally when the maximum temperature is reached. This process can take anywhere from 10 to 15 minutes, depending on ambient temperature.
The steps outlined in the Factory Service Manual for a 2007 4Runner (similar for other Gen 4 models including the 2009) are visually represented here:
In practice, the OBD port on your 2009 Toyota 4Runner might appear inverted compared to the manual’s illustration. However, even if you count the pins from top left to bottom right, the pin locations for the jumper remain consistent. A small paperclip can effectively serve as the jumper:
Once the jumper is correctly positioned, start your 2009 Toyota 4Runner’s engine. The dashboard lights will begin to flash – this is a normal indication at this stage.
Next, shift between Neutral and Drive every 1.5 seconds for a total of 6 seconds. Upon successful entry into Toyota’s Transmission Temperature Check Mode, either the ‘D’ drive indicator or the ‘A/T Oil Temp’ light on your dashboard will illuminate for approximately 2 seconds before turning off. While the 2007 Factory Service Manual excerpt might only mention the ‘Drive’ indicator, in models like the 2007 Limited 4Runner, it’s the ‘A/T Oil Temp’ light that signals mode entry. This is likely consistent for the 2009 Toyota 4Runner as well.
At this point, remove the jumper and allow the engine to idle. As the transmission temperature rises, the ‘D’ or ‘A/T Oil Temp’ light will illuminate steadily again, indicating that the transmission fluid has reached the minimum temperature required for a fluid level check. Prepare your tools and a catch pan beforehand, so you are ready to perform the fill-level check as soon as the light becomes constant, before it starts flashing to signal that the temperature has exceeded the upper limit.
While this paperclip method is cost-effective, it requires careful observation of dashboard lights and can be less straightforward for some users. For a more precise and user-friendly approach, especially when considering regular monitoring of your 2009 Toyota 4Runner’s transmission temperature, OBD2 software offers a superior solution.
Utilizing OBD2 Software for Precise Transmission Temperature Monitoring
For a more advanced and user-friendly method to monitor your 2009 Toyota 4Runner’s transmission temperature, consider using OBD2 software in conjunction with an ELM327 compliant OBDII Bluetooth dongle. This method, while requiring a small investment, provides real-time, accurate temperature readings directly on your smartphone or tablet. The recommended OBD2 software for this purpose is the Torque Pro app for Android devices.
To get started, you will need:
- An ELM327 compliant OBDII Bluetooth dongle. These are widely available online, with prices starting around $15-$20.
- The Torque Pro app, available for purchase on the Google Play Store.
The initial step involves connecting your ELM327 dongle to your 2009 Toyota 4Runner’s OBDII port and pairing it with your Android device via Bluetooth. Refer to the instructions included with your OBDII dongle for specific pairing steps.
Once paired, open the Torque Pro app and configure your vehicle profile if you haven’t already done so. Next, navigate to “Settings” by clicking the gear icon, then select “Manage extra PIDs/Sensors”. On the subsequent screen, tap the menu button and choose “Add custom PID”, then confirm with “OK”.
Now, input the following custom PID data specifically for 4th generation Toyota 4Runners (2004-2009), including your 2009 model:
- OBD2 Mode and PID:
21d9 - Long Name: (e.g.,
Trans Temp) – Choose a descriptive name - Short Name: (e.g.,
Trans Temp) – Choose a short, easily recognizable name - Minimum value:
0 - Maximum value:
300 - Scale factor:
x1 - Unit type:
F - Equation:
(((((G*256)+H)*(7/100))-400)/10)
Ensure you enter the equation precisely as shown, paying close attention to parentheses and the absence of spaces. A green checkmark should appear once the equation is correctly entered. Click “OK” to save the custom PID.
With the custom PID defined, you need to add a gauge to the Torque Pro dashboard to display the transmission temperature. From the main Torque Pro screen, select “Realtime Information”. On the next screen, tap the gear/menu icon and choose “Add display”. Select your preferred display type (e.g., “Digital display”), then choose the custom sensor you created (e.g., “Trans Temp”). Select a widget size and position it on your dashboard as desired.
This custom PID formula has been verified to work on 2007-2009 4Runner models and should be compatible with all 4th generation 4Runners (2004-2009).
While Torque Pro is a popular choice, other OBDII apps, such as OBD Fusion, also support Toyota transmission temperature monitoring when used with an ELM327 dongle. OBD Fusion may require purchasing the app and an enhanced diagnostics add-on for Toyota-specific features. This could be a viable alternative for users who prefer a potentially simpler setup process compared to manually entering custom PIDs.
Choosing the Right Method for Your 2009 Toyota 4Runner Transmission Temp Check
Both the paperclip method and the OBD2 software method offer effective ways to monitor your 2009 Toyota 4Runner’s transmission temperature for fluid level checks and general health monitoring.
The paperclip method is a budget-friendly, DIY approach suitable for occasional fluid checks. However, it requires careful attention to dashboard light signals and may be less precise than digital readings.
Conversely, utilizing OBD2 software like Torque Pro with an ELM327 adapter provides a more accurate, real-time, and user-friendly experience. While it involves a small upfront cost, the benefits of precise temperature monitoring, ease of use after setup, and potential for ongoing transmission health monitoring make it a worthwhile investment, especially for owners who prioritize proactive maintenance of their 2009 Toyota 4Runner. Regularly monitoring your transmission temperature, particularly when towing or under heavy loads, can contribute significantly to the longevity and performance of your 2009 Toyota 4Runner’s transmission system.