For owners of the rugged and reliable 2018 Toyota 4Runner, understanding your vehicle’s diagnostic systems is key to both maintenance and performance enhancement. One of the most crucial access points for this information is the On-Board Diagnostics II (OBD2) port. Knowing the 2018 Toyota 4runner Obd2 Location is the first step in unlocking a wealth of data about your vehicle’s health and operation. This guide will pinpoint exactly where to find this port and explore how it can be used with tools like the ScanGauge II to monitor your 4Runner’s vital signs.
Understanding OBD2 and Why It’s Important for Your 2018 4Runner
The OBD2 system is a standardized system in modern vehicles that provides access to diagnostic data. It’s essentially your 4Runner’s way of communicating its internal state, reporting everything from engine temperature to potential issues. For 2018 Toyota 4Runner owners, the OBD2 port serves as a vital connection point for:
- Reading Diagnostic Trouble Codes (DTCs): When your check engine light illuminates, the OBD2 system stores codes that indicate the source of the problem. An OBD2 scanner can read these codes, helping you understand the issue before visiting a mechanic.
- Real-time Performance Monitoring: Beyond error codes, the OBD2 system provides live data on various engine and vehicle parameters. This includes coolant temperature, RPM, speed, fuel efficiency, and much more.
- Using Performance and Monitoring Tools: Devices like the ScanGauge II plug directly into the OBD2 port to display real-time data in an easy-to-read format, enhancing your driving experience and vehicle awareness.
- Emissions Testing: The OBD2 system is also crucial for vehicle emissions testing, ensuring your 4Runner meets environmental standards.
Knowing the 2018 Toyota 4Runner OBD2 location empowers you to take a proactive approach to vehicle maintenance and gain deeper insights into your SUV’s performance.
Locating the OBD2 Port in Your 2018 Toyota 4Runner
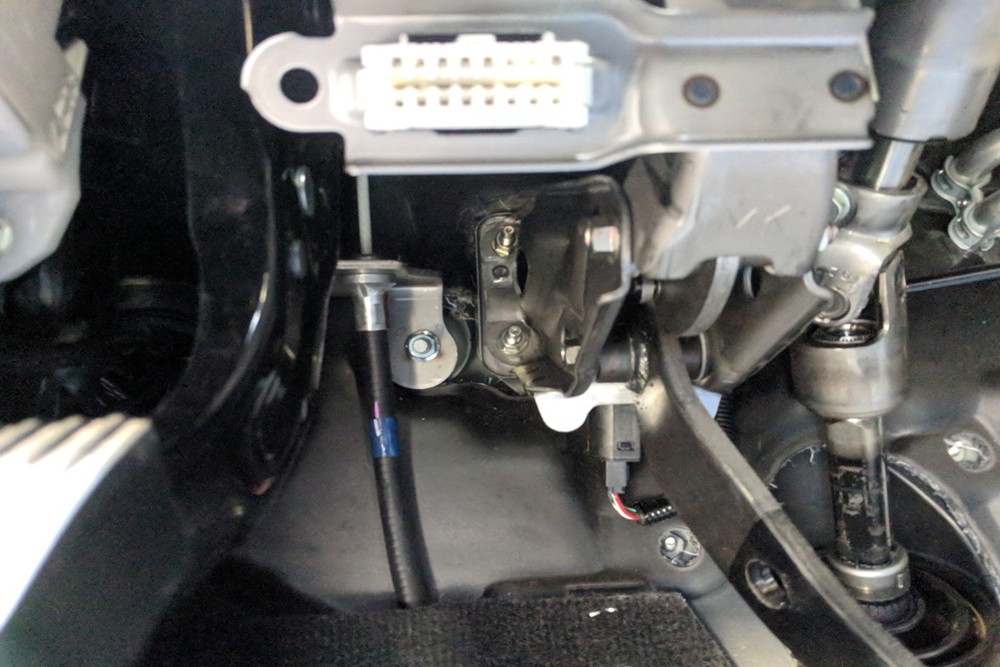
Finding the OBD2 port in your 2018 Toyota 4Runner is a straightforward process. It is intentionally placed in an easily accessible location for quick diagnostics. Here’s how to find it:
- Get into the Driver’s Seat: The OBD2 port is located within the driver’s side compartment.
- Look Under the Steering Column: Position yourself so you can look directly underneath the steering wheel column, above the pedals.
- Identify the Port: The OBD2 port is a trapezoid-shaped, 16-pin connector. It’s usually black and easily identifiable.
In most 2018 Toyota 4Runners, the OBD2 port is not hidden behind any panels, making it readily accessible for plugging in diagnostic scanners or performance monitors.
Why Use an OBD2 Scanner Like ScanGauge II for Your 4Runner?
While the 2018 Toyota 4Runner is a highly capable and well-built SUV, its factory instrument panel lacks certain real-time data displays that can be valuable, especially for off-roading enthusiasts or those who use their 4Runner for towing. This is where OBD2 scanners like the ScanGauge II become incredibly useful.
Real-time Data for Enhanced Driving and Vehicle Awareness
The ScanGauge II and similar OBD2 devices provide a wealth of real-time information directly from your 4Runner’s engine and systems. This can include:
- Transmission Temperature: Crucial for towing and heavy loads, monitoring transmission temperature can prevent overheating and extend transmission life.
- Battery Voltage: Keep an eye on your electrical system’s health, especially important in off-road situations or with aftermarket accessories.
- Coolant Temperature: Track engine temperature to avoid overheating, particularly during strenuous driving conditions.
- Intake Air Temperature: Useful for monitoring engine efficiency and performance.
- Fuel Economy: Real-time and trip-based fuel economy data to help optimize driving habits.
- Engine RPM, Speed, and More: Access a wide array of engine and vehicle parameters not displayed on the standard dashboard.
Easy Diagnostics and Troubleshooting
Beyond real-time monitoring, OBD2 scanners like ScanGauge II also empower you to:
- Read and Clear Check Engine Lights: Diagnose the cause of a check engine light and clear the code after addressing the issue, potentially saving trips to the mechanic for minor problems.
- Access Trouble Codes: Get detailed diagnostic trouble codes to understand the nature of any vehicle issues.
By plugging into the 2018 Toyota 4Runner OBD2 location, the ScanGauge II provides a significant upgrade in vehicle information and diagnostic capability.
Installing ScanGauge II in Your 2018 4Runner: A Simple Step-by-Step Guide
Installing a ScanGauge II in your 2018 Toyota 4Runner is remarkably easy and requires no specialized tools. Here’s a step-by-step guide based on the original article’s process:
Tools & Product Needed:
- ScanGauge II
- Included RJ45 Cable
- Velcro strips (included with ScanGauge II)
- Zip ties (optional, for cable management)
Step 1: Connecting to the OBD2 Port
- Locate the OBD2 Port: As described earlier, find the OBD2 port beneath the steering column of your 2018 4Runner.
- Plug in the RJ45 Cable: Connect one end of the provided RJ45 cable into the ScanGauge II unit and the other end directly into the OBD2 port in your 4Runner.
Step 2: Mounting and Setup
- Choose a Mounting Location: Decide where you want to mount your ScanGauge II. Common locations include the steering column, dashboard, or windshield. The original article suggests the steering column for ease of viewing.
- Use Velcro for Mounting: Apply the Velcro strips to both the ScanGauge II unit and your chosen mounting surface. Press firmly to secure it in place.
- Cable Management: Neatly run the RJ45 cable along the steering column or dashboard, keeping it away from pedals or moving parts. Use zip ties if needed to secure the cable and prevent dangling wires.
Step 3: Programming Your ScanGauge II
- Power On: Start your 2018 Toyota 4Runner. The ScanGauge II should power on automatically as it draws power from the OBD2 port.
- Programming Gauges: Follow the instructions in the ScanGauge II manual to program the gauges you want to monitor. This typically involves navigating the ScanGauge II menu using its buttons.
- X-Gauge for Toyota Specific Parameters: For parameters not listed in the standard menu, such as transmission temperature for your 2018 4Runner, you may need to use the X-Gauge function. Visit the ScanGauge website for specific X-Gauge codes for Toyota vehicles.
Key Features of the ScanGauge II
- Easy Installation: Plugs directly into the 2018 Toyota 4Runner OBD2 location with no tools required.
- Self-Powered: Draws power directly from the OBD2 port, no batteries needed.
- Automatic Protocol Detection: Automatically detects your 4Runner’s communication protocol.
- Versatile Mounting: Comes with a long cable and Velcro for flexible placement.
- Customizable Display: Choose from a variety of display colors to match your interior.
- Comprehensive Gauges: Monitor a wide range of vehicle parameters, including those specific to Toyota vehicles through X-Gauge programming.
Conclusion
Locating the 2018 Toyota 4Runner OBD2 location and utilizing tools like the ScanGauge II can significantly enhance your ownership experience. Whether you’re looking to monitor your vehicle’s performance, diagnose issues, or simply gain a deeper understanding of your 4Runner’s operation, the OBD2 port is your gateway to valuable data. The ScanGauge II offers an easy-to-install and feature-rich solution for accessing this information, providing peace of mind and greater control over your 2018 Toyota 4Runner’s health and performance.