Let’s face it, when that check engine light pops up, it can feel like your car is speaking a language you just don’t understand. But diagnosing car troubles doesn’t have to be a shot in the dark anymore. Enter the Wi-Fi OBD2 scanner – your key to quickly and easily understanding what’s going on under the hood.
These clever devices have revolutionized car diagnostics, making it simpler and less stressful than ever before. Take the Foxwell NT809BT for example; it’s designed with user-friendliness and powerful features in mind, especially when you link it up with your PC for in-depth analysis.
Ready to learn how to harness the power of a Wi-Fi OBD2 scanner connected to your computer and take control of your vehicle’s health? Let’s explore how these tools work and how to use them effectively.
Understanding the Functionality of a Wi-Fi OBD2 Scanner
 Car Scanner Functions | Foxwell
A OBD2 scanner acts like an interpreter for your car’s internal systems. It taps into your vehicle’s onboard computer to extract a wealth of data. This includes everything from engine performance metrics and fuel efficiency readings to diagnostic trouble codes that signal when something isn’t quite right. Essentially, it translates the complex language of your car’s computer into information you can understand.
Wi-Fi enabled OBD2 scanners, like the Foxwell NT809BT, elevate this functionality by offering wireless connectivity to your PC, smartphones, or tablets. This wireless capability is a game-changer for several reasons:
- Comprehensive System Checks: These scanners aren’t limited to just engine codes. They can delve into various systems like ABS, transmission, and more, providing a holistic view of your vehicle’s condition.
- Real-Time Performance Monitoring: Get up-to-the-second data on crucial parameters such as RPM, coolant temperature, and sensor readings. This live data stream is invaluable for diagnosing intermittent issues and understanding how your car performs in real-time.
- Wireless Convenience: Wi-Fi connectivity eliminates the clutter and restrictions of cables. It allows for greater freedom of movement around the vehicle during diagnostics and simplifies the connection process with your devices.
Whether you’re a seasoned DIY mechanic or a car owner keen on preventative maintenance and saving on repair costs, understanding how a Wi-Fi OBD2 scanner works and utilizing one can be incredibly beneficial. It empowers you to proactively manage your car’s health and make informed decisions about maintenance and repairs.
Preparing to Use a Wi-Fi OBD2 Scanner
Before you start diagnosing your car wirelessly, ensure you have everything you need for a smooth connection:
- A Wi-Fi Enabled Computer: You’ll need a PC or laptop with Wi-Fi capabilities to connect to the scanner.
- Your Wi-Fi OBD2 Scanner: Make sure you have your Foxwell NT809BT or another compatible Wi-Fi OBD2 scanner at hand.
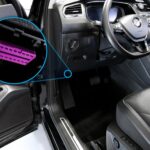
- Your Vehicle: Of course, you’ll need the car you intend to diagnose and know the location of its OBD2 port. This port is typically found under the dashboard on the driver’s side.
- Diagnostic Software: Install the necessary diagnostic software on your PC. Popular options include Torque, OBD Auto Doctor, or the software provided by your scanner manufacturer, like Foxwell’s PC Suite.
Quick Tip: Before plugging in the scanner, turn your car’s ignition to the “ON” position. This activates your car’s computer systems, allowing the scanner to establish a connection and retrieve data effectively. Do not start the engine at this stage.
Connecting Your Wi-Fi OBD2 Scanner Step-by-Step
Connecting your Wi-Fi OBD2 scanner to your PC is a straightforward process. Follow these steps to establish a wireless diagnostic link:
Step 1: Physical Connection to the OBD2 Port
Locate the OBD2 port in your car—typically situated beneath the steering wheel column or in the vicinity of the center console. Firmly plug your NT809BT scanner into this port until you hear or feel it click securely into place. Once connected, the scanner should power on, and its indicator lights will illuminate, confirming it’s receiving power.
Step 2: Establishing a Wi-Fi Connection
- On your PC, access your Wi-Fi settings. Initiate a search for available wireless networks.
- From the list of networks, look for the Wi-Fi network broadcast by your NT809BT scanner. This network name often includes the scanner’s model, such as “NT809BT_WIFI”.
- Select the scanner’s network and connect to it. You may be prompted for a password; this is usually provided in the scanner’s user manual and is often a default password like “1234” or “password.”
Step 3: Configuring Diagnostic Software
Launch your chosen diagnostic software on your PC. Navigate to the software’s settings or preferences menu, usually found under options like “Connection,” “Communication,” or “Settings.”
- Within the software settings, specify “Wi-Fi” or “Wireless” as your preferred connection method for the OBD2 scanner.
- You may need to enter the scanner’s IP address and port number in the software’s connection settings. This information is essential for establishing communication and can be found in your scanner’s manual.
- Save the configured settings within the diagnostic software.
Step 4: Verifying the Connection
Most diagnostic software includes a “Test Connection” or “Connection Status” feature. Use this function to verify that the connection between your PC and the Wi-Fi OBD2 scanner is successfully established. If the setup is correct, the software should indicate a successful connection, and you may start seeing real-time data streaming from your car’s sensors. Congratulations, you’re now wirelessly connected and ready to diagnose!
Maximizing the Potential of Your Wi-Fi OBD2 Scanner
Understanding how Wi-Fi OBD2 scanners operate extends beyond just connection. To truly leverage their capabilities, consider these points:
- Regular Updates: Keep your Wi-Fi OBD2 scanner’s firmware updated. Manufacturers like Foxwell frequently release updates that enhance compatibility with newer vehicles, add features, and improve performance. Wi-Fi scanners often simplify this process with over-the-air updates.
- Software Customization: Explore the settings and customization options within your diagnostic software. Tailor the dashboard to display the specific data parameters that are most relevant to you for efficient monitoring and diagnosis.
- Data Logging and Reporting: Utilize your PC’s capabilities to create detailed diagnostic reports. Saving and exporting data logs over time is invaluable for tracking intermittent problems, monitoring vehicle health trends, and providing comprehensive records for maintenance purposes.
Troubleshooting Wi-Fi OBD2 Scanner Connections
Even with straightforward steps, you might encounter minor hiccups. Here’s how to troubleshoot common connection issues:
PC Not Detecting Scanner’s Wi-Fi Network
- Check Scanner Power: Ensure the OBD2 scanner is securely plugged into the OBD2 port and that the indicator lights are on, signaling it’s powered.
- Ignition Position: Double-check that your car’s ignition is in the “ON” position. The car’s systems need to be active for the scanner to operate correctly.
Software Not Receiving Data
- Verify IP Address and Port: Double-check that you have correctly entered the scanner’s IP address and port number in the diagnostic software’s connection settings.
- Restart Devices: A simple restart can often resolve communication glitches. Restart both your Wi-Fi OBD2 scanner and your PC.
Intermittent or Dropping Connection
- Proximity: Ensure your PC is within a reasonable range of the Wi-Fi OBD2 scanner to maintain a stable wireless signal.
- Firmware Updates: Check for and install any available firmware updates for your NT809BT. Firmware updates often include bug fixes that can improve connection stability.
Final Thoughts
A Wi-Fi OBD2 scanner, like the Foxwell NT809BT, is more than just a tool—it’s an investment in understanding and maintaining your vehicle’s health. By connecting it to your PC, you unlock advanced diagnostic capabilities, empowering you to address issues proactively and confidently. Whether you’re deciphering a check engine light or monitoring live engine data, a Wi-Fi OBD2 scanner provides the insights you need.
Equip yourself with a Wi-Fi OBD2 scanner, follow these steps to connect it to your computer, and start gaining a deeper understanding of your car today. You’ll quickly realize how indispensable this technology is for modern vehicle maintenance and diagnostics.
FAQs
How does a Wi-Fi OBD2 scanner work?
A Wi-Fi OBD2 scanner plugs into your car’s OBD2 port, reads data from the car’s computer, and transmits this data wirelessly over Wi-Fi to a connected device like a PC or smartphone for analysis using diagnostic software.
What can I do with a Wi-Fi OBD2 scanner?
With a Wi-Fi OBD2 scanner, you can read diagnostic trouble codes, clear check engine lights, view real-time sensor data, monitor vehicle performance, perform system diagnostics (depending on the scanner’s capabilities), and generate diagnostic reports.
Why use a Wi-Fi OBD2 scanner with a computer?
Using a Wi-Fi OBD2 scanner with a computer offers a larger display for easier data viewing, more powerful processing for in-depth analysis, comprehensive diagnostic software options, and the ability to log and export data for detailed record-keeping and analysis.