An OBD2 scanner is an invaluable tool for any car owner wanting to understand their vehicle’s health. Whether you’re a seasoned DIYer or just curious about that pesky check engine light, an OBD2 scanner can provide insights into potential issues. This diagnostic tool connects to your car’s computer system and reads trouble codes, helping you or your mechanic pinpoint problems. Understanding how to use an OBD2 code manual in conjunction with your scanner is key to effective car diagnostics.
But how exactly do you use an OBD2 scanner, and more importantly, how do you interpret the results using your OBD2 code manual? This article will provide a comprehensive, step-by-step guide on using an OBD2 scanner effectively and understanding the fault codes with the help of your manual. We’ll also cover frequently asked questions to give you a deeper understanding of this essential tool.
Step-by-Step Guide: Using Your OBD2 Scanner and Code Manual
Using an OBD2 scanner is generally a straightforward process. Here’s a detailed guide on how to get started:
Step 1: Locate the Diagnostic Link Connector (DLC) – Your OBD2 Port
Modern cars, specifically those manufactured from 1996 onwards, are equipped with a standardized Diagnostic Link Connector (DLC), often referred to as the OBD2 port. This is a 16-pin connector, and you’ll typically find it located inside the cabin on the driver’s side. Common locations are underneath the dashboard, near the steering column. It may be covered by a small flap or door.
If you are having difficulty locating the OBD2 port, consulting your car’s owner’s manual is the best approach. The manual will provide the precise location of the DLC for your specific vehicle model.
Step 2: Establish Connection – Plugging in Your OBD2 Scanner
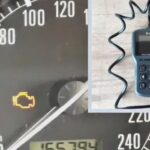
Before connecting your OBD2 scanner, ensure your car’s ignition is turned off. This is a precautionary measure to prevent any electrical issues during the connection process. Take your OBD2 scanner tool and carefully plug its connector into the DLC port. If you are using a Bluetooth OBD2 scanner, you will insert the adapter directly into the OBD2 port. For these wireless scanners, you’ll then need to pair it with a smartphone app on your device to view the diagnostic information.
After physically connecting the scanner, it’s crucial to check the instructions that came with your specific OBD2 scanner. Some scanners require the car to be in the “ON” position (ignition turned on, but engine not running), while others may require the engine to be idling. Following the correct procedure is vital to ensure proper communication between the scanner and your car’s computer and to avoid potential damage to the scanning tool.
Once connected correctly, your OBD2 scanner will begin to communicate with your car’s onboard computer system. You should see a confirmation message on the scanner’s screen indicating a successful connection to the OBD II system.
Step 3: Vehicle Information Input – VIN and Model Details
Your car is uniquely identified by its Vehicle Identification Number (VIN). Depending on the capabilities and features of your OBD2 scanner, you might be prompted to enter the VIN. This allows the scanner to access vehicle-specific diagnostic information.
The scanner may also request additional information, such as the engine type, vehicle model, and year of manufacture. This information helps the scanner to accurately interpret the data it retrieves from your car’s computer.
Locating your VIN: If your scanner requests the VIN, it’s usually found in several locations:
- Windshield: Typically located on the driver’s side, at the base of the windshield.
- Driver’s Side Doorjamb: On a sticker on the doorjamb of the driver’s side door.
- Vehicle Registration and Insurance Documents: Also readily available on your car’s official paperwork.
Step 4: Navigating the Scanner Menu – Accessing OBD Codes
Once the scanner is connected and vehicle information is entered (if required), you will navigate to the main menu on the scanner’s display screen. Look for options like “Read Codes,” “Diagnostic Codes,” or similar terminology, which may be detailed in your OBD2 code manual. Select the option that allows you to access diagnostic trouble codes. You might be able to choose to scan specific vehicle systems, such as the engine, transmission, or ABS. Selecting a specific system can narrow down the scan and provide more focused results.
The scanner will then display any active and pending engine codes.
Understanding Active vs. Pending Codes:
- Active Codes: These codes indicate current problems that are causing the check engine light to illuminate.
- Pending Codes: These codes suggest intermittent issues or problems that have occurred but haven’t yet triggered the check engine light. Pending codes can become active codes if the issue persists or recurs.
The display interface and menu options will vary depending on the specific OBD2 scanner you are using. Some basic scanners may only display the fault codes themselves, while more advanced scan tools offer a wider range of options, including live data streaming, freeze frame data, and the ability to select specific systems to scan. Refer to your OBD2 code manual for detailed instructions on menu navigation and feature access for your particular device.
Step 5: Interpreting OBD Codes – Consulting Your Code Manual
Once the OBD codes are displayed, the crucial step is to understand what they mean. This is where your OBD2 code manual becomes essential.
Each OBD code is a five-character alphanumeric code. It begins with a letter followed by four digits. The first letter categorizes the system related to the code:
- P: Powertrain (Engine, Transmission)
- B: Body (Interior and Exterior Body Components)
- C: Chassis (Braking System, Suspension, Steering)
- U: Network & Vehicle Integration (Communication Networks)
The subsequent numbers provide more specific information about the fault:
- First Digit (after the letter): Indicates if the code is generic (0) or manufacturer-specific (1). Generic codes are standardized across all manufacturers, while manufacturer-specific codes are unique to a particular car brand.
- Second Digit: Refers to the specific vehicle system or subsystem affected (e.g., fuel and air metering, ignition system, auxiliary emissions controls). Your OBD2 code manual or online resources can provide tables detailing these system classifications.
- Last Two Digits: These pinpoint the exact nature of the problem within the identified system. Your OBD2 code manual is critical here, as it should contain a comprehensive list of codes and their descriptions.
Carefully note down all the OBD codes displayed on the scanner. After recording the codes, turn off your car’s ignition and disconnect the OBD2 scanner from the DLC port.
Many advanced OBD2 scanners allow you to transfer diagnostic data to a computer via USB or Bluetooth. This can be helpful for further research and documentation. If your scanner doesn’t provide code definitions or if you need more detailed information than what’s in your OBD2 code manual, you can use online OBD2 code databases or consult a mechanic.
Step 6: Diagnosing the Trouble Code – DIY or Professional Help?
The OBD2 scanner provides you with the fault codes, indicating what system is experiencing a problem. However, it doesn’t tell you how to fix it. Understanding the code is the first step in diagnosing the underlying issue.
Using your OBD2 code manual and potentially online resources, research the possible causes associated with each code. Determine if the error code points to a minor issue, like a loose gas cap (often triggering an EVAP system code), or a more significant problem, such as a failing catalytic converter or a major sensor malfunction.
Based on your research and your comfort level with car repairs, decide whether you can address the issue yourself (DIY) or if it’s best to seek professional help from a certified mechanic. For complex issues, or if you are unsure about the diagnosis or repair procedure, it’s always recommended to consult a professional to avoid further damage or costly mistakes.
Step 7: Resetting the Check Engine Light – After Repairs
After you have addressed the issue indicated by the OBD codes and completed the necessary repairs, the check engine light may turn off automatically after driving for a short period. This happens because the car’s computer re-evaluates the system and, if the problem is resolved, deactivates the warning light.
However, you can also use your OBD2 scanner to manually clear the codes and reset the check engine light immediately.
How to Reset the Check Engine Light:
- Reconnect your OBD2 scanner to the DLC port.
- Turn the car’s ignition to the “ON” position (or start the engine, depending on your scanner’s instructions).
- Navigate the scanner’s menu to find options like “Clear Codes,” “Erase Codes,” or “Reset Codes.” Your OBD2 code manual will guide you to the correct menu option.
- Select the reset option and follow the on-screen prompts.
- Wait for the scanner to confirm that the codes have been cleared.
Important Note: Resetting the check engine light without fixing the underlying problem is only a temporary solution. The light will reappear if the issue persists. Clearing codes should only be done after the fault has been properly diagnosed and repaired.
Now that you understand how to use an OBD2 code manual and scanner, let’s address some common questions.
Frequently Asked Questions About Using OBD2 Scanners
Here are answers to some common questions about OBD2 scanners:
1. OBD1 vs. OBD2 Scanners – What’s the Difference?
OBD (On-Board Diagnostics) systems have evolved over time. OBD2 is the more advanced and standardized system compared to OBD1.
Key Differences:
- Connectivity: OBD1 scanners typically require specific cables and adapters for different vehicle makes and models. OBD2 is standardized with a universal 16-pin DLC port, simplifying connections. OBD2 scanners can also utilize Bluetooth or WiFi for wireless connectivity.
- Compatibility: OBD1 systems were used in vehicles manufactured before 1996. OBD2 is mandatory for vehicles manufactured in 1996 and later in the United States (and in many other countries). OBD2 provides broader coverage and standardization across manufacturers.
- Functionality and Data: OBD2 offers enhanced diagnostic capabilities, reading a wider range of parameters and providing more detailed diagnostic information compared to OBD1.
2. Types of OBD2 Scanners – Code Readers vs. Scan Tools
OBD2 scanners can be broadly categorized into two main types:
a) OBD2 Code Readers
These are basic, entry-level tools.
- Functionality: Primarily designed to read and clear OBD2 fault codes. They provide the basic code number but may offer limited or no code definitions directly on the device. You often need to use your OBD2 code manual or look up codes online.
- Cost: Code readers are generally affordable and readily available for DIY users.
- Limitations: May not support advanced features like live data streaming, manufacturer-specific codes beyond basic powertrain codes, or advanced system diagnostics.
b) OBD2 Scan Tools
These are professional-grade diagnostic tools.
- Functionality: Offer advanced features beyond basic code reading and clearing. They often include:
- Comprehensive code definitions displayed directly on the tool.
- Live data streaming – displaying real-time sensor readings and vehicle parameters.
- Freeze frame data – capturing data snapshots when a fault code is triggered.
- Enhanced diagnostics – supporting manufacturer-specific codes and deeper system analysis (ABS, SRS, Transmission, etc.).
- Actuation tests – allowing you to command certain vehicle components to activate for diagnostic purposes.
- Cost: Scan tools are more expensive than code readers and are typically used by professional mechanics and advanced DIYers.
- Features: Some advanced scan tools incorporate additional diagnostic equipment, such as multimeters and oscilloscopes, further enhancing their diagnostic capabilities.
3. Key Considerations When Buying an OBD2 Scanner
When choosing an OBD2 scanner, consider these factors:
- Compatibility: Ensure the scanner is compatible with your vehicle’s make, model, and year. Most OBD2 scanners are universally compatible with OBD2-compliant vehicles (1996 and newer in the US).
- Features: Determine the features you need. For basic check engine light diagnosis, a code reader might suffice. For more in-depth diagnostics, consider a scan tool with features like live data, enhanced codes, and system tests.
- Ease of Use: Look for a scanner with a user-friendly interface, clear display, and intuitive menu navigation. A well-organized OBD2 code manual is also a plus.
- Updates: Some scanners offer software updates to support newer vehicles and expand their code database. Consider scanners that provide update options.
- Portability and Durability: If you need a handheld scanner, consider its size, ergonomics, and build quality.
AutoNation Mobile Service: Expert Diagnostics and Repair
Using an OBD2 scanner and understanding your OBD2 code manual empowers you to take control of your car’s maintenance. It’s a cost-effective way to identify potential issues early on.
While an OBD2 scanner helps you understand what might be wrong, fixing the problem often requires expertise. For reliable diagnosis and repair services, consider AutoNation Mobile Service.
Our certified mobile mechanics can accurately diagnose OBD codes and provide convenient repair services right at your location. We offer a hassle-free online booking system and service availability seven days a week.
Contact AutoNation Mobile Service today to resolve your car troubles efficiently and get back on the road with confidence!