Adding new vehicles to your game server can significantly enrich the player experience. While incorporating entire car packs is relatively straightforward using merger tools, a common hurdle arises when players try to customize these add-on vehicles. Imagine the disappointment when those sleek, custom parts fail to appear in Los Santos Customs or your server’s equivalent modification shop!
This guide addresses that exact issue. If you’ve encountered the frustration of missing custom parts when modifying add-on cars on your server (like Unity, for example), you’re in the right place. The solution lies in identifying and implementing hexadecimal codes for each custom part. This process ensures that all those meticulously designed components become available for in-game customization.
Initially, finding a comprehensive guide for this specific task proved challenging. After some hands-on experimentation, we’ve compiled a clear, step-by-step tutorial to help you seamlessly integrate add-on car parts into your server.
To achieve this, you will need the following readily available tools:
- OpenIV: A powerful tool for exploring and editing game files.
- Notepad++: A versatile text editor (though any text editor will suffice).
In this example, we will demonstrate using a car with a selection of custom parts. Whether your vehicle has a few modifications or an extensive array, the method remains consistent.
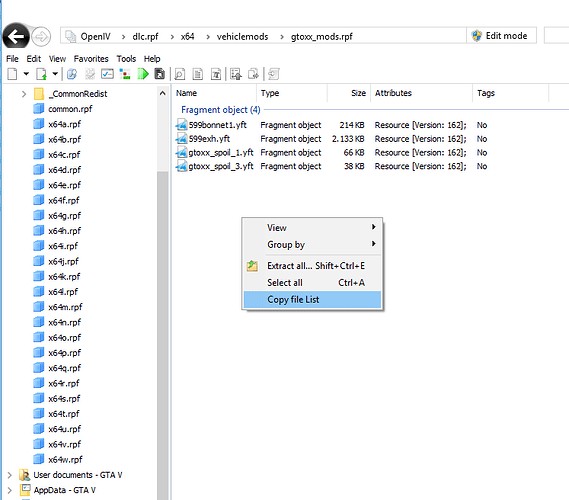
Step 1: Locate Part Files and Copy File List
Navigate to the specific .dlc folder containing your vehicle’s add-on parts. This folder houses the files that define the custom components you wish to integrate.
Right-click within the folder, ensuring no file is selected, and choose the “Copy file list” option. This action copies the names of all files within the folder to your clipboard.
Step 2: Clean Up File Names
Paste the copied file list into Notepad++ or your preferred text editor. To streamline the next step, remove the .yft file extensions from each filename in the list. This cleanup simplifies the process of generating hash codes.
Step 3: Utilize Hash Generator in OpenIV
Open OpenIV and go to the “Tools” menu. Select “Hash Generator” from the dropdown options. This tool is crucial for converting filenames into the necessary hexadecimal format.
Step 4: Generate Hex Codes
Copy the cleaned list of filenames (without .yft extensions) from your text editor and paste them into the “Input” field of the Hash Generator. Crucially, also include the filename of the base vehicle itself in this input list.
In the Hash Generator settings, select “Hex” as the output format and ensure “Case Sensitivity” is checked. Click the “Generate” button. The “Output” field will now display the corresponding hexadecimal values for each filename you entered.
Step 5: Create vehicle_names.lua File
Create a new file named vehicle_names.lua. Place this file within your server resource directory. This Lua script will house the hex codes and their associated part names, enabling the game to recognize and display the custom parts.
Open vehicle_names.lua and insert the following code structure:
function AddTextEntry(key, value)
    Citizen.InvokeNative(GetHashKey("ADD_TEXT_ENTRY"), key, value)
end

Citizen.CreateThread(function()
    AddTextEntry('0x[VEHICLE_HEX_CODE]', '[VEHICLE_NAME]')
    AddTextEntry('0x[PART_HEX_CODE_1]', '[PART_NAME_1]')
    AddTextEntry('0x[PART_HEX_CODE_2]', '[PART_NAME_2]')
    AddTextEntry('0x[PART_HEX_CODE_3]', '[PART_NAME_3]')
    -- Add more parts as needed
end)
Replace the bracketed placeholders with your actual values:
0x[VEHICLE_HEX_CODE]: The hex code generated for your vehicle’s base filename.[VEHICLE_NAME]: A descriptive name for your vehicle (e.g., “Ferrari 599 GTO”).0x[PART_HEX_CODE_1],0x[PART_HEX_CODE_2], etc.: The hex codes generated for each of your custom part filenames.[PART_NAME_1],[PART_NAME_2], etc.: Descriptive names for each custom part. These names will appear in the customization menu. Generic names like “Bonnet 1,” “Spoiler A,” or “Front Bumper Custom” are perfectly acceptable and user-friendly.
Step 6: Reference vehicle_names.lua in __resource.lua
In your resource’s __resource.lua file (or fxmanifest.lua depending on your server version), add the following line to ensure your server loads the vehicle_names.lua script:
client_script { 'vehicle_names.lua' }Adjust the path if your vehicle_names.lua file is located in a subdirectory within your resource. For example, if it’s in a data folder, use:
client_script { 'data/vehicle_names.lua' }Step 7: Start Resource and Test
Start or restart your server resource. Spawn the modified vehicle in-game and visit a vehicle modification shop. You should now find all the custom parts you added correctly listed and available for installation!
Handling Large Numbers of Parts
While manually copying filenames works for vehicles with few custom parts, it becomes tedious and error-prone for vehicles with extensive modification options. The “Copy file list” and Hash Generator method significantly simplifies this process, saving time and reducing the chance of mistakes.
Troubleshooting and Further Assistance
If you encounter issues or need further assistance, remember that communities dedicated to game server modifications, often found on platforms like Car Parts Discord Servers, can be invaluable resources. These servers host experienced modders and server administrators who can offer real-time support and troubleshooting tips. Searching for “game server modding Discord” or “car modding community Discord” can connect you with helpful communities.
Conclusion
By following these steps, you can successfully add custom car parts to your game server, enhancing vehicle customization and player enjoyment. While more intricate tutorials may exist, this guide provides a quick and effective solution for those seeking to resolve the common issue of missing add-on vehicle parts. Enjoy the enhanced customization options on your server!