Bluetooth OBD2 scanners have revolutionized car diagnostics, offering a convenient and wireless way to access your vehicle’s onboard computer system. If you’re looking to use a Bluetooth OBD2 scanner with your Windows 10 laptop or desktop, this guide will walk you through the process step-by-step. Connecting your Bluetooth Obd2 Windows 10 setup is simpler than you might think, and unlocks a wealth of information about your car’s health and performance.
Step 1: Prepare Your Bluetooth OBD2 Scanner and Windows 10 PC
Before you begin, ensure you have the necessary components ready. You’ll need:
- A Bluetooth OBD2 scanner: These compact devices plug into your car’s OBD port and communicate wirelessly.
- A Windows 10 PC: Your laptop or desktop computer will be used to receive data from the scanner.
- Your Car: Of course, you’ll need the vehicle you intend to diagnose!
Step 2: Plug the OBD2 Scanner into Your Car’s OBD Port
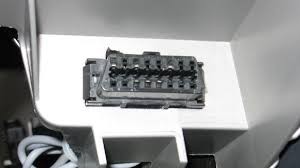
The OBD-II port (On-Board Diagnostics II) is a standardized port found in most modern vehicles. Locating it is usually straightforward.
-
Common Location: Check under the driver’s side dashboard, often near the steering column. It might be exposed or behind a small cover.
-
Need Help Finding It? If you’re having trouble locating the OBD port, use an online OBD-II port locator tool for your specific car make and model. A helpful resource is the InstallerNet Fit Guide.
Once located, firmly plug your Bluetooth OBD2 scanner into the OBD port.
Step 3: Turn On Car Ignition (Accessory Mode)
To power up the OBD2 scanner, you need to turn your car’s ignition to the “Accessory” position.
- Accessory Mode: This is usually one click of the key (or one press of the start button without pressing the brake pedal) before starting the engine. This mode activates the car’s electronics, including the OBD-II port, without starting the engine.
Step 4: Pair the Bluetooth OBD2 Scanner with Windows 10
Now, you’ll need to pair your Bluetooth OBD2 scanner with your Windows 10 computer.
Initiate Bluetooth Pairing on Windows 10
-
Access Bluetooth Settings: Click the Action Center icon in your taskbar (usually in the bottom right corner) and select “Bluetooth” if it’s not already enabled. Then, right-click on the Bluetooth icon and choose “Go to Settings”. Alternatively, you can search for “Bluetooth settings” in the Windows search bar.
-
Add Bluetooth Device: In the Bluetooth settings window, click “Add Bluetooth or other device”.
-
Select Bluetooth: Choose “Bluetooth” as the type of device you want to add.
Select Your OBD2 Scanner
Windows 10 will now scan for Bluetooth devices in range. Your OBD2 scanner should appear in the list, often with names like:
- OBDII
- OBD-II
- VLink
- Can OBDII
- ELM327
Note: It may take up to 15 seconds for the scanner to appear in the list.
Signal Not Showing?
- Rescan: If the scanner doesn’t appear, try exiting the “Add a device” screen, unplugging the OBD2 scanner from your car, plugging it back in, and then trying “Add a device” again.
- Restart: If it still doesn’t show, restart your Windows 10 computer and repeat the process.
- Check Power: Ensure the red power light on your Bluetooth OBD2 scanner is lit, indicating it’s receiving power from the car’s OBD port. If the power light is on, the device should be detectable.
- Already Paired?: If you’ve attempted pairing before, the scanner might not reappear in “Add a device”. In this case, check “Show Bluetooth devices” in the Bluetooth settings, it might already be listed there.
Once your scanner appears, click on it to begin pairing.
Enter Pairing Code
You might be prompted to enter a pairing code (passkey). Common pairing codes for OBD2 Bluetooth scanners are:
- 1234
- 0000
Enter one of these codes when prompted and click “Connect” or “Pair”.
Identify the COM Port
After successful pairing, Windows 10 will configure the Bluetooth connection and display the COM port numbers assigned to the OBD2 scanner.
- Outgoing COM Port: Note down the number of the “Outgoing” COM port. You will need this COM port number to configure your OBD-II software to communicate with the scanner.
Step 5: Connect with OBD2 Software
With the Bluetooth OBD2 scanner paired with your Windows 10 system, the final step is to use OBD-II software to read and interpret the data from your car.
-
Launch OBD Software: Install and launch your preferred OBD-II diagnostic software on your Windows 10 PC. Ensure the software you choose supports Bluetooth connections.
-
Software Recommendation: While there are many OBD-II software options available, TOAD (Total OBD & ECU Diagnostics) software is a professional-grade option known for its compatibility with ELM327 Bluetooth scanners and comprehensive features.
-
Connect in Software: Within your OBD software settings, you’ll need to select the Outgoing COM port number you noted down earlier. The software should then automatically detect and connect to your Bluetooth OBD2 device and your car’s ECU (Engine Control Unit). Click the “Connect” button within your software.
Troubleshooting Connection Issues
If your OBD software is having trouble connecting to your car through the Bluetooth OBD2 scanner, consider these troubleshooting steps:
Baud Rate Adjustment
Sometimes, connection issues can arise from the communication speed (baud rate) between the software and the OBD2 scanner.
- Software Setting: Check if your OBD software has an option to set the baud rate. If so, try setting it to 9600 or 110 bits per second. Some software, like TOAD, allows you to force a 9600 bps connection, which can resolve random disconnection problems.
Adjusting Baud Rate in Windows Device Manager
If your software doesn’t have baud rate settings, you can adjust it directly in Windows 10.
-
Open Device Manager:
- Right-click on the Start Menu button and select “Device Manager”.
- Alternatively, search for “Device Manager” in the Windows search bar.
-
Locate COM Ports: Expand the “Ports (COM & LPT)” section.
-
Find Bluetooth COM Port: Look for the “Standard Serial Bluetooth link” or a similar entry related to your Bluetooth OBD2 scanner’s COM port. The exact name might vary.
-
Properties: Right-click on the relevant “Standard Serial Bluetooth link” and select “Properties”.
-
Port Settings: Go to the “Port Settings” tab.
-
Lower Bits per second: In the “Bits per second” dropdown menu, reduce the value to 110.
-
Confirm: Click “OK” to save the changes.
After adjusting the baud rate, try reconnecting within your OBD software.
By following these steps, you should be able to successfully connect your bluetooth obd2 windows 10 setup and start diagnosing your car like a professional! Explore the features of your chosen OBD-II software to read error codes, monitor live data, and gain valuable insights into your vehicle’s performance.