For almost half a century, I’ve been immersed in the world of car repair. As vehicles evolved into complex, computerized systems, the need for specialized tools became essential. The introduction of the OBD2 (On-Board Diagnostics II) standard in 1996 was a game-changer, providing a universal port to access a wealth of data from your car’s computer. Whether you’re dealing with a check engine light or ensuring your vehicle is ready for its emission test, understanding how to utilize your OBD2 port is crucial. This journey, from diagnosing a simple code to performing advanced system checks, often begins right here.
OBD2 scanners range from basic, affordable handheld devices that read and clear trouble codes, to sophisticated, professional-grade tools used in dealerships. These advanced systems can perform in-depth diagnostics, run specific tests, and even emulate factory tools. For enthusiasts and DIY mechanics, a range of emulators are available, often requiring a special OBD2-to-USB connector to link a laptop to the vehicle’s diagnostic system. While deciphering codes and navigating the complexities of modern car electronics can be challenging, the OBD2 port provides invaluable access to the intricate systems monitoring your engine, transmission, and more.
One of the most vital uses of OBD2 is verifying the functionality of your vehicle’s emission control systems. Typically, a lit check engine light (Malfunction Indicator Lamp – MIL) will automatically fail an inspection. Even if an emissions-related code triggered the MIL and the code was cleared after repair, your car might still not pass inspection until the various IM (Inspection and Maintenance) readiness monitors are validated by the car’s Engine Control Unit (ECU). Common monitors include misfire, catalytic converter, EVAP (Evaporative Emission Control System), air injection system, oxygen sensors (O2), heated O2 sensors, and EGR (Exhaust Gas Recirculation).
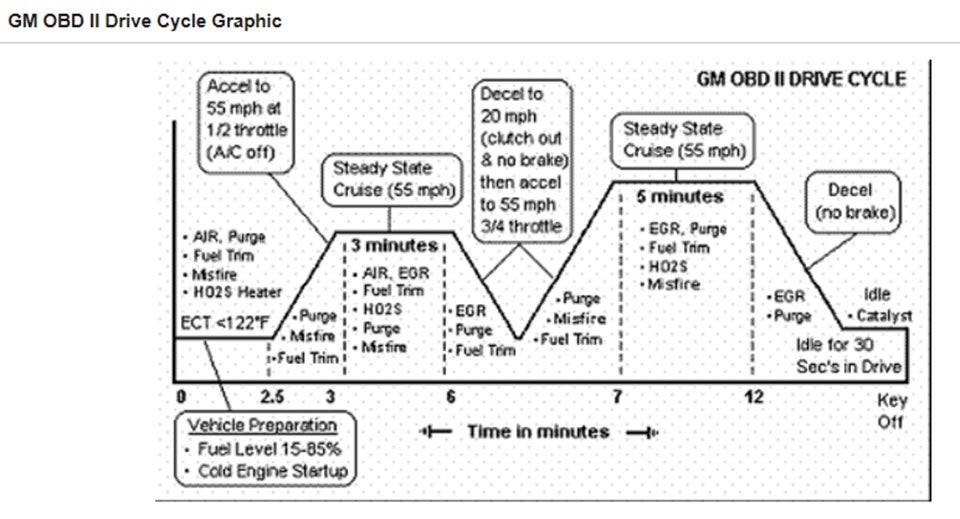
Vehicle manufacturers implement specific driving cycles designed to test each of these systems. These cycles can be quite demanding, requiring precise driving parameters to be met for a monitor to set. It can take numerous drive cycles, spanning hundreds of miles and multiple cold starts, for all monitors to become ready.
This system evolved from earlier OBD2 implementations where only the absence of a MIL and a basic visual inspection were required to pass. In those days, a common, albeit frowned upon, practice to temporarily pass inspection was to disconnect the battery just before arriving at the inspection station, resetting the MIL. However, this also reset the crucial emission monitors, a loophole that modern systems have closed.
This brings us to a common scenario many car owners face, especially with vehicles that are not driven frequently. In my case, it involved my Corvette. Due to infrequent use during the COVID period, the battery eventually died. Replacing it, while necessary, inadvertently reset all the IM monitors. To get the car ready for inspection, I had to undertake the GM-specific drive cycle.
The particularly challenging step in this cycle is maintaining a steady 55 mph for an extended period, then completely releasing the accelerator without braking, and coasting down to below 20 mph. While many monitors often set during normal driving, the EVAP monitor is notoriously difficult to activate. These tests are initiated with an overnight cold start, and any deviation from the required sequence necessitates starting over again with another cold start. For months, I struggled to get the EVAP monitor to pass. Compounding the issue, my car’s registration had expired due to the failed inspection. This meant nighttime drives were needed to attempt these specific drive cycles.
Initially, using my ELM327 adapter and accompanying software, I could access Mode 06 data to observe the EVAP tests. While these tests seemed to pass repeatedly, the IM readiness for EVAP remained unset. Frustrated, I turned to online forums, discovering countless others grappling with the same EVAP readiness issues. The forums revealed a potential solution: the Tech2 EVAP service bay test, typically performed using a professional-grade GM Tech2 dealer scanner. While Tech2 scanners are available for purchase, their high cost – often exceeding a thousand dollars with software – made it a less appealing option for a DIYer.
My search for a more accessible solution led me to VXDIAG and their VCX NANO OBD2 adapter, which emulates Tech2 software on a laptop. Available on platforms like Amazon, the VCX NANO, priced around $90 (with a coupon in my case), offered a significantly more affordable alternative. The software installation on my diagnostic laptop was straightforward, and to my surprise, it genuinely mirrored the functionality of a genuine Tech2 scanner.
Connecting the VCX NANO adapter to the car’s OBD2 port and launching the Tech2 emulator software opened up a new diagnostic avenue. Navigating to the EVAP System Bay Test within the software initiated a guided testing procedure.
The test requires a cold start, emphasizing the importance of an overnight cooldown. With the laptop connected via the VCX NANO to the OBD2 port, and following the on-screen prompts, the process began. The software instructed starting the car and maintaining a steady engine speed between 1800 and 2200 RPM. To achieve this precise and sustained RPM, I ingeniously used a piece of wood wedged between the seat and the gas pedal, adjusting the electric seat forward to apply pressure and maintain a consistent 2000 RPM. Holding this RPM steady for a full eight minutes is crucial and practically impossible to do accurately by foot alone. After the eight minutes, hitting “enter” initiated the Service Bay portion of the test, which itself ran for approximately another eight minutes.
During this phase, the system cycled through the purge valve and other EVAP system sensors, diligently running its diagnostic routines. Upon completion of this automated test,
the software prompted a 15KM (approximately 9.3 miles) and 600-second (10 minute) drive. After completing the drive, a message appeared, instructing me to return to the “bay” (essentially, park the car) and press enter. The final, undocumented step involved shutting off the engine while leaving the Tech2 system connected. During this engine-off test, audible relay clicks could be heard as the system performed its final checks. After about five minutes, the process concluded, and crucially, the EVAP IM monitor was finally set to “ready”!
With the EVAP monitor now ready, the car was finally eligible for inspection and registration. It was undoubtedly a protracted and somewhat convoluted process, but the ability to use the OBD2 port and tools like the VXDIAG VCX NANO with Tech2 emulation proved to be the key to resolving this frustrating issue. Finally, I could get my Corvette inspected, legally registered, and back on the road – perhaps not entirely trouble-free, but at least legally compliant! The journey to emission readiness, initiated through the OBD2 port, was complete.