As a car enthusiast or someone keen on understanding the mechanics of your vehicle, delving into the components of a car’s air conditioning system can be incredibly insightful. Today, we’re going to dissect one of the most crucial parts of this system – the Car Compressor Parts. We’ll be taking apart a compressor to get a hands-on look at its internal workings.
Before we get our hands greasy, let’s have a basic understanding of where the compressor fits into the bigger picture of your car’s AC system.
Image alt text: Diagram illustrating the basic components of a car air conditioning system, including compressor, condenser, evaporator, and expansion valve, showing refrigerant flow.
In simple terms, the compressor is the heart of your AC system. Its primary job is to compress the refrigerant. This compressed refrigerant is then pushed through the system, starting with the evaporator, usually located behind your car’s dashboard. The evaporator cools the refrigerant, and this cool air is what you feel coming out of your vents. The refrigerant then moves through a dryer to remove moisture and finally to the condenser, typically situated at the front of your car.
For a more detailed visual explanation of how a car AC system operates, you can refer to online resources such as YouTube videos that offer in-depth breakdowns.
Modern car AC systems are sophisticated, controlled by various sensors that monitor internal and external temperatures, sun load, and system pressures. Here’s a functional diagram of a Ford Fiesta AC system, a common setup used since around 2012, though more advanced versions exist today.
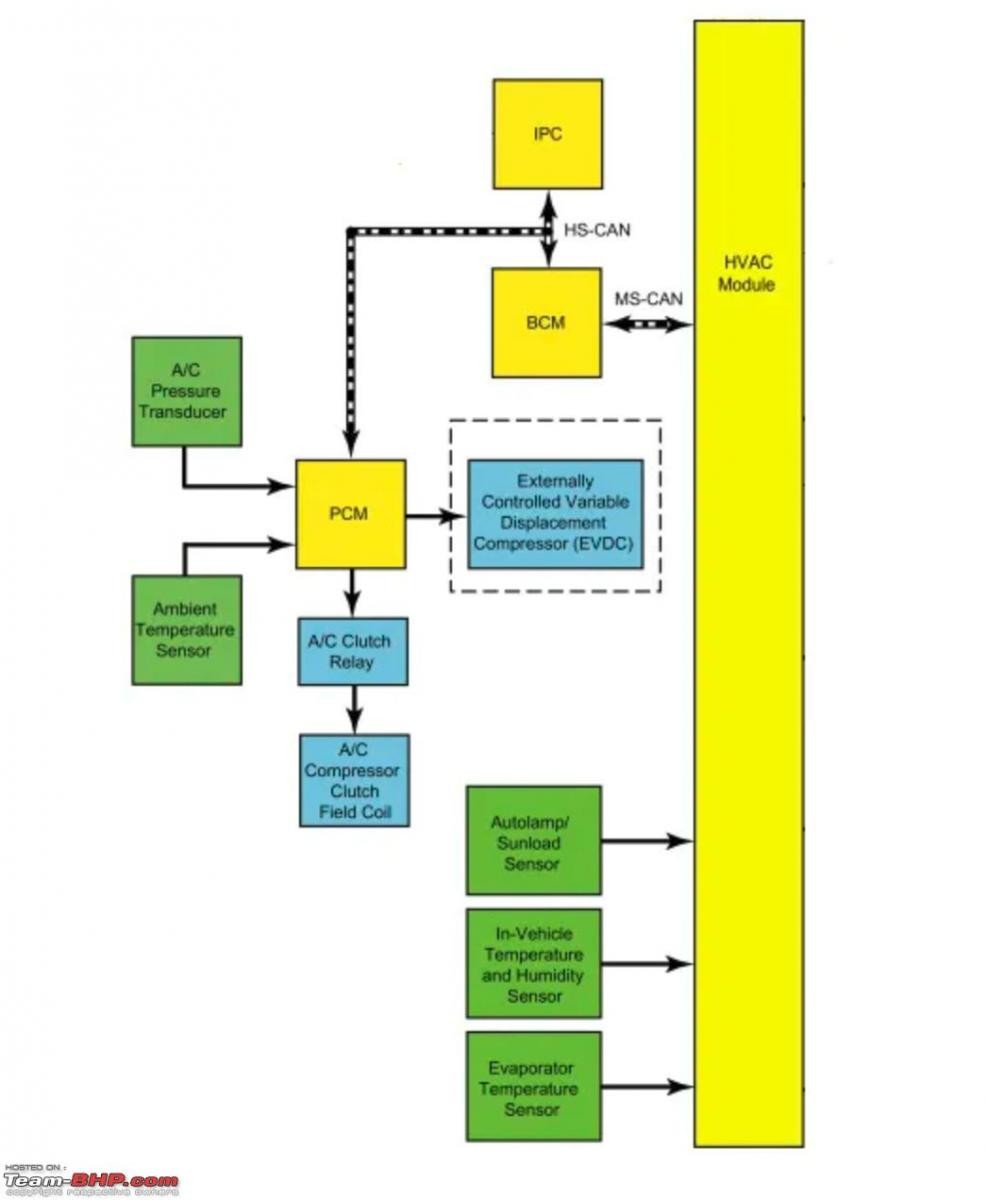 Functional diagram of a Ford Fiesta AC system
Now, let’s talk about the compressors themselves. There are different types, mainly categorized by their control mechanism: clutch-type, variable-type, or a combination of both.
Older cars often use clutch-only compressors. These operate on an ON/OFF system, engaging and disengaging based on the system’s low pressure. You’ll often hear a distinct ‘click’ when the clutch engages. These systems cycle on and off to maintain temperature.
Variable compressors, on the other hand, run continuously once the engine is on. However, they adjust the amount of refrigerant pumped. A downside is they operate even when AC isn’t needed, causing wear and slightly impacting fuel efficiency. Early variable compressors also faced durability issues when not used frequently, as lack of pumping could lead to lubrication problems, especially with low refrigerant levels (refrigerant carries lubricating oil).
This led to the development of clutch-variable compressors, combining the benefits of both types.
Here’s a comparison of an old and a new compressor. We’ll be dissecting the older one, which was replaced on a Ford Fiesta.
Image alt text: Side-by-side view of a used, older car AC compressor and a new replacement compressor, highlighting the external components like pulley and clutch.
The large pulley at the front houses the clutch, identifiable by an electrical connector. This connector activates a magnet to engage the clutch. Another connector on the compressor housing, atop the control valve, manages the variable displacement mechanism.
When installing a new compressor, it’s crucial to know if it’s pre-filled with oil. AC systems require a precise amount of lubrication oil. During system recharge, refrigerant with oil and a leak-detecting dye is added. Workshop manuals specify oil amounts for the system and individual components.
Always check the compressor’s model plate for details. This compressor is a Ford original, made in Hungary in 2015, using R134A refrigerant, a common type today.
Image alt text: Detailed view of a car AC compressor model plate, showing manufacturer details, model number, refrigerant type R134A, and manufacturing origin in Hungary.
Let’s get a closer look at the clutch mechanism:
Image alt text: Detailed close-up of a car AC compressor clutch, showing the electrical lead and components of the electromagnetic clutch system.
The electrical lead powers the electromagnet.
Image alt text: Another view of the electrical connection to the car AC compressor clutch electromagnet, emphasizing the wire and connector.
To remove the pulley and clutch, a small bolt on the shaft needs to be unscrewed. Holding the pulley in a vise allows for easy removal of this bolt.
Image alt text: Image of the process of unscrewing the central bolt on a car AC compressor pulley to begin clutch disassembly, using a socket wrench and vise for stability.
Inside the clutch plate, you can see how it engages with the pulley when activated by the electromagnet. The pulley itself has a bearing allowing it to freewheel when the clutch is disengaged and the compressor is idle.
Image alt text: Internal view of a car AC compressor clutch plate, showcasing the splined center that connects to the compressor shaft and the spring mechanism.
The clutch plate has splines that connect directly to the compressor shaft. The pulley spins freely on the shaft until the clutch engages, locking the pulley to the shaft and driving the compressor.
Image alt text: Disassembled components of a car AC compressor clutch, laid out in order of removal, including bolt, clutch plate, circlip, pulley with bearing, and the electromagnet.
From right to left: bolt and washer, clutch plate, circlip, pulley with bearing, and the electromagnet. Wear in compressors often occurs in the bearing or clutch. Even when the AC is off, the pulley is still running, causing wear over time. Bearing wear is more common, followed by clutch wear. Replacing the clutch or bearing is usually straightforward and often doesn’t require removing the compressor or discharging the refrigerant.
Image alt text: Detailed close-up of a car AC compressor clutch electromagnet, highlighting the green felt seal intended to protect against dirt and grime.
The electromagnet has a green felt seal, likely to protect against dirt and grime from the clutch mechanism.
Image alt text: Car AC compressor with the electromagnet removed, revealing green dye on the clutch sprocket, indicative of a refrigerant leak.
With the electromagnet removed, green dye is visible on the clutch sprocket – a clear sign of a refrigerant leak!
Image alt text: Front view into the disassembled car AC compressor housing, showing accumulated green dye and lubrication oil, pinpointing the location of the refrigerant leak.
Looking at the front assembly, the green gunk is lubrication oil mixed with leak-detecting dye. Compressor leaks often occur at pipe connections (easily fixed with new O-rings) or, most commonly, at the front seal of the compressor shaft, as seen here. The dye around the front of the compressor confirmed this diagnosis.
The splines on the shaft connect to the clutch plate. When engaged, the clutch locks the rotating pulley to the stationary compressor shaft, starting compressor rotation.
Image alt text: Internal view into the front recess of a car AC compressor, showing another bearing and circlip, components that are theoretically replaceable but often impractical.
Deeper inside, there’s another bearing and circlip. While these car compressor parts are theoretically replaceable, it’s often complex, requiring specialized tools. In many regions, replacing the entire compressor for a front seal leak is more common due to labor costs and part availability. Front seal leaks are not typically frequent, and this Ford compressor issue was somewhat unusual for its age and mileage (2015, 97,000km). The felt piece around the bearing/seal likely adds extra protection against contaminants.
Image alt text: Partially disassembled car AC compressor, showing the separation of the body into distinct sections and internal cylinder components.
After removing another circlip, the compressor body can be separated. It consists of three main parts: the middle section with cylinders, and the rear section containing the control solenoid and valve plates.
This exploration into car compressor parts provides a glimpse into the intricate mechanics within your vehicle’s AC system. Understanding these components can be valuable for maintenance and repair knowledge. For a more in-depth look, you can explore detailed threads and resources on automotive AC compressors.