Car door frames are crucial components that ensure your vehicle’s doors close correctly, seal out weather, and reduce noise. Properly adjusted door frames are essential for both comfort and the longevity of your car. This guide will walk you through understanding the parts of a car door frame relevant to adjustment and how to adjust them for an optimal fit.
Ensuring your car door closes snugly and your windows seal tightly often involves adjusting the door frame. This process might seem daunting, but with a few basic tools and a little patience, it’s a task you can accomplish yourself. This article will focus on the key Car Door Frame Parts involved in adjustment and provide a step-by-step approach to fine-tuning them.
The process we’ll describe involves adjusting the window frame after the door and latch are correctly positioned. This ensures that the window aligns properly within the door frame, creating a weather-tight seal.
To begin, locate the adjustment points on your car door frame. These are typically found within the door jamb.
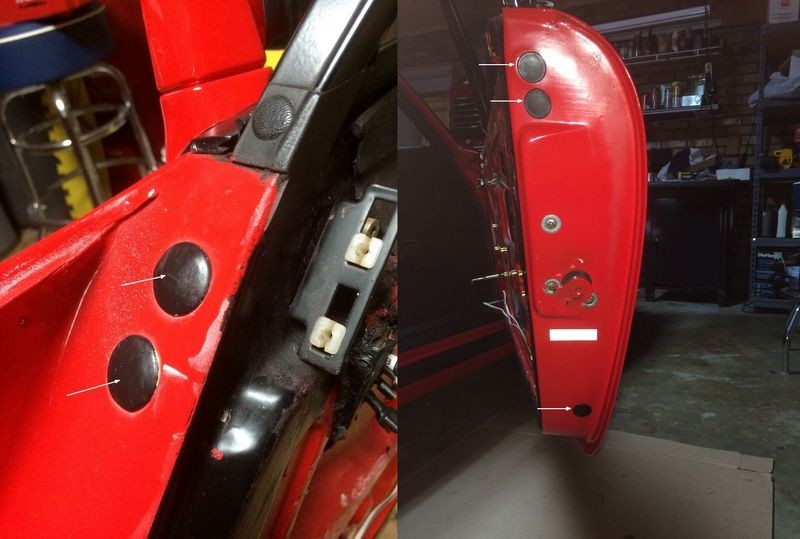
You’ll need to remove the caps, usually rubber or plastic, located on the front and rear door jambs as indicated in the image above. Behind these caps, you will find 5mm Allen screws. These screws are the key to adjusting your car door frame parts.
Loosen all of these Allen screws. The goal here is to loosen them enough to allow for movement and adjustment of the window frame, but not so loose that they don’t offer any resistance. They should be snug enough to hold the frame in place once you make adjustments. These screws provide various adjustment points to help you achieve the desired window frame position.
Adjusting the window frame’s pitch, or the inward and outward lean, involves two main points: the forward frame pitch and the rear frame pitch.
The rear pitch adjustment is typically controlled by the lower Allen screw located at the rear of the door jamb, often referred to as the “20 year” screw in some communities. Moving this Allen screw inwards, towards the center of the car, will loosen the top of the frame relative to the car body. Conversely, moving it outwards, away from the car’s center, will tighten the top of the frame against the car body.
When making this rear pitch adjustment, it’s helpful to slightly loosen one of the two top Allen screws completely. The other top Allen screw should remain snug but movable. This second screw will act as a pivot point, allowing for controlled adjustment around it.
The forward section of the window frame also has a pitch adjustment point. This is usually located on the inside of the door itself.
As seen in the image, the fastener in this area might be missing, or the setup may vary slightly depending on your car model. Typically, this area involves a fastener that secures a bracket to the door. This bracket is connected to the forward window rail, a crucial car door frame part for window alignment.
Washers are often used as shims in this forward adjustment area. They are placed between the bracket and the door. Adding washers pushes the bracket (and thus the bottom of the window rail) outwards, away from the door, which in turn tightens the top of the window frame against the car. Reducing the number of washers allows the bracket to move closer to the door, loosening the top of the window frame’s contact with the car.
Adjusting a window frame to its optimal position is often a process of trial and error. It’s generally recommended to address the height adjustment first. Keep in mind that adjusting the pitch will also have some impact on the height and tightness of the frame against the car body. You’ll develop a feel for this interplay as you begin making adjustments and testing the door closure.
Once you believe you’ve set the frame close to the desired position and are ready to test, before fully closing the door, snug all the Allen screws tighter than they were during the adjustment phase. This is important because the act of closing the door can shift the frame out of adjustment if the screws are too loose. However, there’s no need to overtighten them at this stage; final tightening comes later.
Finding the “just right” setting for your window frame is a delicate balance. A frame that is too loose will not seal properly, leading to wind noise and water leaks. A frame that is too tight can stress the car door frame parts and make the door difficult to close, potentially damaging seals over time.
Determining the correct setting often involves assessing the compression of the door seal and feeling how the door closes. It’s somewhat subjective, relying on your perception of the door’s feel to determine what is “just right”.
While adjusting car door frame parts can be time-consuming, once you achieve the correct frame position, it significantly improves your car’s comfort and weatherproofing. After you are satisfied with the positioning, proceed to fully tighten all the Allen screws securely.
If you encounter any difficulties during this adjustment process, don’t hesitate to seek further assistance or consult a professional. Properly adjusted door frames are vital for a comfortable and well-maintained vehicle.