Unlocking the wealth of data hidden within your car’s onboard computer is now more accessible than ever, thanks to devices like Carloop Obd2. For enthusiasts and DIY mechanics, tapping into this data stream opens up possibilities for diagnostics, performance monitoring, and even custom modifications. This guide delves into establishing a successful connection with your car’s CANbus using Carloop OBD2, drawing from practical experience and code modifications that have proven effective.
One common hurdle when starting out with Carloop OBD2 is ensuring a stable and responsive data connection. Initial setups might encounter issues in receiving data, but often, simple adjustments to the code can make all the difference. Based on hands-on experience, here’s a refined approach to get your Carloop OBD2 setup communicating seamlessly with your vehicle:
To ensure your Carloop OBD2 device correctly interfaces with your car’s system and begins to relay data, incorporate these essential code modifications into your microcontroller program:
-
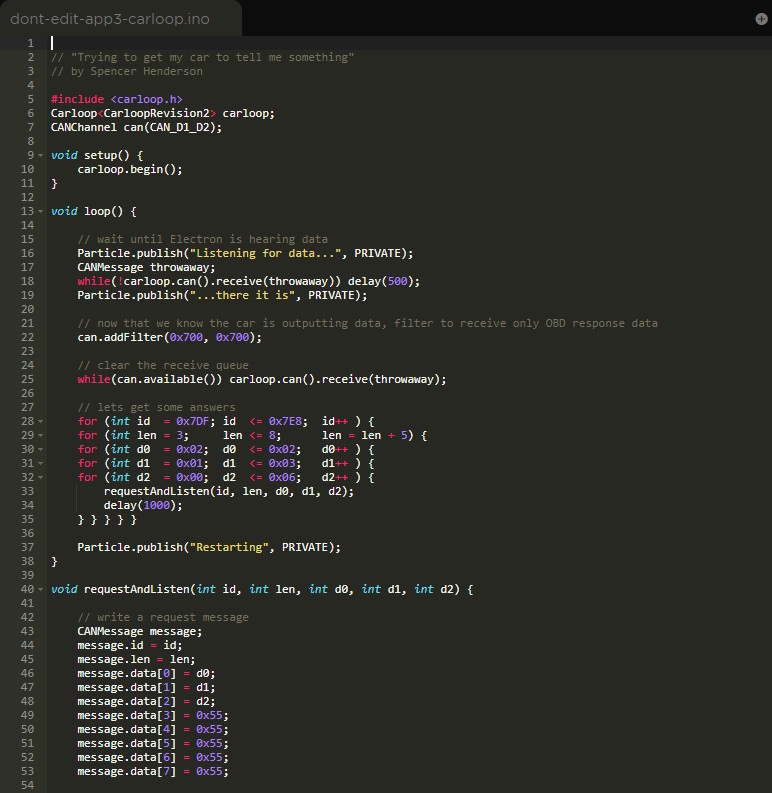
Include the Carloop Library: Begin by adding the line
#include <carloop.h>at the very beginning of your code. This step is crucial as it incorporates all the necessary functions and definitions specifically designed for Carloop devices. -
Define Carloop Revision: Inform your microcontroller about the specific Carloop revision you are using. This is done by adding a line like
Carloop<carlooprevision2> carloop;at the program’s start. Specifying the revision, such ascarlooprevision2, ensures compatibility and proper operation as per Carloop’s library guidelines. -
Initialize Carloop: Replace the standard CAN bus initialization, typically
can.begin(500000);, withcarloop.begin();. This is a key change becausecarloop.begin()not only initializes the CAN bus but also configures it optimally for Carloop, defaulting to a 500000 bits/sec speed, which is commonly used in OBD2 communication. -
Modify CAN Receive Calls: Update all instances of
can.receive(message)tocarloop.can().receive(message). This modification directs the code to use Carloop’s CAN interface for receiving messages, ensuring that the data is correctly read through the Carloop hardware. -
Modify CAN Transmit Calls: Similarly, change all occurrences of
can.transmit(message)tocarloop.can().transmit(message). This ensures that any data you intend to send back to the vehicle’s CAN bus is transmitted via the Carloop interface, maintaining a consistent communication pathway. -
Padding Message Data: In some scenarios, explicitly padding your CAN message data fields can improve responsiveness. Add lines to set data bytes 3 through 7 of your message to a specific value, for example:
message.data[3] = 0x55; message.data[4] = 0x55; message.data[5] = 0x55; message.data[6] = 0x55; message.data[7] = 0x55;. While the exact reason for this isn’t definitively confirmed, practical testing suggests it can play a role in successful data retrieval, especially when encountering initial communication issues.
By implementing these code adjustments, you establish a robust foundation for Carloop OBD2 communication. The inclusion of the Carloop library and the correct initialization are pivotal for aligning your microcontroller with the Carloop hardware. Furthermore, directing CAN receive and transmit calls through carloop.can() ensures you are leveraging Carloop’s optimized interface.
During testing, an interesting observation emerged concerning CAN message lengths. It was noted that transmitting messages with a length of 3 bytes (message.len=3;) sometimes failed to elicit a response from the CANbus. However, simply changing the message length to 8 bytes (message.len=8;) resulted in successful communication and data reception. The underlying reason for this behavior requires further investigation, but it suggests that message length might be a factor in Carloop OBD2 interactions, possibly related to how the CAN controller or the vehicle’s communication protocols handle different message sizes.
In conclusion, successfully connecting to your car’s CANbus with Carloop OBD2 involves more than just hardware connection; it requires precise software configuration. By incorporating the Carloop library, correctly initializing the device, and directing CAN communication through the Carloop interface, you can overcome common initial hurdles. Furthermore, being mindful of factors like CAN message length can be crucial for reliable data exchange. These insights provide a solid starting point for anyone looking to explore the rich data available through their vehicle’s OBD2 port using Carloop.