That ominous check engine light staring back at you from your dashboard can be unsettling. It’s a signal that something isn’t quite right under the hood, and while it’s crucial not to ignore it, it doesn’t always mean a costly trip to the mechanic is immediately necessary. Many times, the issue is minor, and clearing the code can be a simple DIY task. This is where understanding how to Clear Codes With Obd2 scanners becomes incredibly useful.
In this guide, we, your trusted auto experts at carparteu.com, will walk you through the straightforward process of using an OBD2 scanner to turn off your check engine light. You might be surprised to discover that resolving this common car issue can be done right in your driveway, saving you time and potentially money. Think of it as having a basic yet powerful diagnostic tool at your fingertips, comparable in ease to using your smartphone.
To effectively clear codes with OBD2, you will need an OBD2 scanner, often referred to as an OBDII reader. It’s important to note that while some basic code readers can only read diagnostic trouble codes (DTCs), you’ll need a scanner capable of both reading and erasing these codes to successfully turn off the check engine light. Investing in a scanner that offers both functionalities is key for this task.
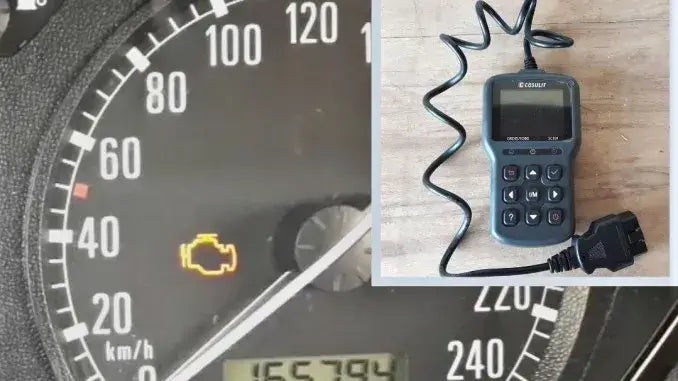
A reliable OBD2 scanner, like the CGSULIT SC301, provides a great balance of features and ease of use. For in-depth reviews of tools like this, you can explore resources online and find video demonstrations to see them in action.
Step-by-Step Guide: Clearing Check Engine Light Codes with an OBD2 Scanner
While prior experience with an OBD2 scanner can be helpful, it’s certainly not a prerequisite for this process. If you’re new to using a code reader, don’t worry! This guide will break down each step to ensure you can confidently clear codes with OBD2 even on your first attempt.
1. Locate the OBDII Port in Your Vehicle
The first step in your mission to clear codes with OBD2 is to find the OBDII port in your car. This port is standardized across most vehicles manufactured after 1996 and is typically located within the driver’s side interior, often under the dashboard, near the steering column, or in the vicinity of the pedals. Refer to your vehicle’s owner’s manual if you are having trouble locating it. The port is usually trapezoidal in shape with 16 pins.
2. Connect Your OBD2 Code Reader to the Port
Once you’ve found the OBDII port, take your OBD2 scanner and firmly plug the connector into the port. Ensure it is securely connected to establish a proper communication link between the scanner and your vehicle’s computer system. You might hear a click or feel it seat into place.
3. Turn On the Ignition of Your Vehicle
To allow the OBD2 scanner to communicate with your car’s computer and clear codes with OBD2, you need to turn on the ignition. Turn your key to the “ON” position. This position powers up your car’s electrical systems and computer without actually starting the engine. In vehicles with push-button start, press the start button without pressing the brake pedal to enter accessory or ignition mode.
4. Allow the OBD2 Code Reader to Scan for Codes
With the OBD2 scanner connected and the ignition on, power on your scanner. Most scanners will automatically begin scanning for diagnostic trouble codes (DTCs) once they are connected and powered up. Follow the prompts on your scanner’s screen to initiate a scan if it doesn’t start automatically. The scanning process may take a few moments.
5. Read and Understand the Error Codes Displayed
After the scan is complete, the OBD2 scanner will display a list of error codes, if any are present. You might see one code or multiple codes. It’s crucial to carefully note down these codes. Understanding what these codes mean is a vital step before you clear codes with OBD2. This information will tell you the nature of the problem your vehicle is reporting.
Most OBD2 scanners have a built-in DTC library that allows you to look up the meaning of the codes directly on the device. Alternatively, you can use online resources or consult your vehicle’s repair manual to interpret the codes. Understanding the meaning of the codes helps you assess the severity of the issue and decide on the appropriate course of action. Remember, clearing the code doesn’t fix the underlying problem, it only turns off the light. If the issue persists, the check engine light will likely reappear.
6. Navigate the Scanner Menu to Clear the Check Engine Light
Once you have reviewed and understood the error codes and have addressed or are aware of the underlying issue, you can proceed to clear codes with OBD2. Navigate through your scanner’s menu to find the option for clearing codes. This option is often labeled as “Erase Codes,” “Clear DTCs,” or something similar, usually found within a “Tools” or “Maintenance” menu.
Select the command to clear the codes. The scanner might ask for confirmation before proceeding. Confirm your intention to clear the codes by selecting “Yes” or “OK.”
7. Return to the Main Menu of Your OBD2 Scanner
After successfully clearing the codes, use the “Escape” or “Return” button on your OBD2 scanner to navigate back to the main or start menu. This ensures that the code clearing process is fully completed and the scanner is ready for the next steps.
8. Disconnect the OBD2 Code Reader from the OBDII Port
Carefully disconnect the OBD2 scanner from the OBDII port. Gently pull the connector straight out to avoid damaging the port or the scanner. If your OBD2 scanner has a power button, it’s good practice to turn it off before disconnecting it.
9. Turn Off the Ignition of Your Vehicle
Turn the ignition off completely by turning the key back to the “OFF” position or pressing the start button to turn off the vehicle entirely.
10. Start Your Engine and Check if the Check Engine Light is Off
Finally, start your engine as you normally would. Check your dashboard to see if the check engine light has turned off. If the process was successful in clearing the codes, the light should now be off.
To ensure the issue is truly resolved (if it was a minor, temporary glitch), drive your car for a short distance and restart the engine a few times. If the check engine light remains off, you’ve successfully clear codes with OBD2 for that particular instance. However, if the light comes back on, it indicates a persistent issue that requires further investigation and repair.
Conclusion: Empowering Yourself with OBD2 Code Clearing
As you’ve seen, learning how to clear codes with OBD2 is a remarkably simple process. It typically takes only a few minutes, making it a convenient way to address the check engine light. Mastering this skill empowers you to take a proactive approach to car maintenance and understand your vehicle better.
However, it’s essential to reiterate that while clearing codes turns off the check engine light, it doesn’t magically fix the underlying problem. Always prioritize understanding the error codes and addressing the root cause of the issue, especially if it’s a serious one. Ignoring persistent problems can lead to more significant damage and costly repairs down the road.
Ultimately, knowing how to clear codes with OBD2 is a valuable skill for any car owner. It’s a useful step in DIY car repairs and maintenance, allowing you to confirm that you’ve addressed an issue effectively. By using an OBD2 scanner, you gain a helpful tool for understanding your vehicle’s health and confidently managing minor issues, all from the comfort of your own garage.