Understanding and utilizing your vehicle’s onboard diagnostics system has become increasingly accessible thanks to OBD2 Bluetooth adapters. These handy devices wirelessly link your car’s computer to your smartphone, tablet, or laptop, unlocking a wealth of real-time data about your vehicle’s performance and health. This guide will walk you through the process of connecting your OBD2 Bluetooth adapter, ensuring a smooth and successful setup.
Understanding OBD2 Bluetooth Adapters
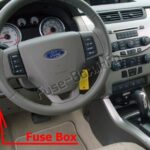
OBD2, or On-Board Diagnostics II, is a standardized system in most modern vehicles that allows access to the vehicle’s computer. An OBD2 Bluetooth adapter, like the popular ELM327, plugs into your car’s OBD2 port, typically located under the dashboard. This adapter then uses Bluetooth to transmit vehicle data to a compatible device running a dedicated OBD2 application. This connection empowers you to read diagnostic trouble codes, monitor engine performance, check sensor readings, and much more, right from your mobile device or computer.
Step-by-Step Guide to Connecting Your OBD2 Bluetooth Adapter
Connecting your OBD2 Bluetooth adapter is generally a straightforward process, but it can vary slightly depending on your device’s operating system (Android or iOS). Here’s a general guide to get you started:
Pairing Your Adapter with Your Android Device
Android devices typically offer seamless pairing with OBD2 Bluetooth adapters. Here’s how to connect:
- Plug in the Adapter: Locate the OBD2 port in your vehicle (refer to your car’s manual if needed) and firmly plug in your OBD2 Bluetooth adapter.
- Turn on Ignition: Turn your car’s ignition to the “ON” position. This powers up the OBD2 system and your adapter. Do not start the engine unless your app specifically instructs you to.
- Enable Bluetooth on Your Android Device: Go to your Android device’s settings and turn on Bluetooth.
- Search for Bluetooth Devices: Your Android device will automatically scan for nearby Bluetooth devices. The ELM327 adapter should appear in the list, often named “OBDII” or “OBD2”, or sometimes with a name like “ELM327”.
- Pair with the Adapter: Tap on the OBD2 adapter’s name in the list to initiate pairing. You might be prompted to enter a pairing code. Common codes are “1234” or “0000”. Refer to your adapter’s manual if these don’t work.
- Open Your OBD2 App: Once paired, open your chosen OBD2 application on your Android device.
- Connect Within the App: Within the app’s settings or connection menu, you’ll usually need to select the Bluetooth connection type and choose your paired OBD2 adapter. The app should now connect to the adapter and start retrieving data from your vehicle.
Connecting with iOS Devices (iPhone/iPad)
Connecting OBD2 Bluetooth adapters to iOS devices like iPhones and iPads can be slightly more complex due to Apple’s Bluetooth protocols. Direct Bluetooth pairing through the iOS settings menu is often not possible with many OBD2 adapters, including ELM327. Instead, the connection is typically managed directly within the OBD2 application itself.
Here’s the general approach for iOS:
- Plug in the Adapter & Turn Ignition ON: Follow steps 1 and 2 as described for Android.
- Do NOT Pair in iOS Bluetooth Settings: Unlike Android, do not attempt to pair the OBD2 adapter through your iPhone or iPad’s Bluetooth settings menu. It likely won’t discover the adapter, or pairing attempts might fail.
- Open Your Compatible OBD2 App (Crucial for iOS): You need to use an OBD2 app specifically designed to work with Bluetooth adapters on iOS. Popular compatible apps include “OBD Fusion”, “Car Scanner ELM OBD2”, and others. Check app compatibility before purchasing an adapter if you primarily use iOS.
- Connect Within the App: Open your chosen OBD2 app on your iOS device. Navigate to the app’s settings or connection/adapter menu.
- Select Connection Type (Bluetooth LE or similar): Within the app, you’ll usually be prompted to select the connection type. For iOS, this will often be “Bluetooth LE” or a similar option indicating Bluetooth Low Energy, which is the protocol many iOS-compatible OBD2 adapters use.
- Choose Your Adapter Within the App: The app should then scan for and list available OBD2 adapters. Select your adapter from the list within the app. The app should then establish a connection directly to the adapter, bypassing the need for system-level Bluetooth pairing.
Troubleshooting Common Connection Issues
While the connection process is usually smooth, you might encounter issues. Here are some common troubleshooting steps:
- Adapter Not Discoverable (Especially iOS): Ensure you are not trying to pair through iOS Bluetooth settings. Use a compatible app and connect within the app itself. Verify the adapter is powered on (ignition is in the “ON” position).
- Pairing Fails (Android): Double-check the pairing code (try “1234” or “0000”). Ensure Bluetooth is enabled on your Android device. Restart your Android device and try again. If still failing, the adapter itself might have a pairing issue.
- App Cannot Connect: Ensure the adapter is properly paired (if necessary for Android) and selected within the app’s settings. Check that the app is compatible with your adapter model and operating system. Force-close and reopen the app.
- Check Adapter and App Compatibility: Not all OBD2 adapters work with all apps and operating systems. Research compatibility before purchasing, especially if you are an iOS user. Some older or cheaper adapters might have connectivity issues.
- Vehicle Compatibility: While OBD2 is a standard, very old vehicles might not be fully compatible. Confirm your vehicle is OBD2 compliant (most vehicles from 1996 onwards are).
By following these steps and troubleshooting tips, you should be able to successfully connect your OBD2 Bluetooth adapter and start exploring the wealth of diagnostic and performance data your vehicle has to offer. Enjoy the enhanced insights into your car’s inner workings!