Swapping an engine in your BMW E30 can breathe new life into your classic ride, and opting for an OBD2 engine offers numerous advantages, including improved diagnostics and potentially better performance. This guide provides a detailed walkthrough on how to perform an OBD2 swap in your E30, ensuring you retain OBD2 functionality for a more modern and efficient system.
Essential Steps for Your E30 OBD2 Engine Conversion
Performing an OBD2 swap into your BMW E30 requires careful planning and execution. This guide breaks down the critical steps, ensuring a smoother and more successful engine conversion.
1. Wiring Harness: The Backbone of Your Swap
The engine wiring harness is the nervous system of your swap. Obtain the complete wiring harness that corresponds to your chosen OBD2 engine. Ideally, acquire it with the engine itself to ensure compatibility.
Modification is Key: This OBD2 harness needs modification to integrate seamlessly into your E30. You have two options:
- Professional Modification: Sending your harness to a specialist like Dave at Markert Motorwerks guarantees a plug-and-play solution. They expertly modify the harness for E30 integration.
- DIY Harness Modification: While possible, DIY harness modification is complex and not recommended unless you possess advanced wiring expertise. Professional services save time and reduce potential issues.
Resource: Consider Markert Motorwerks for professional harness conversion: http://www.markertmotorworks.com/#!p…ess-conversion
2. ECU Tuning: Optimizing Performance and Functionality
The Engine Control Unit (ECU) is the brain of your engine. Secure the ECU that matches your OBD2 engine when purchasing the engine. Tuning the ECU is crucial for a successful swap and optimized performance.
Professional ECU Tuning Services: Sending your ECU for a professional tune is highly recommended. DesertBMW, a reputable tuner on forums, offers cost-effective and comprehensive tuning services.
Benefits of a Professional Tune: A custom ECU tune for your E30 Obd2 Swap typically includes:
- Rear O2 Sensor Delete: Eliminates the need for rear oxygen sensors, simplifying the exhaust system.
- Secondary Air Pump (SAP) Delete: Disables the SAP system, common in OBD2 engines but often unnecessary in swaps, and can be removed for a cleaner setup.
- EWS (Immobilizer) Delete: Disables the Electronic Immobilizer System, which can complicate swaps into older vehicles.
- Fuel Tank Sensor Delete: Removes reliance on the OBD2 fuel tank sensor if not integrating it into your E30.
- Muffler Flap Valve Delete: Deactivates the muffler flap valve, often for performance and simplicity.
Image: Tuned OBD2 ECU from DesertBMW, ready for E30 swap.
Retaining Systems: While deleting these systems simplifies the swap, you can retain some if desired, but it increases complexity. For most swaps, deletion is the preferred, easier route.
Tuning Service Resource: DesertBMW offers affordable ECU tuning for swaps: http://www.r3vlimited.com/board/member.php?u=35673
Alternative Tuning Options:
- TRM Tuning: http://www.racersmarket.net/index.ph…hk=1&Itemid=93
- Markert Motorworks Tuning: http://www.markertmotorworks.com/#!bmw-ecu-tuning/cd6w
Cost Consideration: ECU tuning costs can vary. DesertBMW offered a tune for $280 at the time of the original article, but prices are subject to change.
3. SAP Delete: Streamlining Your Engine Bay
If you opted for SAP delete during ECU tuning, physically removing the Secondary Air Pump system cleans up your engine bay.
DIY SAP Delete Method: The most economical method is to:
- Cut the SAP pipes at the flanges connected to the exhaust manifolds.
- Weld the flanges closed to seal them.
- Paint the welded flanges for corrosion resistance and aesthetics.
Images: Welded SAP delete flanges for BMW E30 OBD2 swap.
Pre-made SAP Delete Plates: Alternatively, you can purchase pre-fabricated SAP delete plates from various manufacturers for a quicker, bolt-on solution.
SAP Delete Plate Resources:
- ECS Tuning: https://www.ecstuning.com/b-genuine-bmw-parts/egr-secondary-air-pump-block-off-plate/11121438086/
- Turner Motorsport: https://www.turnermotorsport.com/p-211084-e36-m52s52-air-pumpegr-block-off-plates/
- Achilles Motorsports: http://www.achillesmotorsports.com/Secondary-Air-Injection-Pump-Block-Off-Plate-p/11-am-sapps54.htm
Image: Achilles Motorsports SAP Delete Plate.
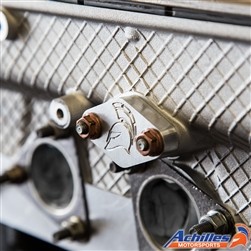 Achilles Motorsports Secondary Air Injection Pump Block Off Plate (EGR Block Off Plate) for BMW engine, a performance part for simplifying engine swaps.
4. Fueling Considerations: Adapting to OBD2 Systems
OBD2 BMWs, especially S52 engines (verify for M52), utilize a remote Fuel Pressure Regulator (FPR) and a fuel system with a running loss valve mounted on the frame rail.
Fueling Options:
- Retain OBD2 Fuel System: You can keep the OBD2 remote FPR and fuel rail setup.
- Convert to OBD1 Fuel Rail: A popular alternative is to switch to an M50 OBD1 fuel rail and FPR, along with an M50 intake manifold (discussed in step 5). This simplifies the fuel system in the engine bay.
M50 Fuel Rail Modification: Using an M50 fuel rail with an OBD2 harness requires a minor modification:
- Bend the tabs on the M50 fuel rail that interfere with the OBD2 injector harness connectors.
- Trade-off: Bending these tabs prevents the use of the fuel rail beauty cover.
- Alternative OBD-II Fuel Rail: For retaining the beauty cover, use an early OBD-II fuel rail from an E36 328 or E39 528. These have the FPR on the rail and do not interfere with the harness or cover. You’ll need fuel rail cover tabs from an M50 manifold conversion kit.
Engine Bay Image: M50 manifold and fuel rail in an E30 OBD2 swap.
5. M50 OBD1 Intake Manifold & Intake Components: Performance Upgrade
While not mandatory for an OBD2 swap, installing an M50 OBD1 intake manifold is a common upgrade due to potential power gains.
Benefits of M50 Manifold:
- Increased Power: M50 manifolds are known to improve airflow and potentially increase horsepower in certain RPM ranges compared to stock OBD2 manifolds.
- Simplified SAP and FPR Routing: If deleting SAP and OBD2 FPR, the M50 manifold simplifies vacuum line routing.
M50 Manifold Conversion Kits: These kits facilitate the installation of an M50 manifold onto OBD2 engines.
M50 Manifold Kit Image: M50 Manifold conversion kit components for BMW engine swap.
M50 Manifold Kit Resources:
- M50manifold.com: http://m50manifold.com//index.php?op…d=23&Itemid=40
- Turner Motorsport: http://www.turnermotorsport.com/p-19…an-m52s52.aspx
- KO Performance: http://www.koperformance.com/BMW/eng…kit_e36_m3.htm
Vacuum Lines: With SAP and OBD2 FPR deleted, cap the vacuum nipple on the main vacuum source connector on the manifold.
Intake Boot and IAT Sensor:
- OBD1 Intake Boot: Use the longer OBD1 intake boot (part number: 13541738757) with two holes underneath.
- IAT Sensor Mounting: One hole is for the Idle Control Valve (ICV) hose. The other is for mounting the OBD2 Intake Air Temperature (IAT) sensor.
- IAT Sensor in Boot: Mounting the IAT sensor in the intake boot is often preferred over re-threading the manifold to fit the OBD1 IAT location.
- Boot Modification: Slightly shave the plastic around the IAT sensor hole in the boot to make it more circular for a better fit.
Images: Intake boot modification for IAT sensor in E30 OBD2 swap.
6. Dipstick Modification: CCV Integration
If retaining the Crankcase Ventilation (CCV) system, modify the dipstick for proper CCV drainage.
Dipstick Modification Process:
- Cut the CCV drain pipe off your M52/S52 dipstick.
- Drill a hole in an E34 M50 dipstick.
- Weld the M52/S52 drain pipe onto the E34 M50 dipstick.
Dipstick Modification Images: Dipstick modification stages for BMW E30 OBD2 swap.
7. Coolant Lines: Adapting the Cooling System
For E30s with a late model 325 cooling system, most S52/M52 coolant lines can be adapted.
Radiator Compatibility: While the original article mentions using an E36 Mishimoto radiator, it later notes issues with Mishimoto radiators leaking. A Z3M radiator is suggested as a more reliable alternative.
Coolant Hose Solutions:
- Top Radiator Hose: Use an E36 S52 top radiator hose without trimming.
- Bottom Radiator Hose: Initially, a cut E36 S52 hose was used, but this could kink and crack. A better option is NAPA part number “NBH 8484,” cut to length. This hose may also work for the top hose.
- Expansion Tank Hose: Cut a piece of the long S52 hose for the expansion tank to metal pipe connection.
- Heater Core Hoses: Ensure correct routing: Back of head to BOTTOM heater core and back of metal pipe to TOP heater core.
Coolant Line Routing Images: Coolant hose routing examples in a BMW E30 OBD2 swap.
Throttle Body Coolant Lines: These lines can be deleted for simplicity, especially in warmer climates. If deleted, close off the coolant line nipple on the metal pipe. The line from the head is addressed in the next step.
Image: Welded coolant line nipple shut for throttle body coolant delete in BMW E30 OBD2 swap.
8. Coolant Temperature Sensor: Gauge Compatibility
To ensure your E30 cluster reads coolant temperature correctly, use an E30 brown top coolant temperature sensor.
Sensor Installation Location: This sensor replaces the pipe that screws into the head for the throttle body coolant line (if deleted).
Coolant Temp Sensor Options:
- Option 1 (Thread Die): Use a die to re-thread the E30 sensor to match the S52 head threads (pitch m12x1.5, but double-check).
- Option 2 (Tap the Head): Tap the head to match the sensor threads. This is riskier.
- Option 3 (Pre-threaded Sensor): Purchase a pre-threaded brown top sensor from Markert Motorwerks for easy installation.
Image: Modified coolant temp sensor for BMW E30 OBD2 swap.
Pre-threaded Sensor Resource: Markert Motorwerks pre-threaded coolant sensors: http://www.markertmotorworks.com/MMWProducts.html
Basic Swap Steps: Transmission, Drivetrain, and Mounting
The following steps cover essential mechanical aspects of the E30 OBD2 swap.
9. Transmission: Choosing Your Gearbox
You have transmission options depending on your goals and parts availability.
Transmission Options:
- Option 1: ZF Transmission (E36 M3/328i): Bolts directly to the engine and E30 chassis using 318is/325 transmission braces. Use shift linkage from an E36 M3 or 328i.
- Option 2: G260 (M20 E30): Requires a custom or aftermarket transmission brace (e.g., from White325is). The selector rod needs a 10-degree twist to correct the angle, achievable by twisting, welding, or using a UUC DSSR.
G260 Transmission Brace Resource: White325is transmission braces: http://www.r3vlimited.com/board/show…ght=white325is
UUC DSSR Resource: UUC Motorwerks DSSR selector rod: http://store.uucmotorwerks.com/share…t=products.asp
10. Differential: Optimizing Gear Ratio
Any E30-compatible differential can be used. A medium case differential is recommended for increased durability, especially with the added power of an OBD2 engine.
Differential Recommendation: A 3.25 Limited Slip Differential (LSD) is ideal for S52 swaps. Lower ratios like 4.10 or lower can work for M52s.
11. Driveshaft: Connecting Power to the Wheels
Driveshaft selection depends on your transmission and differential setup.
Driveshaft Options:
- Option 1: 1986-1987 325e Driveshaft: Use with the large front flange.
- Option 2: 1996-99 M3 or 328i Driveshaft: Bolts directly to the E30 differential with a 4-bolt rear flange.
- Option 3: Revshift Adapter Guibo: Allows using the stock E30 driveshaft with an adapter flex disc.
Revshift Adapter Resource: Revshift 24v swap flex disc: https://www.revshift.com/shop/24v-sw…-flex-disc.php
12. Brake Booster: Clearance Solutions
The larger OBD2 engine may interfere with the stock brake booster.
Brake Booster Options:
- Option 1: Relocate Stock Booster: The preferred option for retaining brake pedal feel. DIY relocation guides are available.
- Option 2: E30 325ix Booster: May be a direct bolt-on (requires further research).
- Option 3: E21 320i Booster: Requires shortening and re-threading the clevis shaft. Pre-modified units are available from Zionsville.
- Option 4: Porsche 944 Booster: Input rod needs shortening and threading, but thread diameter and pitch match the E30 clevis.
DIY Brake Booster Relocation Guide: Hwy84 DIY guide: http://www.r3vlimited.com/board/showthread.php?t=250474
Zionsville Modified Booster Resource: Zionsville Autosport modified E21 booster: http://www.zionsvilleautosport.com/s…code/POMBB.htm
13. Engine Mounting: Securing the Engine
Use E36 aluminum engine mount arms. Ideally, acquire these with your engine.
Engine Mount Options:
- Option 1: E28 535i or M5 Engine Mounts.
- Option 2: Aftermarket 24v Swap Mounts: From vendors like Condor Speed Shop and AKG Motorsport.
Condor Speed Shop Mounts: http://www.condorspeedshop.com/collections/all
AKG Motorsport Mounts: http://www.akgmotorsport.com/catalog…0%2FM50%20Swap
14. Oil Pan: E34 Front Sump Conversion
S52 and M52 engines have rear sump oil pans, incompatible with the E30 subframe. A front sump oil pan conversion is necessary.
Required Parts for Oil Pan Swap:
- E34 M50 oil pan
- E34 M50 oil pickup tube
- E34 M50 dipstick tube and dipstick (modified in step 6 for CCV)
- E34 M50 oil level sensor
Oil Pan Swap Procedure:
- Remove the original oil pan, pickup tube, and windage tray.
- Cut the bracket for the S52 oil pickup tube. Do this with the engine vertical to prevent metal debris from entering the engine, or bend it off with pliers.
- Install the E34 M50 pickup tube with a new gasket.
Oil Pan Removal Images: Oil pan removal steps in BMW E30 OBD2 swap.
Oil Pickup Tube Modification Image: Oil pickup tube bracket cut for BMW E30 OBD2 swap.
E34 M50 Pickup Tube Installation Image: E34 M50 pickup tube installed during BMW E30 OBD2 swap.
Optional Oil Pump Nut Safety: M50-based engines can have issues with the oil pump nut loosening. Securing it is highly recommended while the pan is off.
Oil Pump Nut Securing Methods:
- Safety Wire and Loctite: Use safety wire and red Loctite to secure the nut.
- Tack Weld: Tack weld the nut to the shaft (less common but effective).
Oil Pump Nut Safety Image: Oil pump nut secured with safety wire in BMW E30 OBD2 swap.
Oil Pump Nut Resources:
- Rally Road Secured Oil Pump Nut Kit: http://www.rallyroad.net/content/secured-oil-pump-nut-kit-bmw-6-cylinder
- BimmerWorld Drilled Oil Pump Nut: http://store.bimmerworld.com/m50-drilled-oil-pump-nut-p640.aspx
Oil Pan Installation: Install a new oil pan gasket and the E34 oil pan. Apply silicone sealant to the seams where the block meets the front timing case and rear main seal cover.
Oil Pan Sealing Image: Oil pan sealing with silicone during BMW E30 OBD2 swap.
15. Throttle Cable: E34 M50 Cable Required
An E34 M50 throttle cable (Part Number: 35 41 1 160 609) is needed for the swap.
Installation Tip: If relocating the brake booster, install the throttle cable before the booster for easier access. Use the 318is throttle cable mount for better cable stabilization if available.
Throttle Cable Mount Image: Throttle cable mount in BMW E30 OBD2 swap.
16. Cooling Fan: Electric Fan Conversion
Due to the longer OBD2 engine, space for a mechanical fan is limited. An electric puller fan (mounted behind the radiator) or pusher fan (mounted in front) is recommended.
Electric Fan Recommendation: A SPAL 16″ pusher slim fan is a cost-effective and quality option.
SPAL Fan Mounting: Use SPAL brackets and gasket for easy mounting, avoiding expensive aftermarket brackets.
SPAL Part Numbers:
- Fan: 30100401 (16″)
- Gasket: 30130074
- Mounting Brackets: 30130011
Electric Fan Installation Image: SPAL electric pusher fan installed in BMW E30 OBD2 swap.
Electric Fan Wiring Guide: Refer to Dave’s electric fan write-up for wiring instructions: http://www.r3vlimited.com/board/showthread.php?t=210783
17. ECU Mounting: Securing the Brain
Use ECU mounting brackets from an E30 318is (or potentially any 318 model).
ECU Bracket Relocation: In some E30s (like the 318is), brackets may need to be moved rearward to allow ECU plug-in without excessive harness tightness.
ECU Mounting Location Images: ECU bracket relocation for BMW E30 OBD2 swap.
Reverse Lights: Wiring Connection
Reverse lights are straightforward to wire. Find a two-prong E36 plug matching the E36 transmission reverse switch and splice it into the E30 reverse light wiring under the shift boot.
Tips for Dropping in Your OBD2 Engine
- Tip 1: Engine and Transmission Together: Install the engine and transmission as a single unit for easier installation.
- Tip 2: Intake Manifold Removal: Drop the engine in without the intake manifold to save space and prevent damage. Install it afterward.
- Tip 3: Load Leveler: Use a load leveler to angle the engine and transmission for easier maneuvering during installation.
Load Leveler Setup Image: Engine load leveler setup for BMW E30 OBD2 swap.
Load Leveler Resource: Harbor Freight load leveler (or similar): http://www.harborfreight.com/3-4-qua…ler-67441.html
- Tip 4: Helpers Needed: Have at least one helper, ideally two or more, for safe and efficient engine installation.
- Tip 5: Mounts to Subframe First: Bolt engine mounts to the subframe first, then lower the engine onto the mount studs.
- Tip 6: Protect Car Body: Protect the front support and other areas of your car from scratches during engine installation.
- Tip 7: Transmission Jack: Use a jack under the transmission to help level the engine during lowering.
Enjoy Your Modernized E30!
By following these steps, you can successfully complete an E30 OBD2 swap, bringing modern engine technology and diagnostics to your classic BMW. Remember to consult forums and resources for specific details related to your engine and E30 model. Happy swapping!