The On-Board Diagnostics II (OBD II) system is a crucial component in modern vehicles, acting as the car’s self-monitoring system for emissions and performance. When something goes wrong, particularly with sensors, the dreaded “Check Engine Light” illuminates. Often, these issues are related to a faulty OBD2 sensor. But what exactly are these sensors, and how can you address problems with them? This guide, brought to you by the experts at carparteu.com, will delve into the world of OBD2 sensors, helping you understand, diagnose, and ultimately fix sensor issues to keep your car running smoothly and efficiently.
Understanding OBD2 Sensors and Their Importance
OBD II systems were mandated for all cars sold in the US starting in 1996 to monitor vehicle emissions and engine performance. These systems employ a network of sensors to keep tabs on various parameters, ensuring your vehicle operates within acceptable emission limits and at peak efficiency. Think of OBD2 sensors as the nervous system of your car, constantly feeding data to the engine control unit (ECU), or the car’s brain.
But what exactly is an OBD2 sensor? It’s essentially any sensor that the OBD II system monitors. This can include a wide array of sensors, but some of the most common and crucial ones include:
- Oxygen Sensors (O2 Sensors): These sensors are vital for monitoring the oxygen levels in your exhaust. They ensure the engine maintains the optimal air-fuel mixture for efficient combustion and emissions control. Problems with O2 sensors are a frequent cause of “Check Engine Light” illumination.
- Mass Air Flow (MAF) Sensor: The MAF sensor measures the amount of air entering the engine. This information is critical for the ECU to calculate the correct fuel delivery. A faulty MAF sensor can lead to poor fuel economy and performance issues.
- Manifold Absolute Pressure (MAP) Sensor: The MAP sensor measures the pressure in the intake manifold. This data helps the ECU determine engine load and adjust fuel and ignition timing accordingly.
- Throttle Position Sensor (TPS): The TPS monitors the throttle plate’s position, indicating how much the driver is pressing the accelerator pedal. This is essential for engine control and responsiveness.
- Coolant Temperature Sensor (CTS): The CTS measures the engine coolant temperature. This is crucial for engine management, especially during cold starts and warm-up phases.
These are just a few examples, and the specific sensors in your vehicle will vary depending on make, model, and year. However, all these sensors play a vital role in the OBD II system’s ability to monitor and maintain your vehicle’s health.
Diagnosing a Faulty OBD2 Sensor: Spotting the Signs
Recognizing the symptoms of a failing OBD2 sensor is the first step towards fixing the problem. While the “Check Engine Light” is the most obvious indicator, there are often other performance issues that can point to a sensor malfunction:
- Check Engine Light (CEL) Illumination: This is the most common sign. The light may be constantly on or intermittently illuminate. In some cases, a blinking CEL indicates a more serious, potentially catalyst-damaging issue.
- Poor Fuel Economy: Faulty sensors can disrupt the air-fuel mixture, leading to the engine burning more fuel than necessary.
- Rough Idling or Stalling: An incorrect air-fuel mixture or inaccurate sensor readings can cause the engine to idle roughly or even stall, especially at low speeds or when stopped.
- Reduced Engine Performance: You might notice a lack of power, sluggish acceleration, or hesitation when pressing the gas pedal.
- Failed Emissions Test: Since OBD II systems are directly related to emissions control, a faulty sensor can cause your vehicle to fail an emissions test (Smog Check).
If you experience any of these symptoms, especially in conjunction with the “Check Engine Light,” it’s crucial to investigate further and diagnose the potential sensor issue.
Using an OBD2 Scanner to Pinpoint the Problem
The most effective way to diagnose a faulty OBD2 sensor is by using an OBD2 scanner. These scanners are readily available and range from basic handheld devices to more advanced professional-grade tools.
How to Use an OBD2 Scanner:
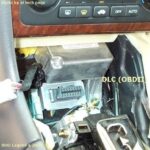
- Locate the OBD2 Port: This port is typically located under the dashboard on the driver’s side. Consult your vehicle’s owner’s manual if you’re unsure of its exact location.
- Plug in the Scanner: With the ignition off, plug the OBD2 scanner into the port.
- Turn Ignition to “ON” (Engine Off): Turn the ignition key to the “ON” position, but do not start the engine. This powers up the car’s electrical system and the OBD II system.
- Follow Scanner Instructions: Turn on the OBD2 scanner and follow the on-screen prompts. Typically, you’ll need to select options like “Read Codes” or “Diagnostic Codes.”
- Record the Diagnostic Trouble Codes (DTCs): The scanner will display any stored DTCs. These codes are standardized and provide information about the detected malfunction. Write down all the codes.
Alt text: OBD2 port location under the dashboard, illustrating typical car diagnostic port access.
Interpreting OBD2 Codes Related to Sensors:
OBD2 codes are alphanumeric and follow a specific format. For sensor-related issues, you’ll often see codes that start with “P0,” “P2,” or “P1.” Here’s a general breakdown:
- P0xxx: Generic powertrain codes (common across all manufacturers).
- P2xxx: Powertrain codes, manufacturer-specific in some cases but often generic.
- P1xxx: Manufacturer-specific powertrain codes.
Within these categories, specific digits indicate the system and component affected. For example:
- P01xx: Oxygen Sensor Circuit Malfunction
- P010x: Mass Air Flow (MAF) Circuit Malfunction
- P011x: Intake Air Temperature (IAT) Circuit Malfunction
- P012x: Throttle Position Sensor (TPS) Circuit Malfunction
- P013x: O2 Sensor Circuit Malfunction (Bank 1, Sensor 2 – for example)
- P018x: Fuel Temperature Sensor Circuit Malfunction
- P023x: Manifold Absolute Pressure (MAP) Sensor Circuit Malfunction
By researching the specific DTCs you retrieve, you can pinpoint the potentially faulty sensor and the nature of the problem (e.g., circuit high, circuit low, no activity, etc.). Websites and apps dedicated to OBD2 code lookups are invaluable resources for this.
Fixing a Faulty OBD2 Sensor: Replacement and Repair
Once you’ve diagnosed a faulty OBD2 sensor, the most common solution is replacement. Here’s a general guide to the replacement process:
Tools and Materials You’ll Need:
- New Replacement Sensor: Ensure you get the correct sensor for your vehicle’s make, model, and year. Use your VIN (Vehicle Identification Number) to verify compatibility.
- Wrench or Socket Set: The size will depend on the sensor and vehicle.
- Penetrating Oil (Optional): Helpful for loosening corroded sensors, especially oxygen sensors in the exhaust system.
- OBD2 Scanner (for clearing codes):
- Gloves and Safety Glasses:
General Replacement Steps (Always Consult Your Vehicle’s Repair Manual for Specific Procedures):
- Locate the Faulty Sensor: Based on the OBD2 code and your research, identify the location of the sensor in your vehicle.
- Disconnect the Sensor’s Electrical Connector: Carefully disconnect the electrical connector from the old sensor. There’s usually a clip or tab to depress.
- Remove the Old Sensor: Use the appropriate wrench or socket to unscrew and remove the old sensor. Penetrating oil can be helpful if it’s stuck. Be gentle to avoid damaging the threads.
- Install the New Sensor: Apply a small amount of anti-seize compound (if recommended by the sensor manufacturer) to the threads of the new sensor. Carefully screw in the new sensor by hand first to avoid cross-threading. Then, tighten it to the manufacturer’s recommended torque specification (if available) or snug it down firmly.
- Reconnect the Electrical Connector: Plug the electrical connector back onto the new sensor until it clicks into place.
- Clear the OBD2 Codes: Use your OBD2 scanner to clear the stored diagnostic trouble codes.
- Start the Engine and Check for the “Check Engine Light”: Start your car and ensure the “Check Engine Light” has turned off.
- Test Drive: Take your vehicle for a test drive to ensure the issue is resolved and the car is performing correctly.
DIY vs. Professional Repair and Cost Considerations:
Replacing an OBD2 sensor can often be a DIY-friendly task, especially for sensors that are easily accessible. However, some sensors can be in difficult-to-reach locations or require specialized tools.
- DIY Advantages: Cost savings on labor. Learning experience.
- DIY Considerations: Requires basic mechanical skills, tools, and time. Potential for mistakes if not careful.
- Professional Repair Advantages: Expertise, proper tools, and quicker repair time. Warranty on labor and parts.
- Professional Repair Considerations: Higher cost due to labor charges.
The cost of replacing an OBD2 sensor typically ranges from $100 to $400, depending on the type of sensor, vehicle make and model, and whether you DIY or go to a professional mechanic. The sensor itself can cost anywhere from $20 to $200+, and labor can add another $80 to $200+ per hour.
Using Quality Replacement Parts:
It’s crucial to use high-quality replacement sensors from reputable brands. Cheap, generic sensors may not meet OEM specifications and could lead to further problems or inaccurate readings. Using OEM or equivalent quality aftermarket parts will ensure proper function and longevity.
OBD2 Sensors, Smog Check, and Emissions
OBD II systems are fundamentally linked to vehicle emissions. Faulty OBD2 sensors directly impact your car’s ability to control emissions effectively. In states with emissions testing (like California’s Smog Check program), OBD II system functionality is a critical part of the inspection.
During a Smog Check, technicians perform an OBD II inspection, which includes:
- Visual Inspection: Checking that the “Check Engine Light” is functioning correctly (turns on briefly when the ignition is turned on and then turns off if no faults are detected).
- Functional Inspection: Using Smog Check equipment to communicate with the vehicle’s on-board computer and check for stored fault codes and “readiness monitors.”
Alt text: Smog Check technician using diagnostic tool for OBD II inspection, showcasing vehicle emission testing procedure.
Readiness Monitors and Sensors:
“Readiness monitors” are self-tests performed by the OBD II system to ensure all emission-related components and systems are functioning correctly. These monitors need to be in a “ready” or “complete” state for a vehicle to pass a Smog Check. If sensors are faulty or have recently been replaced, the readiness monitors related to those sensors may not be complete.
If your vehicle fails Smog Check due to OBD II system issues or incomplete readiness monitors, addressing any faulty OBD2 sensors is often a necessary step to get your car to pass inspection and be legally registered.
Maintaining Your OBD2 System for Long-Term Vehicle Health
Regular vehicle maintenance, including addressing issues indicated by the “Check Engine Light” and OBD2 system, is crucial for long-term vehicle health, fuel efficiency, and emissions control. Promptly diagnosing and fixing faulty OBD2 sensors not only resolves immediate performance problems but also prevents potential damage to other components, like the catalytic converter, and ensures your vehicle remains environmentally friendly.
By understanding OBD2 sensors, learning to diagnose potential issues, and knowing how to fix a faulty sensor, you can take proactive steps to maintain your vehicle’s health and keep it running reliably for years to come. Remember to always consult your vehicle’s repair manual for specific procedures and seek professional help when needed.