Maintaining optimal tire pressure is crucial for the safety, fuel efficiency, and longevity of your Toyota Highlander’s tires. The Tire Pressure Monitoring System (TPMS) is designed to alert you to pressure drops, but what if you want to monitor real-time tire pressure data or diagnose potential TPMS issues more deeply? This is where accessing your Highlander’s TPMS data through OBD2 PIDs becomes invaluable. This guide will walk you through the process of using an OBDLink MX+ and the OBDLink app to access and interpret your Toyota Highlander’s TPMS data, empowering you with detailed insights into your vehicle’s tire health.
What You’ll Need to Get Started
Before diving into the steps, ensure you have the following:
- Toyota Highlander: This guide is tailored for Toyota Highlander vehicles (while the original test was on a 4Runner, the process is applicable due to similar Toyota systems).
- OBDLink MX+ OBD2 Adapter: This adapter is known for its compatibility and enhanced features, including access to OEM-specific data.
- OBDLink App (on a compatible device): Available for Android and iOS, this app is essential for communicating with the OBDLink MX+ and accessing vehicle data.
- Toyota, Lexus, Scion Enhanced OEM Add-Ons for OBDLink App: These add-ons are critical as they unlock access to the proprietary PIDs (Parameter IDs) needed to read TPMS and other advanced data from your Toyota. You’ll need to purchase and install these within the OBDLink app.
Once you have these components ready, you can proceed with the following steps to access your Highlander’s TPMS information.
Step-by-Step Guide to Accessing Highlander TPMS Data with OBD2
Follow these detailed instructions to set up your OBDLink MX+ and OBDLink app to read your Toyota Highlander’s tire pressure data.
1. Configure Vehicle Parameters in the OBDLink App
This step ensures the app correctly identifies your vehicle for accurate data retrieval.
- Open the OBDLink App: Launch the OBDLink application on your tablet or smartphone.
- Do NOT Connect to MX+ Yet: It’s important to configure settings before establishing a connection.
- Access Settings: Navigate to the “Settings” menu within the app.
- Go to Vehicle Editor: Select “Vehicle Editor” from the settings options.
- Enter Vehicle Information: Input your Toyota Highlander’s specific details (Year, Make, Model, and Engine if prompted). Accurate vehicle information is crucial for the app to access the correct PIDs.
- Enhanced Network Setting: For “Enhanced Network,” choose “Prompt.” This setting allows you to select the specific enhanced network you want to access (in this case, TPMS) each time you connect, providing flexibility and preventing unnecessary data retrieval.
- Default Settings: For other settings pages, accept the default values unless you have specific knowledge to customize them. You can adjust “Engine Size” and “Fuel Tank Capacity” if desired, but these are not critical for TPMS data.
- Save and Exit: Use the back button to save your vehicle settings and return to the main settings menu.
2. Update OBDLink MX+ Firmware
Keeping your OBDLink MX+ adapter firmware updated ensures optimal performance and compatibility with the latest vehicle protocols and app features.
- Connect MX+ to OBD II Port: Plug your OBDLink MX+ adapter into your Toyota Highlander’s OBD II port. This port is typically located under the dashboard on the driver’s side.
- Open OBDLink App (if not already open): Launch the OBDLink app.
- Do NOT Connect to MX+ (Disconnect if already connected): Ensure you are not actively connected to the adapter before proceeding with the firmware update.
- Access Firmware Updates: Go to “Settings” within the OBDLink app.
- Check for Updates: Select “Firmware Updates” and then “Check for Updates.” The app will communicate with the OBDLink server to see if a newer firmware version is available for your MX+.
- Update Firmware (if available): If an update is found, select “Update Firmware” and follow the on-screen prompts to complete the update process. Do not interrupt the update process.
- Return to Settings: Once the firmware update is complete (if any), use the back button to return to the settings menu.
3. Set Units Preferences
Configuring unit preferences ensures that your TPMS data is displayed in your preferred units (e.g., PSI, kPa, Bar).
- Open OBDLink App (if not already open): Launch the OBDLink app.
- Do NOT Connect to MX+ (Disconnect if already connected).
- Go to Preferences: Select “Settings” and then “Preferences.”
- Access Units Settings: Choose “Units” from the preferences menu.
- Select “psi” for Pressure: Under “Pressure,” select “psi” (pounds per square inch) or your preferred unit for tire pressure.
- Set Other Units: Configure other unit preferences on this page as desired (temperature, speed, etc.).
- Save and Exit: Use the back button to save your unit preferences and return to the main settings screen.
4. Add a Dashboard and TPMS Displays
Now, you will create a dashboard and add digital gauges to display your Toyota Highlander’s real-time TPMS data.
-
Return to Main Page: Use the back button until you reach the main screen of the OBDLink app.
-
Tap Dashboard Icon: Locate and tap the “Dashboard” icon, usually found at the bottom left corner of the screen.
-
Open Dashboard Menu: Tap the vertical ellipsis (three dots) to open the dashboard menu.
-
Add New Dashboard: Select “Add Dashboard” to create a new, blank dashboard specifically for TPMS monitoring.
-
Open Dashboard Menu Again: Once the new dashboard is displayed, open the menu again (vertical ellipsis).
-
Add Display: Select “Add Display” to add a gauge to the dashboard.
-
Choose Digital Gauge: In the “Display Type” pop-up, select “Digital Gauge.” This type of gauge is well-suited for displaying numerical TPMS values.
-
Select Display Style (Optional): Choose a “Built-In” style or a custom style if you have created one. “Dark” style can offer a clean look with a borderless, colorless background.
-
Select PID (Parameter ID): In the next pop-up (which might initially show “Vehicle Speed”), tap the “Item” dropdown menu (it will likely display “Vehicle Speed” with a down arrow).
-
Navigate to Toyota, Lexus, Scion PIDs: On the “Select PIDs” page, scroll through the list and select “Toyota, Lexus, Scion.” If you do not see this option, it indicates that the Enhanced OEM Add-Ons were not correctly installed. Double-check the installation of these add-ons within the OBDLink app.
-
Access Tire Pressure Monitor PIDs: On the “OEM Add-Ons Select PIDs” page, find and select “Tire Pressure Monitor” within the “Tire Pressure Monitor” section.
-
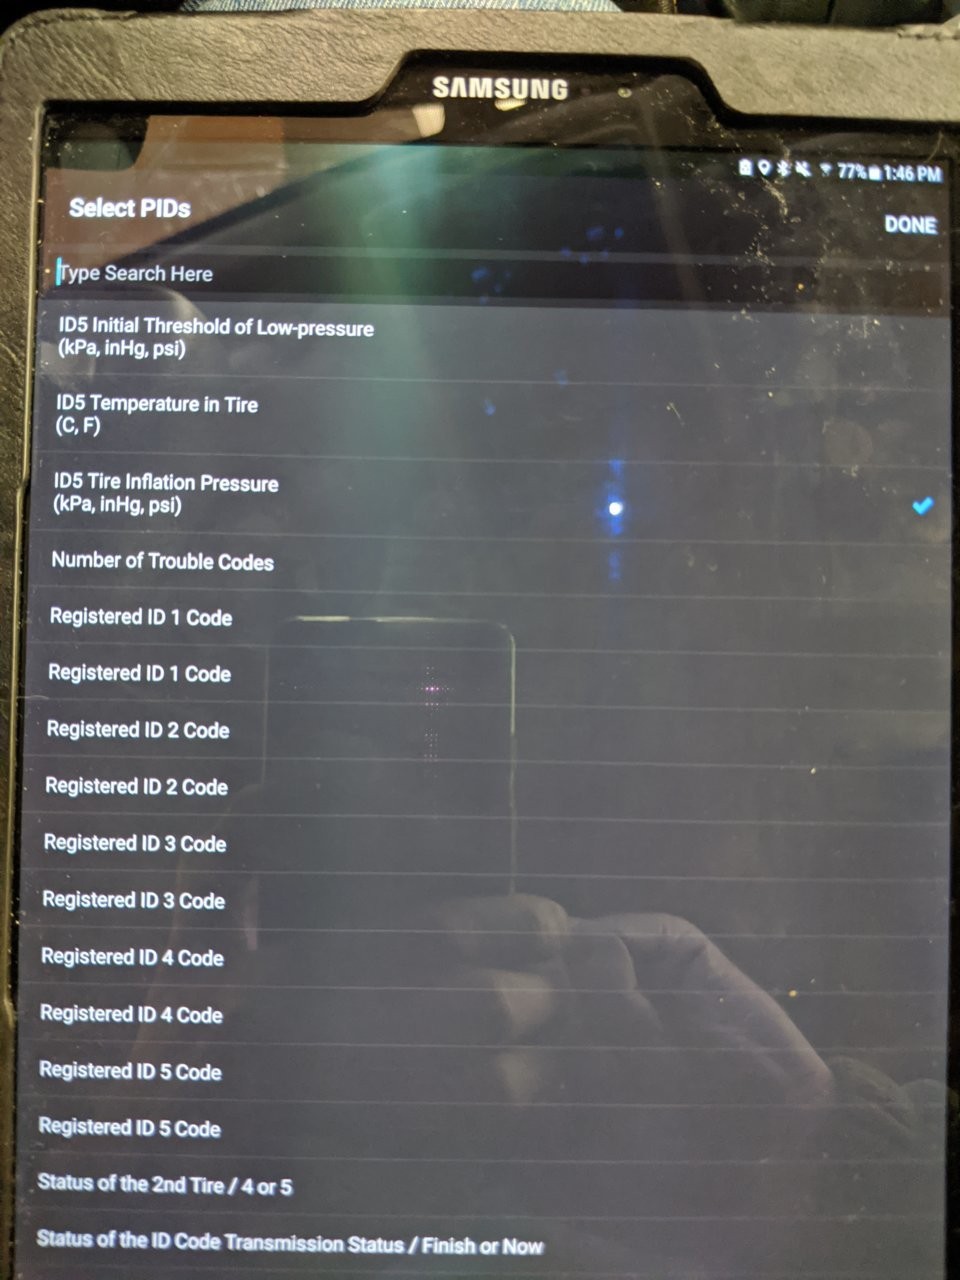
Choose TPMS PIDs: On the “OEM Tire Pressure Monitor Select PIDs” page, you will see a list of TPMS PIDs. The PIDs that are most likely to work are typically found towards the bottom of the list. Scroll to the bottom and then slowly scroll back up. Look for PIDs labeled “ID# Tire Inflation Pressure.”
-
PID Identification (Example – may vary slightly):
- ID5: Spare Tire
- ID4: Right Front Tire
- ID3: Right Rear Tire
- ID2: Left Rear Tire
- ID1: Left Front Tire
-
Select PIDs: Tap on each PID you want to monitor (e.g., ID1 through ID5). A checkmark will appear to the right of each selected PID.
-
Select “Done”: Once you have selected all desired TPMS PIDs, tap “Done” at the top of the page.
-
-
Customize Display Title: Tap on the default title of the gauge (e.g., “Vehicle Speed”). A text input will appear. Change the title to a shorter, more descriptive name like “Spare PSI,” “RR Tire PSI,” “LF Tire PSI,” etc.
-
Save Display: Tap “Done” on the virtual keyboard and then tap “OK” to save the display onto your dashboard.
-
Customize Display Style (Optional): To further customize the appearance of the display (colors, fonts, etc.), tap and hold on the newly created display until the “Edit Display” pop-up appears. Select “Style” and modify the settings. You can save custom styles for reuse.
-
Repeat for Remaining Tires: Go back to “Select Add Display” and repeat steps 6-15 for each of the remaining TPMS PIDs (for each tire you want to monitor). You can select your previously created custom style for consistency.
5. Connect and View Real-Time TPMS Data
With your dashboard set up, you can now connect to your Highlander and view live TPMS data.
- Ensure MX+ is Plugged In: Make sure the OBDLink MX+ is securely plugged into your Toyota Highlander’s OBD II port.
- Start Your Vehicle: Turn on your Toyota Highlander’s engine. Simply turning the key to the “ON” position may not be sufficient. The engine needs to be running for TPMS data to be consistently available.
- Open OBDLink App: Launch the OBDLink app on your device.
- Tap “Connect”: Tap the “Connect” button in the app. The app will attempt to connect to the OBDLink MX+.
- Select “Tire Pressure Monitor” Network: When prompted with the “Enhanced Network” settings (due to selecting “Prompt” earlier), choose “Tire Pressure Monitor” from the list.
- Select “Connect”: Tap “Connect” again to specifically connect to the Tire Pressure Monitor enhanced network.
- Navigate to TPMS Dashboard: Tap the “Dashboard” icon and swipe left or right until you reach the TPMS dashboard you created.
- View Tire Pressures: You should now see real-time tire pressure readings displayed on the digital gauges you added to your dashboard.
Benefits of Monitoring TPMS Data via OBD2
Accessing your Toyota Highlander’s TPMS data through OBD2 offers several advantages:
- Real-Time Monitoring: Get instant tire pressure readings while driving or stationary, providing up-to-the-second information beyond basic TPMS warnings.
- Detailed Diagnostics: OBD2 access can reveal more granular TPMS data, potentially aiding in diagnosing sensor issues or intermittent problems that might not trigger standard alerts immediately.
- Spare Tire Monitoring (If Equipped): Depending on your Highlander’s TPMS configuration and PID availability, you may be able to monitor the spare tire pressure, which is often not included in standard TPMS displays.
- Customizable Dashboards: The OBDLink app allows you to create custom dashboards, displaying TPMS data alongside other vehicle parameters you find important.
- Enhanced Vehicle Understanding: Gaining access to TPMS PIDs deepens your understanding of your vehicle’s systems and empowers you with more information for proactive maintenance.
Conclusion
By following these steps, you can successfully unlock your Toyota Highlander’s TPMS data using an OBDLink MX+ and the OBDLink app. This setup provides valuable real-time insights into your tire pressures, contributing to safer driving, improved fuel economy, and extended tire life. Regularly monitoring your TPMS data through OBD2 PIDs empowers you to stay ahead of potential tire issues and maintain your Toyota Highlander in optimal condition.