Swapping engines in your 92-00 Honda Civic can significantly boost performance and breathe new life into your ride. However, navigating the wiring, especially when dealing with different OBD (On-Board Diagnostics) systems, can be daunting. This comprehensive guide, tailored for the DIY mechanic and Honda enthusiast, clarifies the intricacies of engine swap wiring, focusing particularly on OBD2 swaps and the crank sensor – a crucial component often misunderstood in these conversions. Whether you’re upgrading to a VTEC engine or swapping between OBD generations, this guide provides the essential information to ensure a smooth and successful engine swap.
Understanding OBD Systems and Engine Swaps
Before diving into specific wiring scenarios, it’s crucial to grasp the basics of OBD systems. OBD systems are essentially the engine’s diagnostic and control network. Honda Civics of the 92-00 era primarily used OBD1 and OBD2 systems. OBD1 is simpler and was used in earlier models (92-95), while OBD2 is more advanced, introduced in later models (96-00) to meet stricter emission standards.
Engine swaps often involve mixing and matching engines and ECUs (Engine Control Units) from different OBD generations. This is where wiring complexities arise. One frequently discussed component in OBD2 swaps is the crankshaft position sensor, also known as the CKF sensor (Crankshaft Fluctuation Sensor) in Honda terminology. This sensor plays a vital role in OBD2 systems by monitoring crankshaft speed and position, crucial for precise ignition timing and misfire detection.
However, when you swap an OBD2 engine into an older OBD1 Civic and use an OBD1 ECU, the crank sensor situation becomes unique. Let’s explore different swap scenarios and how the crank sensor, and other wiring considerations, come into play.
OBD1 Engine/ECU into OBD1 Civic (Plug and Play with Minor Tweaks)
Generally, swapping an OBD1 engine into an OBD1 Civic is the most straightforward. For 92 Civics, VTEC wiring is often pre-run to the ECU harness, simplifying VTEC engine swaps.
D16Z6/D15B (JDM) / Mini-Me with P28 ECU
- DX/LX – D15B7: Wiring the VTEC solenoid and VTEC pressure switch to the P28 ECU is necessary. The rest is typically plug-and-play. (See Figure 1 for OBD1 ECU wiring details).
- CX – D15B8: Similar to DX/LX, VTEC wiring is needed. If your CX is not a 4-wire O2 sensor model, you’ll also need to wire the additional O2 sensor connections to the ECU (Figure 1).
- VX – D15Z1: VTEC wiring as above. For knock sensor and IAB (Intake Air Bypass) wiring, refer to Figure 1. If using a chipped P28 ECU, IAB and knock sensor wiring might not be required. VX models with 7-wire O2 sensors will need conversion to 4-wire (diagram available at http://www.hybridautomotive.com/tech/o2/).
B16A3/B17A/B18C1/B18C (OBD1 JDM) with Chipped P28/P30/P61/P72 ECU
- EX/Si – D16Z6: VTEC is plug and play. Knock sensor and IAB wiring are shown in Figure 1, but may not be needed with a chipped P28 ECU.
- DX/LX – D15B7: VTEC, knock sensor, and IAB wiring are needed as per Figure 1, though IAB and knock sensor may be bypassed with a P28 ECU.
- CX – D15B8: VTEC, knock sensor, and IAB wiring (Figure 1). 4-wire O2 conversion might be needed for some CX models (Figure 1).
- VX – D15Z1: VTEC wiring is plug and play. 7-wire O2 to 4-wire conversion may be needed (http://www.hybridautomotive.com/tech/o2/).
B18A (OBD1)/B18B in DX/CX/VX/EX using P74/P75 ECU or Chipped OBD1 ECUs
- LX/DX/EX – D15B7/D16Z6: Plug and play.
- CX/VX – D15B8/D15Z1: Plug and play. 4-wire O2 conversion for 1-wire CX models (Figure 1). 7-wire to 4-wire O2 conversion for VX (http://www.hybridautomotive.com/tech/o2/).
OBD2 Engine/OBD1 ECU into OBD1 Vehicle: Crank Sensor Considerations
This swap type introduces the core of our keyword focus: the interaction between OBD2 engines and OBD1 ECUs, particularly concerning the crank sensor. When using an OBD1 ECU with an OBD2 engine, the OBD2 crank sensor (CKF sensor) is generally not used or needed. OBD1 ECUs are not designed to receive or process the CKF sensor’s input.
D16Y8 with P28 ECU
-
EX/Si/VX – D16Z6/D15Z1: Mostly plug and play. VTEC is plug and play. The knock sensor will not be used with the P28 ECU. The EX/Si/VX distributor might require modification for the Y8 head. Alternatively, use an OBD2 to OBD1 distributor adapter harness with the Y8 distributor. Relocate the Intake Air Temperature (IAT) sensor to the intake arm (Figure 3) or use the Z6/Z1 manifold. Reuse Z6 injectors. For VX, use EX/SI/DX injectors for similar flow rates. Reuse the Z6/Z1 alternator. The CKF sensor on the Y8 crank will not be used; tie it out of the way. For VX, convert 5-wire O2 to 4-wire (http://www.hybridautomotive.com/tech/o2/).
-
LX/DX/CX – D15B7/D15B8: Mostly plug and play. Wire VTEC solenoid and pressure switch (Figure 1). Reuse the DX/CX distributor. For Y8 distributor, use an OBD2 to OBD1 adapter harness. Relocate IAT sensor to intake arm (Figure 3) or use the CX/DX manifold. Use DX injectors (same flow rate). For CX, use EX/SI/DX injectors for higher flow rates. Reuse CX/DX alternator. CKF sensor on Y8 is not used; tie it out of the way.
B16A2/B18C1 (OBD2)/B18C5 with Chipped P28/P30/P72
- EX/SI/VX – D16Z6/D15Z1: Mostly plug and play. VTEC is plug and play. Knock sensor is not used for P28 ECU but will be for others. Use an OBD2 to OBD1 adapter harness for the A2/C1/C5 distributor. Relocate IAT sensor to intake arm. Reuse Z6 injectors. For VX, use EX/SI/DX injectors. Use an OBD1 B-series alternator. CKF sensor on A2/C1/C5 is not used; tie it out of the way. For VX, convert 5-wire O2 to 4-wire (http://www.hybridautomotive.com/tech/o2/).
- DX/CX – D15B7/D15B8: Mostly plug and play. Wire VTEC (Figure 1). Knock sensor not used for P28 ECU but will be for others. Use an OBD2 to OBD1 adapter harness for the A2/C1/C5 distributor. Relocate IAT sensor to intake arm. Reuse DX injectors. For CX, use EX/SI/DX injectors. Use an OBD1 B-series alternator. CKF sensor on A2/C1/C5 is not used; tie it out of the way. For 1-wire O2 CX, convert to 4-wire using Figure 1.
B18B/B20B/Z (OBD2) with P75 ECU
- EX/SI/VX/DX/CX – D16Z6/D15Z1/D15B7/D15B8: Mostly plug and play. Use an OBD1 B18 distributor or OBD2 LS dizzy with an adapter harness. Use OBD1 B-series alternator. For EX/SI/DX, reuse injectors. For VX/CX, use EX/DX/SI injectors. CKF sensor is not used. For 1-wire O2 CX, convert to 4-wire (Figure 1). For VX 7-wire O2, convert to 4-wire (http://www.hybridautomotive.com/tech/o2/).
OBD0 Engine into OBD1 Vehicle with OBD1 ECU
B18A (OBD0) with P75 OBD1 ECU
- EX/SI/DX/CX/VX – D16Z6/D15Z1/D15B7/D15B8: Mostly plug and play. OBD0 and OBD1 alternators plugs are the same. Reuse EX/SI/DX injectors; for CX/VX, use EX/SI/DX injectors. Rewire the fan switch from the thermostat housing to the back of the block (OBD0 fan switch location). For VX 7-wire O2 (http://www.hybridautomotive.com/tech/o2/) and CX 1-wire O2, convert to 4-wire using Figure 1.
OBD2 Engine into OBD2 Vehicle with OBD2 ECU
Important Note: 96-98 OBD2A and 99-00 OBD2B engine and dash harnesses are not interchangeable due to different ECU connectors (Figure 11).
D16Y8 with P2P ECU
- DX/LX/CX – D16Y7: Mostly plug and play. Wire VTEC solenoid, VTEC pressure switch, and knock sensor (Figure 6 for OBD2A, Figure 7 for OBD2B). Wire idle air control valve from 3-wire to 2-wire (Figure 6/7). Lengthen secondary O2 sensor wiring if using an EX catalytic converter. Relocate IAT sensor to intake arm (Figure 8).
- HX – D16Y5: Mostly plug and play. Reuse VTEC solenoid and pressure switch. Wire knock sensor for 5-speed models (Figure 6 – all HX 96-00 are OBD2A). Convert 7-wire O2 to 4-wire (eastcoasthondas.com – eastcoasthondas Resources and Information.).
B16A2/B18C1/B18C5 with P30 (OBD2A)/P2T/P72
- EX – D16Y8: Mostly plug and play. Reuse VTEC solenoid, pressure switch, and knock sensor wiring. Extend secondary O2 if needed. Wire IABs for B18C1 with P72 ECU (Figure 6/7). Relocate IAT sensor to intake arm (Figure 8). For B18C1/C5, convert to round style IAT and place connector on manifold (Figure 9).
- DX/LX/CX – D16Y7: Mostly plug and play. Wire VTEC solenoid, pressure switch, and knock sensor (Figure 6/7). Wire idle air control valve (3-wire to 2-wire) (Figure 6/7). Extend secondary O2 wiring if needed. Relocate IAT sensor to intake arm (Figure 8). For B18C1/C5, convert to round style IAT (Figure 9).
- HX – D16Y5: Mostly plug and play. Reuse VTEC solenoid and pressure switch. Wire knock sensor for 5-speed models (Figure 6 – OBD2A). Convert 7-wire O2 to 4-wire (eastcoasthondas.com – eastcoasthondas Resources and Information.).
B18B/B20B/Z with OBD2A P75 (Avoid 00-01 P75 due to immobilizer)
- EX/HX – D16Y8/D16Y5: Plug and play. For HX, convert 7-wire O2 to 4-wire (eastcoasthondas.com – eastcoasthondas Resources and Information.).
- DX/LX/CX – D16Y7: Mostly plug and play. Wire idle air control valve (3-wire to 2-wire) (Figure 6/7). Extend secondary O2 wiring if needed. Relocate IAT sensor to intake arm (Figure 8).
OBD1 Engine into OBD2 Vehicle with OBD1 ECU
D16Z6 with P28 ECU
- DX/LX/CX – D16Y7: Mostly plug and play. Wire VTEC solenoid and pressure switch (Figure 1). Wire idle air control valve (3-wire to 2-wire) (Figure 6/7). Relocate IAT sensor to intake arm (Figure 8) or rewire IAT to OBD1 style (Figure 9). CKF, EVAP purge, and secondary O2 are eliminated. Use D16Z6 distributor with adapter. Use Z6 injectors (remove injector “clips” – Figure 10). Reuse Y7 alternator.
- HX – D16Y5: VTEC plug and play. Relocate IAT sensor (Figure 8) or rewire to OBD1 style (Figure 9). CKF, EVAP purge, EGR, and secondary O2 are eliminated. Convert 7-wire O2 to 4-wire (eastcoasthondas.com – eastcoasthondas Resources and Information.). Use D16Z6 distributor with adapter. Use Z6 injectors (remove “clips” – Figure 10). Reuse Y7 alternator.
- EX – D16Y8: VTEC plug and play. Relocate IAT sensor (Figure 8) or rewire to OBD1 style (Figure 9). CKF, EVAP purge, EGR, and secondary O2 are eliminated. Use D16Z6 distributor with adapter. Use Z6 injectors (remove “clips” – Figure 10). Reuse Y7 alternator.
B16A2/B18C1/B18C5 with OBD1 P30
- DX/LX/CX – D16Y7: Mostly plug and play. Wire VTEC solenoid, pressure switch, and knock sensor (Figure 1). Wire idle air control valve (3-wire to 2-wire) (Figure 6/7). Relocate IAT sensor (Figure 8) or rewire to OBD1 style (Figure 9). CKF, EVAP purge, and secondary O2 are eliminated. For 96-98 Civics, use OBD2 B-series VTEC distributor or OBD2A to OBD1 distributor adapter. For 99-00, use OBD2B to OBD1/2 distributor adapter and OBD1/2 B-series DOHC VTEC distributor. Use B-series injectors (remove “clips” – Figure 10). Use OBD2 B-series alternator or OBD2-1 alternator adapter.
- HX – D16Y5: VTEC plug and play. Relocate IAT sensor (Figure 8) or rewire to OBD1 style (Figure 9). CKF, EVAP purge, EGR, and secondary O2 are eliminated. Convert 7-wire O2 to 4-wire (eastcoasthondas.com – eastcoasthondas Resources and Information.). Use OBD2 VTEC distributor or OBD2A to OBD1 distributor adapter. Use B-series injectors (remove “clips” – Figure 10). Use OBD2 B-series alternator or OBD2-1 alternator adapter.
- EX – D16Y8: VTEC plug and play. Wire knock sensor (Figure 1). Relocate IAT sensor (Figure 8) or rewire to OBD1 style (Figure 9). CKF, EVAP purge, EGR, and secondary O2 are eliminated. For 96-98 Civics, use OBD2 B-series VTEC distributor or OBD2A to OBD1 distributor adapter. For 99-00, use OBD2B to OBD1/2 distributor adapter and OBD1/2 B-series DOHC VTEC distributor. Use B-series injectors (remove “clips” – Figure 10) or Y8 injectors. Use OBD2 B-series alternator or OBD2-1 alternator adapter.
B18A/B using OBD1 P75
- DX/LX/CX – D16Y7: Mostly plug and play. Wire idle air control valve (3-wire to 2-wire) (Figure 6/7). Extend secondary O2 wiring if needed. Relocate IAT sensor to intake arm (Figure 8). CKF, EVAP purge, EGR, and secondary O2 are eliminated. Use OBD2 B18B distributor or OBD2A to OBD1 distributor adapter. For 99-00 Civic, use OBD2B to OBD1 distributor adapter with OBD1 or OBD2 B18A/B distributor. Use B18A/B injectors (remove “clips” – Figure 10). Use OBD2 B-series alternator or OBD2-1 alternator adapter.
- EX/HX – D16Y8/Y5: Relocate IAT sensor (Figure 8) or rewire to OBD1 style (Figure 9). CKF, EVAP purge, EGR, and secondary O2 are eliminated. For 96-98 Civics, use OBD2 B18B distributor or OBD2A to OBD1 distributor adapter. For 99-00, use OBD2B to OBD1/2 distributor adapter and OBD1/2 B-series DOHC VTEC distributor. Use B18A/B injectors (remove “clips” – Figure 10). Use OBD2 B-series alternator or OBD2-1 alternator adapter. For HX, convert 7-wire O2 to 4-wire (eastcoasthondas.com – eastcoasthondas Resources and Information.).
Figure 1 (OBD1 ECU Wiring)
Figure 2 (JDM VTEC solenoid)
 JDM VTEC Solenoid
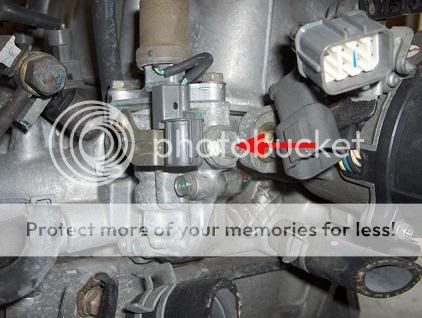
Figure 3 (OBD1 IAT sensor in intake arm)
Figure 4 (OBD0 fan switch/OBD1 fan switch)
Figure 5 (OBD1 Shocktower harness)
Figure 6 (OBD2A hybrid pinouts)
Figure 7 (OBD2B hybrid pinouts)
Figure 8 (OBD2 IAT into intake arm)
Figure 9 (Round style IAT)
Figure 10 (Injector Clip Removal)
Figure 11 (OBD2 Harness Comparison)
Disclaimer: This guide is for informational purposes only. Engine swaps and wiring modifications should be performed by experienced individuals with a strong understanding of automotive electrical systems. Always consult your vehicle’s service manual and relevant wiring diagrams for specific instructions. carparteu.com is not responsible for any damage or issues arising from the use of this guide.