Diagnosing your car problems used to require a trip to the mechanic, often for something as simple as understanding why your check engine light is on. Thankfully, modern cars equipped with On-Board Diagnostics II (OBD2) systems offer a way for you to get a preliminary diagnosis right from your own garage using a computer. This guide will walk you through the steps on how to use your computer to read OBD2 codes, empowering you to understand your vehicle’s health and potentially save on repair costs.
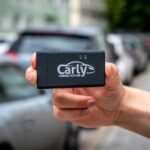
To get started, you’ll need a few key components. First, you’ll need an OBD2 adapter. This small device plugs into your car’s OBD2 port, usually located under the dashboard on the driver’s side. These adapters come in various forms, from basic wired versions to Bluetooth or Wi-Fi enabled wireless models. Secondly, you will need a computer – a laptop or even a desktop will work, depending on the type of adapter you choose and the software compatibility. Finally, you’ll need OBD2 diagnostic software.
Alt: OBD2 adapter plugged into the diagnostic port of a car, ready for computer connection.
Once you have these items, the process is relatively straightforward. Start by turning off your car’s ignition. Locate the OBD2 port in your vehicle and securely plug in your OBD2 adapter. Next, depending on your adapter type, establish a connection between the adapter and your computer. For wired adapters, this is usually a USB connection. For wireless adapters, you’ll typically pair via Bluetooth or connect to a Wi-Fi network broadcast by the adapter.
After the physical connection is established, turn your car’s ignition to the “ON” position, but do not start the engine. This provides power to the car’s computer and the OBD2 system without starting the combustion process. Now, launch your chosen OBD2 diagnostic software on your computer. The software interface will vary depending on the program you are using, but most will have a clear option to “Connect” or “Scan.” Initiate the connection within the software to link it with your OBD2 adapter and your car’s computer.
Alt: Screenshot of OBD2 diagnostic software interface on a laptop screen, showing connection status and diagnostic options.
Once connected, instruct the software to perform a scan for diagnostic trouble codes (DTCs). The software will communicate with your car’s computer and retrieve any stored error codes. These codes are typically displayed in a format like “P0123,” where each character provides information about the system and the nature of the problem. The software should then provide a description of the code, offering an initial understanding of the issue. For example, a code like “P0401” might indicate “Exhaust Gas Recirculation Flow Insufficient Detected,” pointing to a potential problem with your EGR system, similar to the example in the original article, but now read directly by your computer.
While some basic OBD2 software is free, offering code reading and clearing capabilities, more advanced paid software can provide enhanced features. These might include live data streaming (showing real-time sensor readings), advanced diagnostics, and access to repair databases. Choosing the right software depends on your needs and technical expertise.
Reading OBD2 codes with your computer is a powerful first step in car diagnostics. It allows you to identify potential problems and research them before visiting a mechanic. While it’s not a substitute for professional diagnosis and repair, understanding your OBD2 codes can save you time, money, and give you valuable insights into your vehicle’s condition. Remember to always consult your vehicle’s repair manual and seek professional help when dealing with complex automotive issues.

