The On-Board Diagnostics II (OBD2) port in your vehicle is a vital gateway for accessing your car’s computer system. It’s used by mechanics to diagnose issues, emission testing centers, and even you with a simple code reader. However, like any connector exposed to the elements of your car’s interior, the OBD2 port can become dirty or corroded over time. A dirty OBD2 port can lead to connection problems, preventing proper communication with diagnostic tools. Learning how to clean your OBD2 port is a simple maintenance task that can save you headaches and ensure accurate readings when you need them.
Why Cleaning Your OBD2 Port Matters
Think of your OBD2 port as a USB port for your car’s data. Just like a dusty USB port on your computer can cause connection issues, a dirty OBD2 port can interfere with the connection between diagnostic tools and your vehicle’s computer. Dust, debris, and even corrosion can build up inside the port, blocking the pins from making proper contact.
This can lead to several problems:
- Failed diagnostic tests: If the connection is poor, a scan tool might not be able to read data correctly, leading to inaccurate diagnoses or failed emission tests.
- Intermittent connection issues: You might experience unreliable connections, where the tool connects and disconnects sporadically, making it difficult to get a stable reading.
- Damage to pins: Forcing a connection with a dirty port can potentially damage the delicate pins inside the OBD2 port or the connector of your diagnostic tool.
Regularly cleaning your OBD2 port is a preventative measure that ensures a reliable connection whenever you need to use it.
Simple Steps to Clean Your OBD2 Port
Cleaning your OBD2 port is a straightforward process that requires minimal tools and time. Here’s a step-by-step guide:
Step 1: Gather Your Supplies
You won’t need much for this task. Here are the essential items:
- Compressed air: A can of compressed air, like you would use to clean electronics, is ideal for blowing out loose dust and debris.
- Electrical contact cleaner (optional but recommended): For ports with signs of corrosion or stubborn dirt, electrical contact cleaner can help dissolve buildup and improve conductivity. Make sure it’s specifically designed for electronics and plastic-safe.
- Soft brush or lint-free cloth: A small, soft brush (like a toothbrush or a detail brush) or a lint-free cloth can be used to gently wipe away dirt and grime.
Step 2: Locate the OBD2 Port
The OBD2 port is typically located inside the cabin of your vehicle, usually within a few feet of the steering wheel. Common locations include:
- Under the dashboard: Check beneath the steering column or glove compartment.
- Near the center console: Sometimes it’s located in the center console area, often near the gear shifter or infotainment system.
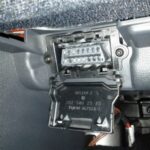
Refer to your vehicle’s owner’s manual if you are unsure of the exact location. It’s usually a 16-pin, trapezoid-shaped connector.
Step 3: Inspect the Port
Before cleaning, take a close look at the OBD2 port. Identify the type of dirt or contamination present:
- Dust and loose debris: This is common and easily removed with compressed air.
- Grime or sticky residue: This might require a soft brush or lint-free cloth.
- Corrosion: Look for greenish or whitish deposits on the pins. Electrical contact cleaner is helpful for corrosion.
Step 4: Gently Clean the Port
Now it’s time to clean the OBD2 port:
- Use compressed air: Hold the can of compressed air upright and use short bursts to blow out any loose dust and debris from the port. Aim the air nozzle into the connector to dislodge particles.
- Brush or wipe (if needed): If compressed air isn’t enough, gently use a soft brush or a lint-free cloth to wipe away any remaining dirt or grime. Be careful not to bend the pins inside the port.
- Apply contact cleaner (for corrosion or stubborn dirt): If you notice corrosion or sticky residue, lightly spray a small amount of electrical contact cleaner onto a lint-free cloth. Then, gently wipe the inside of the OBD2 port and the pins. Allow the cleaner to evaporate completely before using the port. Always follow the manufacturer’s instructions on the contact cleaner.
Step 5: Test the Connection
After cleaning, it’s a good idea to test the connection to ensure you’ve improved it. Plug in your OBD2 scan tool or code reader and see if it connects reliably and reads data without issues.
Maintaining a Clean OBD2 Port
To keep your OBD2 port in good condition, make cleaning it a part of your regular car maintenance routine. Check it periodically, especially if you frequently use the port or drive in dusty environments. A clean OBD2 port ensures reliable communication and can prevent potential diagnostic headaches down the road. By following these simple steps on how to clean your OBD2 port, you can maintain this important connection point in your vehicle.