Connecting an OBD2 Bluetooth adapter to your laptop can unlock a wealth of information about your vehicle’s health and performance. Whether you’re a seasoned mechanic or a car owner keen on understanding your vehicle better, this connection empowers you to diagnose issues, monitor real-time data, and ensure your car is running smoothly. This comprehensive guide will walk you through each step, ensuring a seamless connection between your OBD2 Bluetooth adapter and your laptop.
Step 1: Enabling Bluetooth on Your Laptop
Before attempting to connect your OBD2 adapter, the first crucial step is to ensure Bluetooth is enabled on your Windows laptop. Most modern laptops come with built-in Bluetooth capabilities.
For Laptops with Built-in Bluetooth:
Typically, Bluetooth is enabled by default, but it’s worth verifying.
- Click on the Start Menu (Windows icon) on your laptop.
- Go to Settings (gear icon).
- Select Devices.
- In the left sidebar, click on Bluetooth & other devices.
- Ensure the Bluetooth toggle is switched to ‘On’. If it’s off, simply click the toggle to enable it.
For Laptops Using a USB Bluetooth Adapter:
If your laptop doesn’t have built-in Bluetooth, or if you prefer using a dedicated USB adapter, you’ll need to install it and its drivers.
- Insert the USB Bluetooth adapter into an available USB port on your laptop.
- Install Drivers: Typically, Windows will automatically detect and install generic drivers. However, for optimal performance, it’s recommended to install the manufacturer’s drivers. These are usually provided on a CD that comes with the adapter or can be downloaded from the manufacturer’s website. Follow the instructions provided by the manufacturer to install the drivers correctly.
Once Bluetooth is enabled, you’re ready to move on to the next step.
Step 2: Locating Your Vehicle’s OBD-II Diagnostic Connector
The OBD-II (On-Board Diagnostics II) port is a standardized connector in your vehicle that allows access to the car’s computer system. Finding this port is essential for plugging in your OBD2 Bluetooth adapter.
- Standard Location: The OBD-II diagnostic connector is mandated to be located within the passenger compartment of your vehicle.
- Common Areas: The most common location is underneath the dashboard on the driver’s side. Look below the steering column and the driver’s side dash area.
- Hidden Ports: Sometimes, the connector might be hidden behind a small plastic cover, an ashtray, or a coin tray. You might need to gently remove these covers to access the port.
- Consult Your Vehicle Manual: If you’re having trouble locating it, your vehicle’s owner’s manual will have a diagram showing the exact location of the OBD-II port.
The OBD-II port is typically trapezoidal in shape with 16 pins. Once you’ve located it, ensure it’s easily accessible for the next step.
Step 3: Plugging in the OBD2 Bluetooth Adapter
With the OBD-II port located, you can now plug in your OBD2 Bluetooth adapter.
- Orientation: Align the OBD2 adapter with the port. It should only fit in one orientation.
- Insertion: Gently push the adapter into the OBD-II port. You should feel it click or fit snugly into place. Avoid using excessive force.
- LED Indicators: Once properly connected, the adapter should indicate that it’s receiving power. Typically, a ‘Power’ LED will illuminate, often in green. For models with Wi-Fi capabilities, a ‘Wi-Fi’ light may also start flashing.
Step 4: Turning the Ignition to the ‘ON’ Position
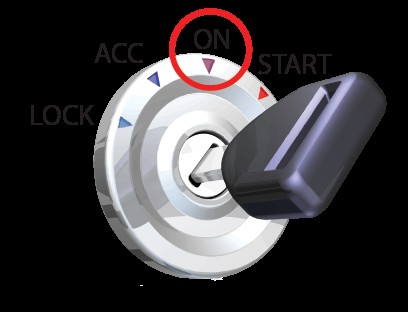
To allow the OBD2 adapter to communicate with your vehicle’s computer, you need to turn the ignition key to the ‘ON’ position. Do not start the engine yet.
- Insert Key: Insert your car key into the ignition.
- Turn to ‘ON’: Turn the key clockwise to the ‘ON’ position. This is usually the position right before you start the engine. In some vehicles, this position might be marked with the Roman numeral ‘II’. You should see the dashboard lights illuminate when the ignition is in the ‘ON’ position.
This step powers up your car’s electronic systems and the OBD-II port, allowing the adapter to establish a connection.
Step 5: Making the OBD2 Adapter Discoverable
Now, you need to make your OBD2 Bluetooth adapter discoverable so your laptop can find and connect to it. The process for this can vary slightly depending on the specific adapter model, but often involves pressing a button on the device.
- Locate ‘Connect’ Button: Find the ‘Connect’ or similar button on your OBD2 Bluetooth adapter.
- Press the Button: Press and release the ‘Connect’ button.
- Observe LED: Watch for the Bluetooth (BT) LED indicator on the adapter. It should start blinking rapidly, indicating that it’s in pairing mode and discoverable.
Important Time Limit: Be aware that many OBD2 adapters only stay in discoverable mode for a limited time, often around 2 minutes. If the pairing process takes longer, you might need to press the ‘Connect’ button again to re-enable discoverability.
Step 6: Pairing the OBD2 Adapter with Your Windows Laptop
With the OBD2 adapter in discoverable mode and Bluetooth enabled on your laptop, you can now pair the devices.
- Access Bluetooth Settings: On your Windows laptop, navigate back to the Bluetooth settings (Settings > Devices > Bluetooth & other devices).
- Add Bluetooth Device: Click on ‘Add Bluetooth or other device’.
- Select Bluetooth: In the ‘Add a device’ window, choose ‘Bluetooth’.
Windows will begin scanning for discoverable Bluetooth devices. After a few moments, your OBD2 adapter should appear in the list of devices, usually named ‘OBDLink’ or something similar depending on the brand.
- Select OBDLink Device: Click on the name of your OBD2 adapter in the list (e.g., ‘OBDLink’). Then, click ‘Pair’ or ‘Next’.
PIN Code or Numeric Comparison:
Depending on your laptop’s Bluetooth adapter, you might encounter one of two scenarios:
- Numeric Comparison: Some newer Bluetooth adapters use Numeric Comparison for pairing. If prompted to ‘Compare pairing codes’, simply select ‘Yes’ and click ‘Next’. You don’t need to enter any code in this case.
- PIN Code Request: Older Bluetooth adapters might require a PIN code. If you are asked to enter a PIN, use ‘1234’. This is a common default PIN for OBD2 Bluetooth adapters. Enter ‘1234’ and click ‘Connect’ or ‘Pair’.
- Pairing Confirmation: Once the pairing is successful, Windows will display a confirmation message indicating that the OBD2 adapter has been successfully connected.
If pairing fails, ensure the OBD2 adapter is still in discoverable mode (BT light blinking rapidly) and repeat Step 6.
Step 7: Installing OBD-II Diagnostic Software on Your Laptop
Pairing the Bluetooth connection is only half the battle. To actually read and interpret data from your vehicle, you need to install OBD-II diagnostic software on your laptop. Several software options are available, ranging from free to professional-grade paid applications.
OBDWiz (Example Software): The original article mentions OBDwiz, which is a compatible software for OBDLink adapters. You can download it from the provided link or find similar software compatible with your adapter and needs.
- Download Software: Download the OBDwiz software or your preferred OBD-II diagnostic software from a reputable source.
- Example Link (OBDWiz): Download OBDwiz
- Install Software: Run the downloaded installer file and follow the on-screen instructions to install the software on your laptop.
Important Pre-requisites: Before launching the software, ensure:
- Your OBD2 adapter is successfully paired with your Windows laptop (as confirmed in Step 6).
- Your vehicle’s ignition is in the ‘ON’ position (Step 4).
Step 8: Initial Software Setup and Adapter Detection
After installing the OBD-II software, you’ll need to configure it to communicate with your OBD2 Bluetooth adapter.
- Launch OBD-II Software: Open the OBDwiz application (or your chosen software) on your laptop.
- Auto-Detect Adapter: Most OBD-II software has an ‘Auto Detect’ or ‘Connection Setup’ feature. In OBDwiz, you’ll find an ‘Auto Detect’ button. Click this button.
The software will automatically scan for available COM ports and Bluetooth connections to find your OBD2 adapter.
- Confirmation: Once detected, you should see a confirmation dialog box indicating that your OBD2 adapter has been found and configured.
Step 9: Connecting to Your Vehicle’s ECU
With the software configured and the adapter detected, the final step is to establish a connection to your vehicle’s Engine Control Unit (ECU) to start retrieving data.
- Click ‘Connect’: In the OBD-II software, locate and click the ‘Connect’ button. In OBDwiz, this button is prominently displayed.
- Protocol Detection: The software will initiate automatic protocol detection to determine the specific OBD-II protocol used by your vehicle. A status screen will usually display the progress of this detection.
- ECU Selection (If Applicable): Some vehicles have multiple ECUs on the OBD-II network. The software might prompt you to select an ECU to connect to, often recommending the ECU reporting the most ‘Supported PIDs’ (Parameter IDs). Click ‘Continue’ to proceed.
Step 10: Accessing Vehicle Data and Diagnostics
Congratulations! You’ve successfully connected your OBD2 Bluetooth adapter to your laptop. You can now access a wealth of vehicle data and diagnostic functions through your OBD-II software.
- Explore Software Features: Familiarize yourself with the features of your OBD-II software. Typically, you’ll find options to:
- Read and clear ‘Check Engine’ light codes: Diagnose and reset trouble codes.
- Monitor Real-time Data: View live sensor readings like engine temperature, RPM, speed, and more.
- Check Emissions Readiness: Verify if your vehicle is ready for emissions testing.
- Log Trips and Performance Data: Record driving data for analysis.
- Navigate Tasks and Tabs: Most software organizes features into tasks or modules accessible from a sidebar or menu. Within each task, you’ll find tabs for more specific information and actions.
- Use Action Buttons: Look for action buttons within each tab to initiate specific functions, such as reading codes, starting data logging, or running tests.
By following these steps, you can effectively connect your OBD2 Bluetooth adapter to your laptop and begin exploring your vehicle’s diagnostics and performance data. This powerful combination of tools and knowledge empowers you to take better care of your vehicle and understand its inner workings.

