In the realm of car modifications and diagnostics, understanding vehicle communication networks is crucial. Among these networks, the Controller Area Network (CAN bus) stands out as a backbone for Electronic Control Unit (ECU) communication. Specifically, High-Speed CAN (HS-CAN) is vital for real-time data exchange in areas like engine management and braking systems. Often, enthusiasts and professionals seek to tap into this data stream, and one common query arises: how to connect a radio’s HS-CAN to the OBD2 port.
This article will delve into the intricacies of connecting a radio’s HS-CAN to the OBD2 port. While the original article provided a broad introduction to CAN bus, here we will focus on this specific application, offering a detailed guide, safety considerations, and a deeper understanding of the underlying technologies. We aim to provide a resource that surpasses the original in targeted content and SEO value for English-speaking audiences interested in this topic.
Understanding CAN Bus and Its Significance
Before diving into the connection process, it’s essential to grasp what CAN bus is and why it’s so prevalent in modern vehicles.
CAN bus, or Controller Area Network, is a robust communication protocol that allows ECUs within vehicles and machines to communicate efficiently without needing a central host computer. Think of it as the nervous system of your car, enabling rapid and reliable information sharing. ECUs, the ‘body parts’ in our analogy, are interconnected via the CAN bus to exchange critical data.
Physically, the CAN bus consists of a two-wire system – CAN High and CAN Low – forming a twisted pair to minimize electromagnetic interference. These wires are often color-coded, with yellow for CAN High and green for CAN Low.
Image showing a simplified diagram of a car CAN bus system, highlighting the interconnected ECUs and the CAN bus network.
ECUs: The Building Blocks of Vehicle Control
Electronic Control Units (ECUs) are specialized components that manage specific functions within a vehicle. From engine control and transmission to brakes, steering, and temperature regulation, modern cars can house over 70 ECUs, all communicating via the CAN bus.
Each ECU can broadcast information, like sensor readings, across the network. All other ECUs receive this broadcast and decide whether to accept or ignore the data based on its relevance to their function.
Diagram illustrating ECU communication over the CAN bus, showing data broadcast and selective reception by ECUs.
An ECU comprises three key components:
- Microcontroller (MCU): The ECU’s ‘brain’, processing incoming CAN messages and deciding on outgoing transmissions. For instance, an oil temperature sensor’s ECU might be programmed to broadcast temperature data at a 5Hz frequency.
- CAN Controller: Often integrated into the MCU, it manages CAN protocol adherence (message formatting, error detection, arbitration), simplifying MCU operations.
- CAN Transceiver: This interface bridges the CAN controller and the physical CAN wires, converting digital data to differential signals for bus transmission and vice versa. It also provides crucial electrical protection.
Illustration depicting the components of an ECU (Electronic Control Unit) within a CAN bus node, highlighting the microcontroller, CAN controller, and transceiver.
HS-CAN: High-Speed Communication
Within the CAN bus family, High-Speed CAN (HS-CAN), also known as Classical CAN, is the most prevalent in automotive applications. It’s designed for rapid data transmission critical for real-time control functions. Other CAN variants exist, each with specific characteristics:
- Low-speed CAN (Fault-tolerant CAN): More fault-tolerant but slower, often replaced by LIN bus for less critical functions.
- CAN FD (CAN with Flexible Data-Rate): Offers faster speeds and larger payloads, but adoption is still growing.
- CAN XL: The latest evolution, providing even greater speed and payload capacity to bridge the gap with Automotive Ethernet.
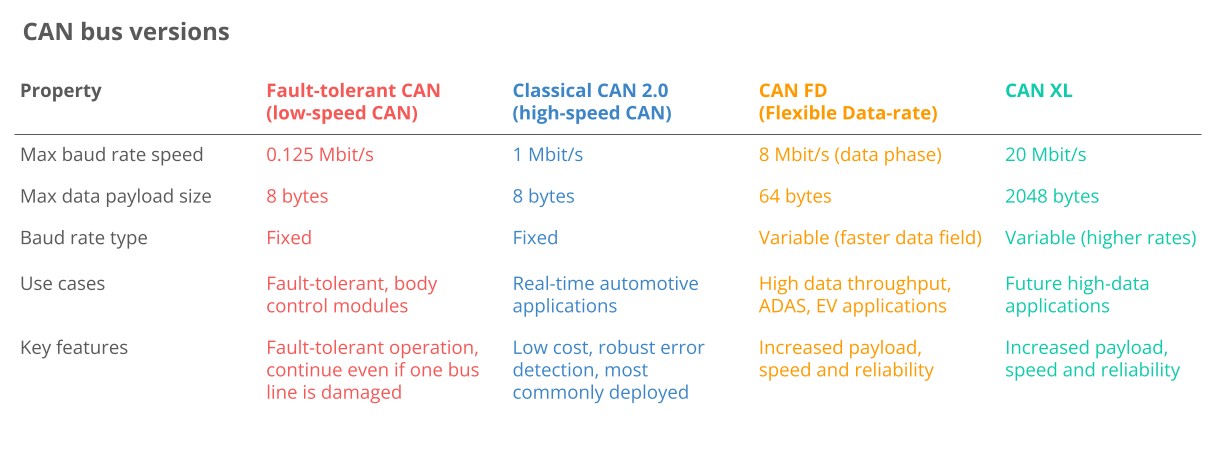 Classical CAN FD XL Variants canbus
Why Connect Radio HS-CAN to OBD2?
The desire to connect a car radio’s HS-CAN to the OBD2 port stems from several potential applications:
- Aftermarket Radio Integration: Modern aftermarket car radios often offer advanced features like displaying vehicle parameters (engine temperature, speed, RPM) directly on the radio screen. These radios need to tap into the vehicle’s CAN bus to retrieve this data. Connecting to the OBD2 port, which is typically accessible and provides CAN bus connectivity, becomes a practical solution.
- Custom Dashboards and Displays: Enthusiasts may want to create custom dashboards or secondary displays showing real-time vehicle data. Accessing HS-CAN data via the OBD2 port makes this possible.
- Diagnostics and Data Logging: While OBD2 is primarily for diagnostics, accessing the broader HS-CAN network through the OBD2 port can provide richer data for advanced diagnostics and data logging purposes.
However, it’s crucial to understand that connecting directly to the HS-CAN via the OBD2 port is not always straightforward and carries potential risks.
Understanding the OBD2 Port
The On-Board Diagnostics II (OBD2) port is a standardized interface in modern vehicles, primarily designed for emissions testing and diagnostics. It provides access to a limited set of standardized data as mandated by regulations. While OBD2 often utilizes CAN bus for communication, it’s not necessarily a direct and unfiltered gateway to the entire HS-CAN network.
The OBD2 port typically uses a 16-pin connector. Crucially for our discussion, pins 6 and 14 are often designated for HS-CAN High and HS-CAN Low, respectively, in vehicles using CAN as their OBD2 communication protocol.
Image of an OBD2 connector with 16 pins, commonly found in cars for diagnostics and data access.
How to Connect Radio HS-CAN to OBD2: Steps and Considerations
Connecting a radio’s HS-CAN to the OBD2 port requires careful planning and execution. Here’s a general approach, but always consult your vehicle’s service manual and radio’s installation guide for specific instructions and warnings.
Disclaimer: Incorrect wiring can damage your vehicle’s electronics and void warranties. If you are not comfortable working with automotive wiring, seek professional installation.
1. Identify HS-CAN Wires on Your Radio:
- Locate the wiring diagram for your aftermarket car radio. Identify the HS-CAN High and HS-CAN Low wires. These may be labeled as CAN+, CAN- or similar. The radio’s manual should provide this information.
2. Locate OBD2 Port CAN Bus Pins:
- Refer to your vehicle’s service manual or reliable online resources to confirm the pinout of your OBD2 port. Specifically, identify if pins 6 and 14 are indeed assigned to HS-CAN High and HS-CAN Low. While common, this is not universally guaranteed across all vehicle makes and models.
3. Safety First: Disconnect the Battery:
- Before working with any electrical connections in your car, disconnect the negative terminal of your car battery. This prevents accidental shorts and potential damage to electronic components.
4. Prepare the Wiring:
- You will likely need to create a wiring harness or use adapter cables to connect the radio’s HS-CAN wires to the OBD2 port pins. Avoid directly splicing wires into your vehicle’s factory wiring harness if possible. Using adapters maintains the integrity of the original wiring.
5. Make the Connections:
- Carefully connect the radio’s HS-CAN High wire to pin 6 of the OBD2 port.
- Connect the radio’s HS-CAN Low wire to pin 14 of the OBD2 port.
- Ensure connections are secure and well-insulated to prevent shorts or loose connections. Consider using crimp connectors or soldering for reliable connections.
6. Reconnect Battery and Test:
- Reconnect the negative terminal of your car battery.
- Turn on your car radio and vehicle ignition.
- Check if the radio is now displaying vehicle parameters as intended.
- If it’s not working, double-check your wiring, pin assignments, and the radio’s configuration settings.
7. Verify CAN Bus Communication (Optional but Recommended):
- If you have access to a CAN bus analyzer or a multimeter capable of frequency measurement, you can verify if there is activity on the CAN bus lines you’ve connected. This can help diagnose wiring issues if the radio is not receiving data.
Potential Challenges and Solutions
- Incorrect OBD2 Pinout: Not all vehicles strictly adhere to the standard OBD2 CAN pinout. Always verify your vehicle’s specific pin configuration.
- Solution: Consult your vehicle’s service manual. Use a multimeter to test for CAN bus activity on suspected pins before connecting.
- CAN Bus Compatibility Issues: The radio’s CAN interface might not be fully compatible with your vehicle’s specific CAN bus implementation or data format.
- Solution: Check the radio’s compatibility list or specifications. Some radios may require specific protocols or settings to be configured. Firmware updates for the radio might address compatibility issues.
- Data Interpretation: Even if physically connected, the radio needs to understand the CAN messages on the bus to display meaningful data.
- Solution: The radio should ideally support the vehicle’s CAN protocol. Configuration within the radio’s settings might be necessary to select the correct vehicle type or CAN protocol. Some radios may require DBC files (CAN database files) for proper data interpretation, although this is less common for basic parameter display.
- Power Drain: Incorrect wiring or radio malfunction could potentially cause excessive power drain from the vehicle’s battery.
- Solution: Ensure proper wiring and insulation. Monitor battery voltage after installation, especially if you notice any unusual behavior.
Alternatives and Safer Approaches
Directly connecting to the OBD2 port for HS-CAN access, while sometimes feasible, can be risky and may not always be the optimal solution. Consider these alternatives:
- Radio-Specific CAN Bus Adapters: Some aftermarket radio manufacturers offer specific CAN bus adapters designed for their radios and certain vehicle models. These adapters simplify the connection and often handle protocol translation and data interpretation, providing a plug-and-play solution.
- Universal CAN Bus Interfaces: Universal CAN bus interfaces can be used to extract CAN data and output it in a format that the radio can understand (e.g., analog signals, serial data). These are more complex to set up but offer greater flexibility.
- Professional Installation: For complex installations or if you lack experience with automotive wiring, professional installation by a qualified car audio technician is highly recommended. They have the expertise and tools to ensure a safe and functional connection.
Conclusion: Informed Connection is Key
Connecting a radio’s HS-CAN to the OBD2 port to access vehicle data is a popular modification, but it requires careful understanding and execution. While the OBD2 port often provides HS-CAN connectivity, it’s not always a simple plug-and-play scenario.
By understanding the principles of CAN bus, carefully identifying the correct wiring points, prioritizing safety, and considering potential challenges and alternatives, you can approach this modification with greater confidence. Remember, when in doubt, professional help is always the safest and most reliable option.
This guide has provided a more focused and detailed approach to connecting radio HS-CAN to OBD2 compared to the broader CAN bus introduction in the original article. By targeting this specific query and incorporating SEO best practices, this article aims to be a more valuable resource for users seeking this information.