The OBD2 connector, your car’s diagnostic port, is essential for vehicle maintenance and troubleshooting. It’s the gateway for mechanics and DIYers to access crucial data about your car’s health. If this connector is damaged, diagnosing and fixing car problems becomes significantly harder. While OBD2 connector repair might seem straightforward, it often presents unexpected challenges. This guide will walk you through understanding, diagnosing, and fixing your OBD2 connector, ensuring you can get back to reading your car’s vital signs.
Understanding the OBD2 Connector
What is an OBD2 Connector?
The On-Board Diagnostics II (OBD2) connector is a standardized 16-pin interface present in all cars manufactured from 1996 onwards. This standardization is a boon for car owners and technicians because it allows any generic OBD2 scanner to retrieve standardized diagnostic information, regardless of the car manufacturer. This access includes essential data mandated by the standard, but it’s important to note that automakers also have proprietary data beyond the OBD2 standard, which usually requires specialized tools to access.
OBD2 Pinout Explained
The 16 pins of the OBD2 connector are assigned specific functions, creating a communication network within your vehicle. Here’s a breakdown of common pin assignments:
- Pin 1: Manufacturer Discretion
- Pins 2 & 10: SAE J1850 network (common in older American vehicles)
- Pin 3: Manufacturer Discretion
- Pin 4: Chassis Ground
- Pin 5: Signal Ground
- Pins 6 & 14: CAN bus high and low (Controller Area Network, the dominant modern standard)
- Pins 7 & 15: ISO 9141 K-Line (older ISO standard)
- Pins 8, 9, 11, 12, 13: Manufacturer Discretion
- Pin 16: Battery Positive (constant power, even when the key is off)
Understanding these pin positions is crucial for diagnosing electrical issues within the connector.
Common OBD2 Connector Problems
While robust, OBD2 connectors are susceptible to damage, and pinpointing the cause is the first step in effective repair.
Pin 16 Damage: The Usual Suspect
Pin 16, providing constant battery power, is frequently the victim of damage. Why is this pin so vulnerable?
-
Fuse Issues: A blown fuse on the circuit powering pin 16 is a common culprit. This might be triggered by poorly designed aftermarket accessories drawing excessive power or an overload on a shared circuit. While a blown fuse itself won’t damage the terminal, improper testing methods can. Inserting probes incorrectly while checking for power can physically damage the pin and connector housing. In fact, damage from careless testing is a leading cause of OBD2 connector problems.
-
Aftermarket Accessories: The rise of OBD2 port accessories like insurance dongles, GPS trackers, and performance monitors contributes significantly to connector wear and tear. Lower quality aftermarket devices can have oversized male pins that stretch and damage the delicate female terminals within the car’s OBD2 connector. Furthermore, some accessories draw excessive and continuous current from pin 16. While not enough to immediately blow a fuse, this constant drain exceeds the connector’s design specifications, intended for intermittent use with diagnostic tools, not continuous power supply to external devices.
Is OBD2 Connector Replacement Straightforward?
Despite the OBD2 standard aiming for uniformity, replacing these connectors is not always as simple as it should be. While any standard male OBD2 connector will physically plug into any female OBD2 port, the mounting and terminal configurations vary significantly between car manufacturers and even models. Connector suppliers offer a vast array of plastic housings and metal terminals, highlighting the lack of true interchangeability beyond basic plug compatibility.
DIY vs. Professional OBD2 Connector Repair
Deciding whether to tackle OBD2 connector repair yourself or seek professional help depends on your skills, tools, and the extent of the damage.
DIY Repair might be suitable if:
- You are comfortable with basic automotive electrical work.
- You have access to tools like wire strippers, crimpers, soldering iron (optional), and heat shrink tubing.
- The damage is limited to a few pins or the connector housing itself.
- You are meticulous and patient.
Professional Repair is recommended if:
- You are not comfortable with electrical work.
- You lack the necessary tools.
- The damage is extensive or involves wiring harness issues.
- You prefer a guaranteed repair and don’t want to risk further complications.
Finding the Right OBD2 Connector Parts
Sourcing replacement parts is a critical aspect of OBD2 connector repair. You have a few options, each with its own pros and cons.
Dealer Parts: The Ideal but Challenging Route
Using genuine OEM (Original Equipment Manufacturer) parts from your car dealership is generally the best approach for quality and compatibility. However, dealerships often don’t sell the complete OBD2 connector assembly as a separate part number.
For example, Toyota might not list a complete OBD2 connector in their parts catalog. However, by consulting the vehicle’s electrical wiring diagrams on Toyota Information System (TIS) and clicking on the OBD2 connector in the diagram, you can often find the part number for the plastic connector housing itself.
Even older service manuals, predating electronic diagrams, may contain connector part number information listed by wiring diagram codes.
Finding the correct metal terminals to fit the connector housing is a further hurdle. Dealership parts departments might struggle to identify the correct terminals. In some cases, resourceful dealerships might have experienced staff or technicians who can identify terminals or even provide salvaged terminals from old harnesses.
For Toyota, part number 82998-05010 is reported to be a compatible terminal (with pigtail wire attached) for some models like the Gen3 Prius and potentially others. However, these individual terminals from dealerships can be surprisingly expensive, costing upwards of $20 per terminal.
Aftermarket Connectors: Proceed with Caution
Online marketplaces like Amazon offer seemingly affordable aftermarket OBD2 connectors, sometimes around $12. While tempting due to the low price, these should be approached with caution.
A primary issue is the mounting compatibility. These generic connectors often don’t fit the original car’s mounting brackets, requiring makeshift solutions like self-tapping screws, which are not ideal for long-term durability or a professional finish.
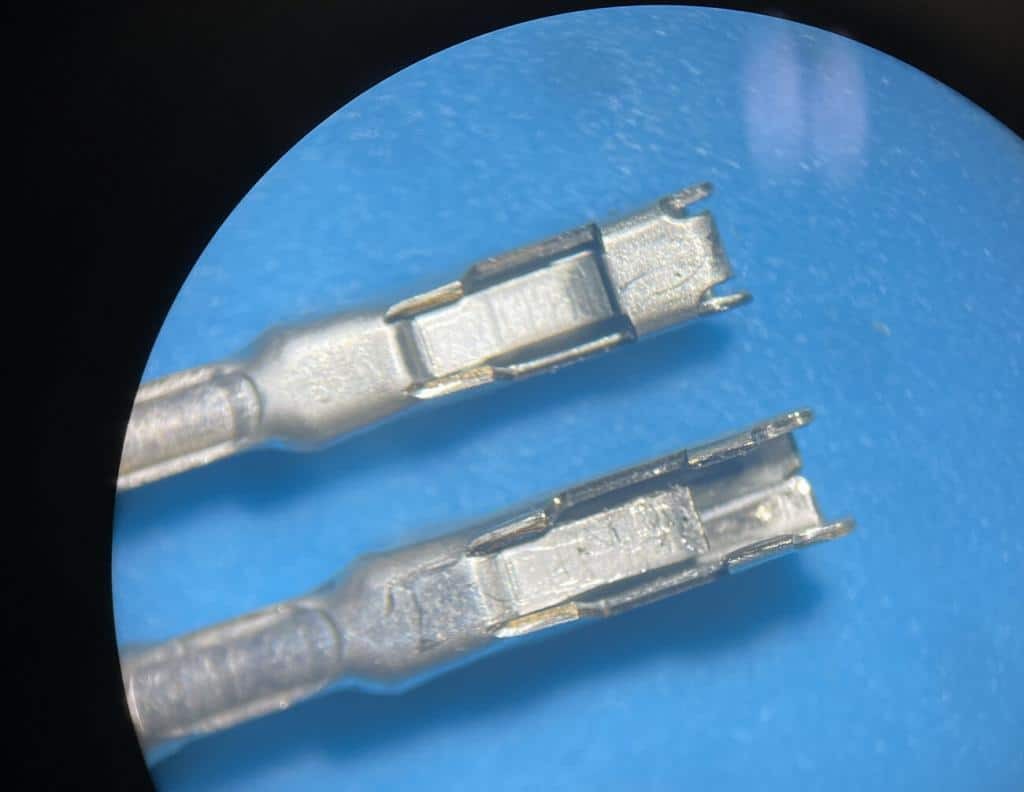
More importantly, the quality of the terminals in these cheap aftermarket connectors is often subpar. The metal used can be soft and lack the springiness of OEM terminals, leading to unreliable connections and potentially short-lived repairs. While they might initially “fix” the problem, their longevity is questionable.
Considering the labor involved in replacing an OBD2 connector – which can easily take 1.5 to 2 hours including dashboard disassembly, wiring, soldering, and reassembly – using substandard parts is a false economy. The risk of premature failure and repeat repairs outweighs the initial cost savings.
Reputable Parts Suppliers
For a balance of quality and availability, consider specialized connector suppliers like Connector Experts. They offer reproductions of OE connectors and terminals. Their terminal TERM86 has been reported as a compatible and high-quality alternative, comparable to OEM terminals but significantly more affordable.
Distributors like Mouser Electronics also carry a wide range of automotive connectors and terminals. However, navigating their extensive catalog to find the exact parts can be challenging and time-consuming.
General Steps for OBD2 Connector Repair
While specific steps vary by vehicle, here’s a general overview of the OBD2 connector repair process:
- Diagnosis: Identify the specific problem. Is it a damaged pin, broken connector housing, or wiring issue? Use a multimeter to check for power and ground at the appropriate pins.
- Parts Sourcing: Obtain the correct replacement connector housing and terminals. Decide between OEM, reputable aftermarket, or salvaged parts.
- Disassembly: Carefully remove the lower dash panels to access the OBD2 connector and its wiring. Take photos as you disassemble to aid in reassembly.
- Disconnect Battery: Disconnect the negative battery terminal to prevent electrical shorts during wiring work.
- Terminal Removal (if necessary): If only replacing terminals, carefully remove the damaged terminals from the connector housing using a terminal removal tool if available, or small precision screwdrivers. Note the wire colors and positions before removal.
- Wiring and Crimping: If replacing the entire connector or individual terminals with pigtails, you’ll need to cut and splice wires. Solder and heat shrink connections for the most reliable and durable repair. Crimping new terminals onto wires requires specialized crimping tools designed for small, open-barrel terminals commonly used in automotive connectors.
- Connector Assembly: Insert the new terminals into the connector housing, ensuring they are securely locked in place.
- Reassembly: Reconnect the OBD2 connector, carefully route the wiring, and reassemble the dash panels.
- Testing: Reconnect the battery and test the OBD2 connector with a scan tool to ensure it is functioning correctly and communicating with the vehicle’s computer.
Tips for a Successful OBD2 Connector Repair
- Patience is Key: OBD2 connector repair often involves working in tight spaces and with delicate components. Take your time and avoid rushing.
- Document Everything: Take pictures of wiring and connector positions before disassembly to ensure correct reassembly.
- Use Quality Tools: Invest in a good set of wire strippers and crimpers designed for automotive terminals. Proper crimping is essential for reliable electrical connections.
- Soldering is Best: While crimping is acceptable, soldering and heat shrinking wire splices provide a more robust and corrosion-resistant connection, especially in harsh under-dash environments.
- Double-Check Pinout: Always verify the correct pinout for your specific vehicle model to avoid wiring errors.
Conclusion
Fixing an OBD2 connector, while seemingly simple, can quickly become complex due to part sourcing challenges and the intricacies of automotive electrical systems. By understanding the common issues, sourcing quality parts, and taking a methodical approach, you can successfully repair your OBD2 connector. However, if you are unsure or uncomfortable with any aspect of the repair, seeking assistance from a qualified automotive technician is always a wise decision to ensure a reliable and lasting fix.