For many drivers, a dashboard warning light can trigger immediate anxiety. While some might feel confident tackling mechanical issues, most of us reach for the vehicle manual, desperately flipping pages to decipher the cryptic symbols. But there’s a simpler, more direct approach: using an OBD2 code reader to understand what your car is trying to tell you.
If you’re a car owner, understanding how to read and interpret OBD2 codes is an incredibly valuable skill. It empowers you to take control when that dreaded “Check Engine” light illuminates, saving you time and potentially costly trips to the mechanic.
For businesses managing vehicle fleets, alongside utilizing top-tier fleet management software and GPS tracking solutions, mastering OBD2 codes becomes an integral part of proactive vehicle maintenance. This knowledge can significantly enhance your fleet management strategy, ensuring vehicles are running efficiently and minimizing downtime.
When the Check Engine light comes on, it’s your car’s way of signaling a problem. This could range from minor issues like a loose gas cap to more significant concerns within the fuel system, ignition, transmission, engine control unit (ECU), or emissions controls. This is where understanding OBD2 codes becomes invaluable.
Modern vehicles are equipped with onboard diagnostic systems (OBD-II) that act like your car’s internal health monitor. When an issue arises, the OBD-II system logs a five-character Diagnostic Trouble Code (DTC), also known as an OBD2 code. This code provides a concise summary of the problem.
By using an affordable OBD2 scanner, you can easily retrieve these codes from your vehicle, giving you a crucial head start in diagnosing the issue. Let’s walk through a straightforward, step-by-step guide on how to read OBD2 codes and begin to understand what they mean, so you can get your car back in top shape.
Preparing to Read OBD2 Codes
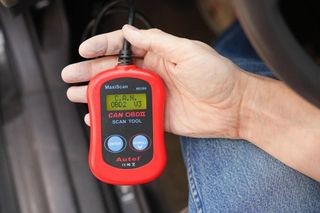
Reading OBD2 codes is a remarkably accessible process, requiring only an OBD2 scanner. These scanners are readily available online or at auto parts stores, with prices typically ranging from $20 to $100 depending on features. The scanner itself is a handheld device with a distinctive 16-pin trapezoidal connector designed to plug into your car’s OBD2 port. No additional tools are necessary – just your scanner and access to your vehicle’s interior.
An OBD-II scan tool, like the CAN OBDII MaxiScan MS300 from Autel, is essential for reading diagnostic codes.
Step 1: Locate and Plug in Your OBD2 Scanner
Your OBD2 scanner is equipped with a 16-pin trapezoidal connector, specifically designed to fit snugly into your vehicle’s OBD2 port, also known as the Diagnostic Link Connector (DLC). The location of this port varies slightly between vehicles, but it’s most commonly found under the driver’s side dashboard, in the vicinity of the pedals. In less frequent cases, it might be situated in the center console area or beneath the glove compartment. Consult your vehicle’s owner’s manual if you’re unsure of the exact location of your DLC.
Step 2: Turn the Ignition to the “On” Position
Insert your key into the ignition and turn it to the “On” position. Crucially, do not start the engine. Turning the ignition to “On” provides power to your OBD2 scanner, initiating communication with your car’s onboard computer system. You should observe a message on the scanner’s screen, such as “Establishing link to OBDII” or similar, indicating that the connection process is underway.
If your scanner fails to power on after switching the ignition, first double-check the physical connection between the scanner and the OBD2 port pins to ensure it’s secure. If it still doesn’t power up, investigate your car’s auxiliary power outlet (often the cigarette lighter). The OBD-II system shares its power circuit with this outlet. If the power outlet isn’t functioning, it suggests a potential issue with the circuit, which would also prevent your OBD2 scanner from working.
Step 3: Input Vehicle Information (If Prompted)
Certain OBD2 scanners, particularly more advanced models, may prompt you to enter your Vehicle Identification Number (VIN), along with the make, model, and engine type of your car. Providing this information enhances the scanner’s diagnostic accuracy. Some OBD2 codes are manufacturer-specific, and this detailed vehicle information allows the scanner to provide more precise and relevant interpretations of the codes it retrieves.
Step 4: Navigate to the “Codes” or “Trouble Codes” Menu
Once your scanner is connected and powered on, use its interface to navigate to the main menu. Look for an option labeled “Codes,” “Trouble Codes,” “Read Codes,” or something similar. The exact menu names and navigation will vary slightly depending on the specific brand and model of your OBD2 scanner.
Within the codes menu, you’ll often encounter a choice between “Active Codes” and “Pending Codes.” Active Codes represent current malfunctions that are actively triggering your Check Engine light to remain illuminated. Pending Codes, on the other hand, indicate errors that have occurred at least once but haven’t yet triggered the Check Engine light to stay on. If a pending error recurs, it will typically be elevated to an Active Code, and the Check Engine light will then activate.
The Nexpeak OBD2 NX501 ODB scanner offers a user-friendly interface for accessing and interpreting OBD2 codes.
Step 5: Deciphering the First Character of the OBD2 Code
With the OBD2 code displayed on your scanner, the next step is to understand its structure and meaning. Each of the five characters in the code provides specific information about the nature and location of the problem. The very first character sets the stage, giving you a broad category of the issue.
- P (Powertrain): Indicates a problem within the powertrain system. This encompasses the engine, transmission, and related components.
- B (Body): Signals an issue within the body system. This can relate to components like airbags, power windows, or central locking.
- C (Chassis): Points to a problem in the chassis system, which includes components like the anti-lock braking system (ABS) and steering.
- U (Network Communication): Denotes an issue with the vehicle’s network communication system, which manages data exchange between various electronic control units.
Step 6: Understanding the Second Character: Generic vs. Manufacturer-Specific
The second character in the OBD2 code clarifies whether the identified problem is a generic issue or manufacturer-specific. When the OBD2 standard was established, the Society of Automotive Engineers (SAE) defined a set of standardized codes for common problems that could occur across most vehicle makes and models. These are known as generic codes.
However, vehicle manufacturers sometimes incorporate proprietary systems or components not fully covered by the generic codes. Therefore, they have the ability to add their own manufacturer-specific codes to provide more detailed diagnostics for their particular vehicles.
To determine if you’re dealing with a generic or manufacturer-specific code, look at the first two characters together:
- Generic Codes: If the first two characters are P0, P2, P34-P39, B0, B3, C0, C3, U0, or U3, the issue is considered generic and defined by the OBD2 standard.
- Manufacturer-Specific Codes: If the first two characters are P1, P30-P33, B1, B2, C1, C2, U1, or U2, the problem is manufacturer-specific. This means the code is defined by the vehicle manufacturer and might require more specialized knowledge to interpret fully.
In practice, you’ll often encounter codes starting with P0 or P1, signifying that the issue lies somewhere within the powertrain system, which is the most common area for faults.
The Autel AutoLink AL539 OBD scanner provides code definitions directly on its screen, simplifying the diagnostic process.
Step 7: Delving Deeper with the Third Character
The third character of the OBD2 code provides even more granular detail, pinpointing the specific subsystem within the broader category identified by the first character. The interpretation of this third character is context-dependent, varying based on whether the first character indicated a powertrain (P), body (B), chassis (C), or network communication (U) issue.
Let’s focus on powertrain (P) issues as they are the most frequent. In this case, the third character provides subsystem information as follows:
- 1: Fuel or Air Metering System problem (e.g., issues with sensors measuring airflow or fuel mixture).
- 2: Fuel or Air Metering Injection System issue (e.g., problems with fuel injectors).
- 3: Ignition System or Misfire problem (e.g., faulty spark plugs or ignition coils).
- 4: Auxiliary Emission Controls System error (e.g., problems with the catalytic converter or oxygen sensors).
- 5: Vehicle Speed Controls or Idle Control System issue (e.g., problems with the idle air control valve).
- 6: Computer Output Circuit problem (e.g., issues with sensors or actuators controlled by the ECU).
- 7, 8, 9: Transmission System problem.
Step 8: Pinpointing the Exact Fault with the Final Characters
The final two characters of the five-character OBD2 code are the most specific. They narrow down the problem to a precise fault within the subsystem identified by the preceding characters. With thousands of potential OBD2 codes defined, memorizing them all is impractical.
To get the exact meaning of your specific code and understand how to address the issue, the most efficient approach is to use online OBD code interpretation websites. Reputable resources like OBD-Codes.com maintain comprehensive databases of OBD2 codes. Simply enter the full five-character code into the website’s lookup tool, and it will provide a detailed description of the fault, potential causes, and often suggested repair steps.
[
OBD-Codes.com is a valuable online resource for quickly looking up and understanding the meaning of specific OBD2 codes.](https://www.obd-codes.com/)
In Conclusion
Modern vehicles have made self-diagnosis significantly more accessible thanks to OBD2 systems and codes. By using an OBD2 scanner, you can quickly and easily determine the reason behind your Check Engine light. The five-character OBD2 code provides a structured breakdown of the problem, allowing you to understand the affected vehicle system and even begin to interpret the code’s meaning yourself.
While you can decipher the general category and subsystem from the code structure, the sheer number of possible codes makes online OBD code lookup websites indispensable for pinpointing the exact fault and gaining insights into potential solutions. Armed with this knowledge, you can approach car repairs with greater confidence and make informed decisions about maintenance and troubleshooting.