Navigating the complexities of vehicle diagnostics can be daunting, especially when faced with a check engine light in an older car. While modern vehicles utilize the standardized OBD2 system, older models, typically from before the mid-1990s, employ the OBD1 system. This difference poses a challenge when you’re trying to diagnose issues using today’s readily available OBD2 scanners. The burning question then becomes: how can you read OBD1 codes using OBD2 technology? This guide will walk you through the methods and understanding needed to bridge this diagnostic gap and effectively troubleshoot your older vehicle.
Understanding OBD1 and OBD2 Systems
Before diving into reading codes, it’s crucial to understand the fundamental differences between OBD1 and OBD2. OBD1, or On-Board Diagnostics generation 1, was not a standardized system. Each manufacturer had its own diagnostic connector, communication protocol, and code structure. This meant a diagnostic tool for a Ford OBD1 vehicle wouldn’t necessarily work on a GM OBD1 vehicle. Codes were often read through blinking lights or analog voltmeters, and deciphering them could be manufacturer-specific and less intuitive.
OBD2, or On-Board Diagnostics generation 2, emerged as a standardized system, mandated in the United States for all cars manufactured from 1996 onwards. OBD2 brought universal diagnostic connectors (the trapezoid 16-pin DLC), standardized diagnostic trouble codes (DTCs), and communication protocols. This standardization simplified vehicle diagnostics, allowing for universal scanners to read codes across different makes and models. However, this very standardization also creates the challenge when dealing with older OBD1 vehicles. Directly plugging an OBD2 scanner into an OBD1 port (if a physical port even exists in the OBD1 standard location) will not work due to incompatible communication protocols and connector types.
 OBD 1 codes
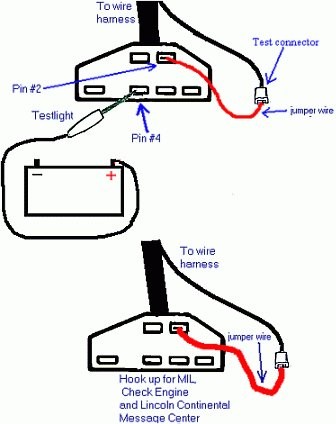
OBD1 Diagnostic Trouble Codes Displayed, illustrating the older vehicle diagnostic system which requires different reading methods compared to OBD2
Methods to Read OBD1 Codes
While you can’t directly use an OBD2 scanner on an OBD1 system without adaptation, there are several methods to retrieve those crucial diagnostic codes.
1. The Paperclip or Test Light Method (For Basic OBD1 Systems)
For many early OBD1 systems, particularly those from the late 80s and early 90s, you can retrieve codes using a simple jumper wire or test light. This method relies on accessing the diagnostic connector, which is typically located in the engine bay, often near the firewall or fender well, and not under the dashboard like OBD2 ports.
Steps:
- Locate the OBD1 Diagnostic Connector: Consult your vehicle’s repair manual to find the exact location and type of diagnostic connector. Common types include ALDL connectors, which may be 12-pin or other configurations.
- Identify Diagnostic Terminals: Again, your repair manual is essential here. You need to identify the specific terminals on the connector designated for diagnostic code retrieval. Often, these are labeled “TE1” and “E1” or similar.
- Prepare Jumper Wire or Test Light: A simple paperclip bent into a U-shape or a 12-volt test light will work.
- Bridge the Terminals: With the ignition off, use the jumper wire or test light to bridge the identified diagnostic terminals (e.g., TE1 and E1).
- Turn Ignition ON (Engine OFF): Turn the ignition key to the “ON” position, but do not start the engine.
- Observe Check Engine Light: The check engine light (or service engine soon light) will begin to flash in a pattern. This pattern represents the diagnostic trouble codes.
- Count the Flashes: The codes are usually displayed in two-digit numbers. A code is indicated by a series of flashes, a short pause, another series of flashes, a longer pause, and then the sequence repeats for the next code. For example, “flash, flash, pause, flash, flash, flash, flash” would represent code 24. Code 12 is often displayed at the beginning and end of the sequence as a system check – ignore this.
- Decode the Codes: You’ll need an OBD1 code chart specific to your vehicle’s make, model, and year to interpret the flash patterns into meaningful trouble codes. These charts are readily available online or in repair manuals.
2. Using a Dedicated OBD1 Scanner
While not as universally available as OBD2 scanners, dedicated OBD1 scanners do exist. These tools are designed to connect to the specific diagnostic connectors and communicate using the protocols of OBD1 systems.
Benefits:
- More User-Friendly: OBD1 scanners typically display the codes directly in text or numerical format, eliminating the need to count flashes.
- Wider Code Coverage: Some OBD1 scanners can access a broader range of codes and potentially offer more advanced diagnostic features compared to the paperclip method.
Considerations:
- Cost: OBD1 scanners can be more expensive and harder to find than OBD2 scanners.
- Vehicle Specificity: Some OBD1 scanners may still be manufacturer or vehicle-specific, so ensure compatibility before purchasing.
3. Using an OBD2 Scanner with an OBD1 Adapter (Bridging the Gap)
This method directly addresses the question of reading OBD1 codes with OBD2. While a standard OBD2 scanner cannot directly interface with an OBD1 system, adapters are available that bridge the physical connector and, in some cases, the communication protocol gap.
How it Works:
- OBD1 to OBD2 Adapter Cable: Purchase an adapter cable specifically designed for your OBD1 vehicle and to connect to an OBD2 scanner. These adapters typically have an OBD1 connector on one end and an OBD2 female connector on the other.
- OBD2 Scanner Compatibility: Ensure your OBD2 scanner is compatible with OBD1 vehicles when used with an adapter. Not all OBD2 scanners are designed to interpret OBD1 signals even with an adapter. Look for scanners that explicitly state OBD1 compatibility or “legacy vehicle support.”
- Connect Adapter and Scanner: Connect the OBD1 end of the adapter cable to your vehicle’s OBD1 diagnostic port and the OBD2 end to your OBD2 scanner.
- Power On and Scan: Turn on your vehicle’s ignition (engine off) and power on your OBD2 scanner. Follow the scanner’s instructions for code retrieval. The scanner, when compatible and used with the correct adapter, should now be able to read and display OBD1 codes.
Important Notes for OBD2 Scanner with Adapter Method:
- Compatibility is Key: Thoroughly research adapter and scanner compatibility for your specific vehicle year, make, and model. Incompatibility can lead to inaccurate readings or no communication at all.
- Limited Functionality: Even with an adapter, the functionality of an OBD2 scanner on an OBD1 system may be limited compared to its capabilities on OBD2 vehicles. Advanced features like live data streaming or actuation tests might not be available.
- Code Interpretation: While the scanner may display codes in a more readable format, you will still need an OBD1 code chart specific to your vehicle to accurately interpret the meaning of the retrieved codes. The codes may not follow the standardized OBD2 P-code format.
Interpreting OBD1 Codes
Once you’ve retrieved OBD1 codes using any of the methods above, the next step is interpretation. Remember that OBD1 codes are not standardized, so you must use a code chart or code list specific to your vehicle’s make, model, and year.
General Code Categories (May Vary by Manufacturer):
- Engine Codes: Relate to engine management systems, sensors, fuel delivery, ignition, and emissions.
- Transmission Codes: Indicate issues within the automatic transmission system.
- ABS Codes: (If applicable) Pertain to the Anti-lock Braking System.
- Body Codes: (Less common in OBD1) May relate to body control modules or accessory systems.
Code Structure:
OBD1 codes are often two-digit numbers, but some manufacturers used three-digit or alphanumeric codes. The code charts will provide the specific meaning for each code in your vehicle’s system.
Common OBD1 Code Symptoms
Symptoms associated with OBD1 codes are similar to those in OBD2 vehicles – the check engine light is the primary indicator. However, you might also experience:
- Reduced Engine Performance: Hesitation, stalling, rough idling, decreased power.
- Poor Fuel Economy: Inefficient engine operation due to sensor or system faults.
- Emissions Issues: Codes related to oxygen sensors, EGR valves, or catalytic converters can indicate increased emissions.
- Transmission Problems: Erratic shifting, slipping gears, failure to shift.
- ABS Light (if applicable): Indicates potential issues with the anti-lock braking system.
Resetting OBD1 Codes
Resetting OBD1 codes can sometimes be achieved by disconnecting the negative battery terminal for a period (typically 5-10 minutes). This clears the vehicle’s computer memory, including stored codes.
Caution:
- Potential Data Loss: Disconnecting the battery can erase radio presets and other stored settings.
- Underlying Problem Remains: Resetting codes only clears the light; it does not fix the underlying problem. If the issue persists, the check engine light will reappear, and the same code or new codes may be logged.
Conclusion
Reading OBD1 codes with OBD2 technology requires understanding the limitations and utilizing appropriate methods like adapters or dedicated OBD1 tools. While the paperclip/test light method remains a basic option for some systems, using an OBD2 scanner with a compatible adapter can offer a more user-friendly approach. Regardless of the method, accurate code interpretation relies on vehicle-specific OBD1 code charts. Remember that diagnostic codes are starting points; further investigation and troubleshooting are often necessary to pinpoint the root cause of the problem and perform effective repairs on your older vehicle. If you’re uncomfortable with DIY diagnostics, consulting a qualified mechanic experienced with older vehicles is always a recommended course of action.