Clearing your vehicle’s check engine light or preparing for an emissions test might lead you to consider resetting your OBD2 port. Understanding how to properly reset your OBD2 system is crucial for vehicle maintenance and ensuring accurate diagnostic readings. This guide provides a detailed overview of resetting your OBD2 port, its implications, and how it relates to your vehicle’s emission readiness.
The On-Board Diagnostic (OBD) system is a vital component of modern vehicles. It constantly monitors various systems, particularly those related to emissions. When an issue is detected, the OBD system illuminates the check engine light and stores Diagnostic Trouble Codes (DTCs). Resetting the OBD2 port essentially means clearing these stored codes and resetting the system’s monitors. This is often done after repairs or when addressing a temporary issue that triggered the check engine light.
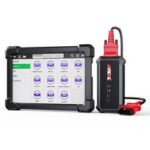
There are several methods to reset your OBD2 port, primarily revolving around cutting power to the vehicle’s computer or using a dedicated scan tool.
Method 1: Using an OBD2 Scan Tool
The most reliable and recommended method for resetting your OBD2 port is using an OBD2 scan tool. These tools are readily available and offer a user-friendly way to interact with your vehicle’s computer.
-
Locate the OBD2 Port: The OBD2 port is typically located under the dashboard on the driver’s side. Refer to your vehicle’s owner manual if you have trouble finding it.
-
Plug in the Scan Tool: With the vehicle’s ignition turned off, plug the scan tool into the OBD2 port.
-
Turn on the Ignition (Key On, Engine Off): Turn the ignition key to the “ON” position, but do not start the engine. This provides power to the vehicle’s computer and the scan tool.
-
Navigate the Scan Tool Menu: Follow the scan tool’s instructions to connect to the vehicle’s computer. Look for options like “Read Codes,” “Erase Codes,” or “Clear Codes.” The exact menu names may vary depending on your scan tool.
-
Clear Diagnostic Trouble Codes: Select the “Erase Codes” or similar option. The scan tool will communicate with the vehicle’s computer and clear any stored DTCs.
-
Verify Reset: After clearing the codes, the scan tool should confirm the action. The check engine light on your dashboard should turn off if it was illuminated due to the codes you cleared.
Method 2: Disconnecting the Battery (Less Recommended)
Disconnecting the vehicle’s battery can also reset the OBD2 system, as it cuts power to the computer and clears volatile memory where DTCs are stored. However, this method is less recommended due to potential drawbacks:
-
Safety First: Ensure the vehicle is turned off and parked on a level surface. Use appropriate tools and wear safety glasses and gloves.
-
Locate the Negative Battery Terminal: Identify the negative (-) terminal of your car battery. It’s usually black and marked with a minus sign.
-
Disconnect the Negative Terminal: Use a wrench to loosen the nut on the negative battery terminal. Carefully remove the cable from the terminal.
-
Wait: Allow the vehicle to sit for about 10-15 minutes. This ensures that any residual power in the system dissipates and the computer memory is fully cleared.
-
Reconnect the Battery: Reattach the negative battery cable to the terminal and tighten the nut securely.
Important Considerations After Resetting Your OBD2 Port
Resetting your OBD2 port clears DTCs and also resets the OBD system’s monitors. These monitors are crucial for emissions testing as they indicate whether various emission control systems have been tested and are functioning correctly. After a reset, these monitors will be in a “Not Ready” state.
OBD Readiness and Drive Cycles
For your vehicle to pass an emissions test, the OBD system needs to achieve a “Ready” state. This requires completing “drive cycles.” A warm-up cycle, as defined by emissions standards, involves operating the vehicle so that the engine coolant temperature rises by at least 40 degrees Fahrenheit after startup and reaches a minimum of 140 degrees Fahrenheit (160 degrees for natural gas engines).
Newer emissions criteria (like those becoming stricter in May 2025) emphasize the number of warm-up cycles, mileage driven, and engine run time since the last code clear to determine OBD readiness. For example, vehicles without Permanent Diagnostic Trouble Codes (PDTCs) might need at least five warm-up cycles, 100 miles traveled, or 200 minutes of engine run time after a reset to be considered “ready.” Vehicles with PDTCs require even more extensive drive cycles.
Permanent Diagnostic Trouble Codes (PDTCs)
It’s important to note the difference between regular DTCs and PDTCs. PDTCs cannot be cleared by simply resetting the OBD2 port or disconnecting the battery. They are designed to remain until the underlying issue is resolved and the relevant monitor runs and passes. This ensures that emission-related problems are properly addressed.
Conclusion
Resetting your OBD2 port can be a useful step in vehicle maintenance, particularly after addressing repairs or dealing with temporary check engine light issues. Using an OBD2 scan tool is the most effective and recommended method. However, understanding that resetting the OBD2 system also resets emission monitors is crucial, especially when preparing for emissions testing. Ensure your vehicle completes the necessary drive cycles to achieve OBD readiness after a reset to avoid failing an emissions test. If you are unsure about the process or your check engine light returns after resetting, consult a qualified mechanic to diagnose and address any underlying issues.