The NEXPEAK NX501 OBD2 scanner is a valuable tool for car owners and enthusiasts alike, offering a user-friendly way to diagnose vehicle issues. This guide will walk you through How To Use A Nx501 Obd2 Scanner effectively, enabling you to understand your car’s health and troubleshoot problems efficiently. Whether you’re facing a check engine light or simply want to monitor your vehicle’s performance, the NX501 provides a range of features to assist you.
Understanding the NEXPEAK NX501 OBD2 Scanner
OBD2 scanners like the NX501 are designed to access your car’s On-Board Diagnostics system. This system monitors various aspects of your vehicle’s operation and can store trouble codes when issues arise. The NEXPEAK NX501 stands out with its multilingual interface and support for all OBD2 compliant vehicles, both gasoline and diesel. It’s equipped with a color display, one-click I/M readiness key for emissions checks, and real-time battery voltage monitoring.
Key features of the NX501 include:
- Broad Compatibility: Works with all OBD2 compliant vehicles (American, European, and Asian).
- One-Click Readiness Key: Quickly checks emissions readiness for state inspections.
- Visual and Audible Indicators: Color-coded LEDs and a built-in speaker for readiness verification.
- Comprehensive Code Support: Reads generic, manufacturer-specific, and pending trouble codes.
- Check Engine Light Control: Turns off the check engine light and resets monitors.
- Enhanced OBD2 Mode 6: Accesses on-board monitoring test results.
- Live Data Stream: Displays real-time vehicle data in text and graph formats.
- Data Logging and Playback: Stores and reviews diagnostic data.
- Multilingual Support: Offers interfaces in multiple languages including English, Spanish, and French.
Step-by-Step Guide: Using the NX501 Scanner
Using the NEXPEAK NX501 is straightforward. Follow these steps to diagnose your vehicle:
-
Locate the OBD2 Port: This is usually found under the dashboard on the driver’s side. Refer to your vehicle’s manual if you are unsure of its location.
-
Connect the NX501 Scanner: Plug the NX501’s OBD2 connector into your vehicle’s diagnostic port. Ensure it is firmly connected.
-
Turn on Ignition: Turn your car’s ignition to the “ON” position without starting the engine. The NX501 scanner will power on automatically.
-
Navigate the Menu: Use the Up/Down and Enter/Exit buttons to navigate the NX501’s menu. Select “Diagnostic Menu” to begin scanning.
-
Read Codes: Choose “Read Codes” to retrieve any stored trouble codes. The scanner will display the code and its definition. You can use the built-in DTC lookup function for more information.
-
Clear Codes (Optional): After addressing the issue, you can select “Erase Codes” to clear the trouble codes and turn off the check engine light.
-
View Live Data: Select “DataStream” to monitor real-time parameters like engine temperature, RPM, and sensor readings.
-
Perform I/M Readiness Test: Use the “I/M Readiness” function to quickly check your vehicle’s emissions system status.
-
O2 Sensor Test and EVAP System Test: The NX501 also supports O2 sensor and EVAP system tests for more in-depth diagnostics.
Vehicle Compatibility of the NX501
The NEXPEAK NX501 is compatible with a wide range of vehicles that adhere to OBD2 protocols. This includes:
- American Cars: From 2000 onwards (Chrysler, Ford, GM, Jeep).
- European Cars: From 2003 onwards (including Alfa Romeo, Audi, BMW, Mercedes-Benz, Volkswagen, and more).
- Asian Cars: From 2006 onwards (including Honda, Hyundai, Toyota, Nissan, and more).
- Chinese Cars: From 2011 onwards.
- Russian Cars: Specific Ssangyong models from 2007 onwards.
Ensure your vehicle has a standard 16-pin OBD2 port, which is typically trapezoidal in shape.
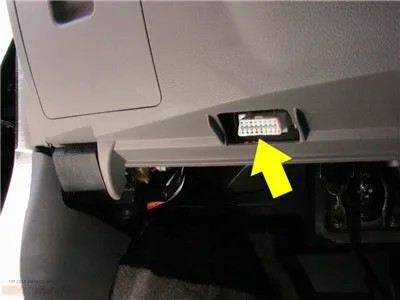 Diagram of a standard OBDII 16-pin diagnostic port location in a vehicle, used for connecting the NX501 scanner.
Conclusion
The NEXPEAK NX501 OBD2 scanner is a user-friendly and powerful tool for diagnosing your vehicle. By understanding how to use a nx501 obd2 scanner, you can effectively read and clear trouble codes, monitor live data, and ensure your vehicle is running smoothly. Its wide vehicle compatibility and ease of use make it an excellent choice for both beginners and experienced car enthusiasts looking to take control of their car maintenance.