For decades, working on cars meant getting your hands greasy and understanding mechanical systems. However, the advent of onboard computers revolutionized automotive repair. Modern vehicles rely heavily on electronic control units (ECUs) and sophisticated sensor networks, making diagnostic tools indispensable. Since 1996, the OBD2 (On-Board Diagnostics II) standard has been mandatory in most cars, providing a universal interface to access vehicle data. While basic OBD2 scanners are readily available, professional-grade tools like the Tech2 offer significantly deeper diagnostic capabilities. This article explores How To Use A Tech2 To Obd2 Adapter to unlock advanced diagnostic features for your car.
Initially designed as a dealer-level tool for General Motors (GM) vehicles, the Tech2 is renowned for its comprehensive diagnostic and programming abilities. However, older Tech2 units use a proprietary connector, not the standard OBD2. This is where the OBD2 adapter comes into play, bridging the gap and allowing you to connect a Tech2 to any OBD2-compliant vehicle. This combination empowers car enthusiasts and professional mechanics alike to perform in-depth diagnostics, system tests, and even some programming functions that are beyond the reach of generic OBD2 scanners.
Understanding OBD2 and the Need for Advanced Tools
The OBD2 system was standardized to monitor vehicle emissions and provide basic diagnostic information. A simple OBD2 scanner can read generic trouble codes, clear the check engine light, and display some live data. This is often sufficient for basic issues. However, for more complex problems, especially those related to specific vehicle systems or emissions readiness, a more advanced tool is necessary.
One crucial aspect of OBD2 is IM (Inspection and Maintenance) readiness monitors. These monitors are self-tests performed by the vehicle’s ECU to ensure that emission control systems are functioning correctly. Common monitors include misfire, fuel system, comprehensive components, catalyst, heated catalyst, evaporative system (EVAP), secondary air system, oxygen sensor, and EGR system. For a vehicle to pass an emissions inspection, these monitors must be in a “ready” state, indicating that the tests have been completed and passed.
VXDIAG VCX NANO OBD2 Adapter connected to a laptop running Tech2 emulation software, illustrating how to use a Tech2 emulator with an OBD2 adapter for vehicle diagnostics.
Sometimes, after repairs or battery replacements, these monitors reset to a “not ready” state. While many will set during normal driving, some, like the EVAP monitor, can be notoriously difficult and require specific driving cycles or service bay tests. Relying solely on generic OBD2 tools might not provide the necessary functionality to expedite this process, which is where a Tech2 emulator becomes invaluable.
The Power of Tech2 Emulation with an OBD2 Adapter
The Tech2 is a powerful diagnostic tool that offers functionalities far beyond basic OBD2 scanners. It allows users to:
- Access manufacturer-specific diagnostic codes: Go beyond generic OBD2 codes and read detailed codes specific to the vehicle’s make and model, providing more precise troubleshooting information.
- Perform bi-directional controls and system tests: Activate components, run system tests (like the EVAP service bay test), and verify component functionality directly from the tool.
- View live data parameters in detail: Access a wider range of live data parameters and often at a higher refresh rate than generic scanners, crucial for diagnosing intermittent issues.
- Perform module programming and calibrations: In some cases, Tech2 emulators can be used for module programming and calibration, although this functionality might be limited depending on the emulator and adapter.
To leverage these capabilities on modern OBD2 vehicles, you need a Tech2 to OBD2 adapter. These adapters, often paired with Tech2 emulation software, effectively convert the Tech2’s proprietary interface to the standard OBD2 connector. One popular and cost-effective solution is the VXDIAG VCX NANO OBD2 adapter combined with Tech2Win software, which emulates the Tech2 interface on a laptop.
Step-by-Step Guide: Using a Tech2 Emulator and OBD2 Adapter for EVAP Service Bay Test
Let’s illustrate the practical application of a Tech2 emulator and OBD2 adapter with a common scenario: forcing the EVAP monitor to run its service bay test. This is particularly useful when facing inspection issues due to a “not ready” EVAP monitor.
Scenario: Your vehicle’s EVAP monitor is not setting to “ready” after a battery replacement, preventing you from passing an emissions inspection.
Solution: Use a VXDIAG VCX NANO and Tech2Win emulator to perform the EVAP Service Bay Test.
Steps:
-
Software Installation: Install the Tech2Win emulation software on your laptop. This typically involves installing the VXDIAG driver and the Tech2Win software itself. Follow the instructions provided with your VXDIAG VCX NANO adapter.
-
Vehicle Connection: Connect the VXDIAG VCX NANO adapter to your vehicle’s OBD2 port. Then, connect the adapter to your laptop via USB.
-
Launch Tech2Win and Vehicle Selection: Launch the Tech2Win software and select the appropriate vehicle make, model, and year.
-
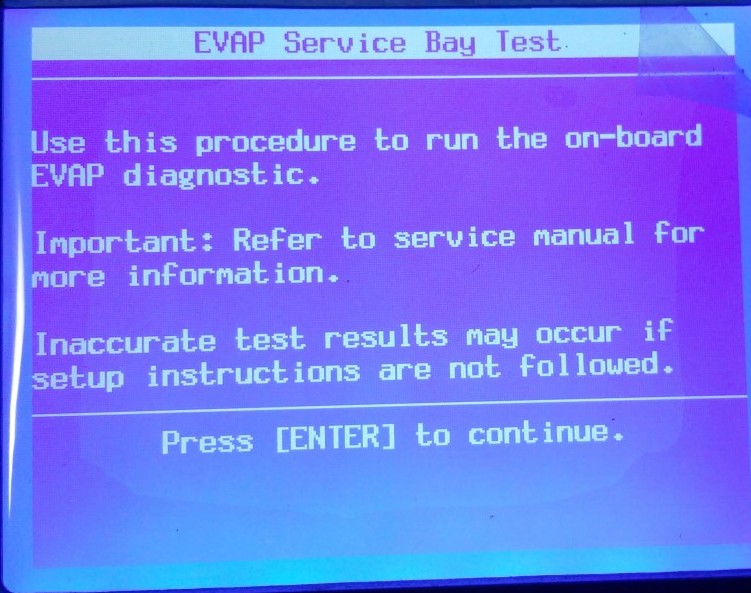
Navigate to EVAP Service Bay Test: Navigate through the Tech2Win menus to find the EVAP System Service Bay Test. This is usually found under “Powertrain Diagnostics” or “Engine Control Module” menus, then look for “System Tests” or “Service Bay Tests.”
Tech2 Emulator EVAP System Bay Test menu, showing the selection of the EVAP service bay test within the Tech2 software.
- Follow On-Screen Prompts: The Tech2Win software will guide you through the EVAP service bay test with on-screen prompts. These prompts are crucial and must be followed precisely. Typically, the test requires a cold start (vehicle not started overnight).
Tech2 Emulator prompts for EVAP test, guiding the user through the initial steps of the service bay test procedure.
-
RPM Hold Procedure: One common step in the EVAP service bay test is to hold the engine RPM at a specific range (e.g., 1800-2200 RPM) for a set duration (e.g., 8 minutes). This often requires a method to maintain a steady RPM without manually holding the accelerator pedal.
-
Test Execution: Once the RPM hold procedure is complete, follow the prompts to initiate the service bay test. The Tech2 emulator will then cycle through various EVAP system components, such as the purge valve and vent valve, performing diagnostic checks.
Tech2 Emulator EVAP test in progress, displaying the real-time data and cycling through purge and other sensors during the test.
-
Post-Test Driving Cycle: After the service bay test, the Tech2Win might instruct you to perform a short driving cycle, typically involving driving at a certain speed for a specific distance and duration.
-
Final Test and Verification: Return to the “bay” (park the car) and follow the final prompts in Tech2Win, which may include an engine-off test. Upon completion, the Tech2Win should indicate whether the EVAP monitor has set to “ready.”
Tech2 Emulator EVAP test completion screen, confirming the successful completion of the EVAP service bay test and IM readiness setting.
GM Drive Cycle Chart illustrating the complex driving pattern required to reset emission monitors, highlighting the need for tools like Tech2 emulators for efficient diagnostics.
Beyond EVAP: Expanding Diagnostic Horizons
The EVAP service bay test is just one example of the advanced capabilities unlocked by using a Tech2 with an OBD2 adapter. This combination can be used for a wide range of diagnostic and service procedures, including:
- ABS (Anti-lock Braking System) diagnostics and bleeding procedures.
- Transmission diagnostics and adaptations.
- Body control module (BCM) configuration.
- Airbag system diagnostics.
- Reading and clearing manufacturer-specific codes for various systems.
Conclusion: Empowering Car Diagnostics with Tech2 and OBD2
While basic OBD2 scanners serve a purpose, tools like the Tech2, when paired with an OBD2 adapter like the VXDIAG VCX NANO, elevate your diagnostic capabilities significantly. They bridge the gap between DIY enthusiasts and professional mechanics, offering access to dealer-level diagnostics and system tests at a fraction of the cost of a genuine Tech2 system. For anyone serious about automotive diagnostics and repair, understanding how to use a Tech2 to OBD2 adapter is a valuable skill that can save time, money, and frustration when tackling complex automotive issues, especially emission-related problems and IM readiness.