On-Board Diagnostics II (OBD2) scanners have revolutionized vehicle maintenance, putting the power of professional diagnostics into the hands of car owners and enthusiasts. By connecting an OBD2 scanner to your car, you can read error codes, monitor real-time data, and gain valuable insights into your vehicle’s health. Pairing this technology with the processing power and user-friendly interface of a laptop takes your diagnostic capabilities to the next level. This guide will walk you through the process of how to use an OBD2 scanner with your laptop, empowering you to understand and maintain your vehicle more effectively.
Step 1: Ensure Bluetooth is Enabled on Your Windows Laptop
If you are utilizing a USB-to-Bluetooth adapter to connect your OBD2 scanner wirelessly, begin by installing any necessary Windows device drivers. These drivers are typically provided by the adapter’s manufacturer and ensure seamless communication between your laptop and the Bluetooth adapter. Refer to the manufacturer’s instructions included with your USB-to-Bluetooth adapter for detailed guidance on driver installation.
For laptops with built-in Bluetooth capabilities, verify that Bluetooth is activated. The method for enabling Bluetooth varies depending on your laptop model and Windows version. Commonly, you can find Bluetooth settings in the Windows Settings menu under “Devices” or “Bluetooth & other devices.” Alternatively, look for a Bluetooth icon in the system tray, usually located in the bottom right corner of your screen. Right-clicking this icon often provides options to enable or disable Bluetooth. If you are unsure about the specific steps for your laptop, consult your PC’s Owner’s Manual for precise instructions on enabling built-in Bluetooth.
Step 2: Locate the OBD-II Diagnostic Connector in Your Vehicle
The OBD-II diagnostic connector is a standardized port present in all modern vehicles, typically mandated in cars manufactured after 1996 in the United States and later in other regions. This connector is your gateway to accessing your car’s diagnostic data. It is always positioned within the interior of your vehicle, close to the dashboard for easy access.
While the diagnostic connector is usually exposed and readily visible, it can sometimes be concealed by a small decorative plastic cover. In some car models, it might be hidden behind an ashtray or a coin tray. The most frequent location for the OBD-II port is underneath the steering column, situated just below the driver’s side dashboard area. Take a moment to visually inspect this area in your vehicle to locate the OBD-II port before proceeding to the next step.
Step 3: Connect Your OBDLink Adapter to the Diagnostic Connector
Carefully take your OBDLink adapter and align it with the OBD-II diagnostic connector you located in the previous step. Gently insert the OBDLink adapter into the connector. Ensure a firm and snug fit without applying excessive force that could potentially damage the connector or the adapter. A proper connection is crucial for reliable data transmission.
In the image above, an OBDLink MX Bluetooth adapter is shown, but the connection process remains consistent across all OBDLink device models, whether they use Bluetooth, Wi-Fi, or USB.
Once the OBDLink adapter is securely plugged into the OBD-II port, observe the indicator lights on the adapter. The ‘Power’ LED should illuminate and display a solid green light. This indicates that the adapter is receiving power from the vehicle’s diagnostic system and is functioning correctly.
For OBDLink models that utilize Wi-Fi connectivity, you will also notice the ‘Wi-Fi’ light emitting a flash at regular intervals, typically every 3 seconds. This flashing light signals that the Wi-Fi functionality of the adapter is active and ready for connection.
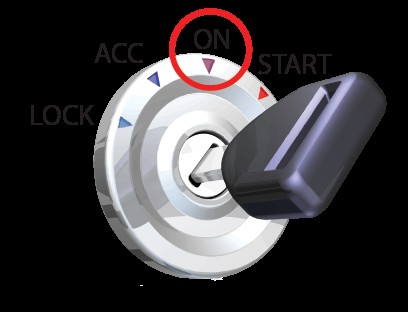
Step 4: Turn Your Vehicle Ignition to the ‘ON’ Position
To initiate communication between your OBDLink adapter and your vehicle’s computer system, it’s necessary to turn the vehicle’s ignition key to the ‘ON’ position. This position activates the car’s electrical systems and provides power to the OBD-II port, enabling data exchange.
On some vehicles, the ‘ON’ position is clearly marked with the Roman numeral ‘II’ on the ignition switch. If your vehicle’s ignition switch lacks such markings, the ‘ON’ position is typically reached by turning the key clockwise to the position just before starting the engine. Stop turning the key just short of engaging the starter motor and cranking the engine. The dashboard lights should illuminate, indicating that the vehicle’s electrical systems are active and the OBD-II port is powered, ready for diagnostic scanning.
Step 5: Make Your OBDLink Adapter Discoverable for Pairing
To establish a wireless connection, you need to make your OBDLink adapter discoverable to your laptop’s Bluetooth. Locate the ‘Connect’ button on your OBDLink device. Press and release this ‘Connect’ button. Upon pressing the button, observe the ‘BT’ light on the OBDLink adapter. This ‘BT’ light will begin to blink at a faster rate. This rapid blinking indicates that the adapter is now in pairing mode and actively broadcasting a Bluetooth signal, making it discoverable by nearby Bluetooth devices like your laptop.
Important Note: The OBDLink adapter typically remains in discoverable pairing mode for a limited time, usually around 2 minutes. This time window is designed to enhance security and prevent unauthorized connections. You will need to complete the Bluetooth pairing process on your laptop (Step 6) within this 2-minute timeframe.
If you require more time to complete the pairing process, simply press the ‘Connect’ button on the OBDLink adapter again. This action will reactivate the pairing mode, resetting the 2-minute timer and allowing you additional time to finalize the Bluetooth connection with your laptop.
Step 6: Pair the OBDLink Adapter with Your Windows Laptop via Bluetooth
Now that your OBDLink adapter is discoverable, you need to initiate the Bluetooth pairing process on your Windows laptop. Locate the Windows System Tray, which is typically situated in the bottom right corner of your screen. Within the system tray, find the Bluetooth icon. This icon usually resembles a stylized “B”.
Right-click on the Bluetooth icon. A context menu will appear. From this menu, select the option labeled ‘Add a Device’. Clicking ‘Add a Device’ will instruct Windows to begin searching for discoverable Bluetooth devices in the vicinity, including your OBDLink adapter.
Windows will automatically scan for and detect Bluetooth devices in range. Once your OBDLink device is discovered, it will be displayed in a list of available devices, usually identified as ‘OBDLink’. Click on ‘OBDLink’ in the list to select it, and then click the ‘Next’ button to proceed with the pairing process.
Note Regarding Numeric Comparison: Some newer Windows Bluetooth adapters incorporate a feature called Numeric Comparison for enhanced pairing security. If your laptop utilizes such an adapter, you might encounter a screen displaying a ‘Compare pairing codes’ request. In the case of OBDLink pairing, it’s generally safe to disregard this request. Simply select ‘Yes’ to acknowledge the comparison prompt, and then click ‘Next’ to continue the pairing process. If you are presented with options to pair without a code or to enter a PIN, choose the option to enter a PIN and use ‘1234’ as the PIN code. This PIN is the standard pairing code for OBDLink devices.
Note Regarding PIN Code Entry: Older Windows Bluetooth adapters might employ PIN codes for pairing. If your laptop uses this type of adapter, you might see a screen prompting you to enter a PIN. If given the choice to pair without a code or enter a PIN, always select the option to enter a PIN. Enter ‘1234’ as the PIN code. This PIN is the universally recognized pairing code for OBDLink adapters and will ensure successful Bluetooth connection.
Upon successful pairing, Windows will display a confirmation message indicating that the OBDLink device has been successfully installed and connected to your laptop.
If the OBDLink adapter fails to install correctly or the pairing process is unsuccessful, press the ‘Connect‘ button on the OBDLink adapter again to re-initiate pairing mode and repeat Step 6. Ensure that Bluetooth is enabled on your laptop and that the OBDLink adapter is within close proximity to your laptop during the pairing attempt.
Step 7: Install the OBDwiz Application on Your Laptop
To interpret and utilize the data transmitted by your OBDLink adapter, you need to install dedicated OBD-II diagnostic software on your laptop. OBDwiz is a popular and compatible software application designed to work seamlessly with OBDLink adapters.
Download the latest version of OBDwiz from the official ScanTool website using the provided download link: Download OBDwiz. Once the download is complete, locate the downloaded installer file (OBDwizSetup.exe) on your computer and run it to begin the installation process. Follow the on-screen prompts and instructions to install OBDwiz on your Windows laptop.
Important Reminders Before Proceeding: Before launching and using OBDwiz, ensure that you have successfully completed the Bluetooth pairing of your OBDLink adapter with your Windows laptop as detailed in the previous steps. Additionally, verify that your vehicle’s ignition key is turned to the ‘On’ position. The vehicle’s ignition must be in the ‘ON’ position for OBDwiz to establish a connection with your vehicle’s computer and retrieve diagnostic data.
Step 8: Initial Software Setup and Auto-Detection in OBDwiz
After successfully installing OBDwiz, launch the application on your laptop. Upon launching OBDwiz for the first time, it’s recommended to perform an auto-detection process. This process automatically configures OBDwiz to communicate correctly with your OBDLink adapter and your vehicle’s specific OBD-II protocol.
In the main OBDwiz interface, locate the ‘Auto Detect’ button. This button is usually prominently displayed and may be circled in red for easy identification, as shown in the image below. Click the ‘Auto Detect’ button to initiate the automatic configuration process.
OBDwiz will now systematically examine all known COM ports and baud rate settings on your laptop. It will automatically identify the correct communication parameters required to work seamlessly with your OBDLink adapter. This auto-detection process simplifies the setup and eliminates the need for manual configuration, ensuring a smooth user experience.
Once the Auto-Detect process is finished, OBDwiz will display a dialog box confirming the successful detection of your OBDLink device and the establishment of communication. The dialog box will typically present information about the detected OBDLink adapter and the communication settings that have been automatically configured.
Step 9: Establishing Connection to Your Vehicle via OBDwiz
With the initial software setup and auto-detection completed, you are now ready to establish a connection between OBDwiz and your vehicle’s computer system to begin retrieving diagnostic data.
In the main OBDwiz interface, locate the ‘Connect’ button. This button is typically clearly visible and might be highlighted with a red circle, as shown in the image below. Click the ‘Connect’ button to initiate the vehicle connection process.
Upon clicking ‘Connect’, OBDwiz will commence cycling through all standardized OBD-II protocols. OBD-II protocols are communication standards used by vehicle manufacturers for diagnostic data exchange. OBDwiz will automatically detect the specific OBD-II protocol employed by your vehicle.
During this protocol detection phase, a status screen will be displayed within OBDwiz. This status screen will visually indicate the progress of the automatic protocol detection process, keeping you informed as OBDwiz identifies the correct communication protocol for your vehicle.
In many modern vehicles, there are often multiple on-board computers, also known as Electronic Control Units (ECUs), that are interconnected on the vehicle’s OBD-II network. These ECUs control various aspects of the vehicle, such as the engine, transmission, brakes, and more.
The OBD-II protocol specifications dictate that you can only establish a connection with one ECU at a time for data retrieval. Therefore, when initially connecting, it is generally recommended to connect to the ECU that reports the highest number of Supported PIDs. PIDs, or Parameter IDs, are codes used to request specific pieces of diagnostic data from the ECU. Connecting to the ECU with the most supported PIDs often provides access to a wider range of diagnostic information.
After OBDwiz completes protocol detection and identifies available ECUs, it will typically prompt you to choose an ECU to connect to. Select the recommended ECU (often the one with the most Supported PIDs) and click ‘Continue’ to finalize the connection and proceed to data access. You can always disconnect and reconnect later to explore data from alternate ECUs if needed.
Step 10: Accessing and Utilizing Vehicle Data in OBDwiz
Once a successful connection to your vehicle’s ECU is established, OBDwiz unlocks a wealth of diagnostic capabilities. You can now access a wide range of features to understand your vehicle’s condition, diagnose issues, and monitor performance.
OBDwiz empowers you to perform various diagnostic tasks, including:
- Diagnosing ‘Check Engine’ Trouble Codes: Retrieve and interpret Diagnostic Trouble Codes (DTCs) that trigger the ‘Check Engine’ light, helping you pinpoint the source of engine problems.
- Monitoring Real-Time Vehicle Performance: Observe live data streams from your vehicle’s sensors, such as engine speed (RPM), coolant temperature, oxygen sensor readings, and more. This real-time data provides valuable insights into engine operation and performance.
- Checking Emissions Readiness: Assess your vehicle’s readiness for emissions testing by verifying the status of various emissions-related monitors.
- Logging Trips and Data: Record trip information and diagnostic data logs for later analysis and review. This feature can be helpful for tracking vehicle performance over time or diagnosing intermittent issues.
To begin exploring these capabilities, navigate the OBDwiz interface and click on a specific task listed along the left-hand side of the main screen. These tasks are typically categorized intuitively, such as ‘Fault Codes’, ‘Live Data’, ‘Emissions’, and ‘Trip Logging’.
Each selected task within OBDwiz often features multiple tabs that provide more detailed information or actions related to that specific diagnostic area. For example, within the ‘Fault Codes’ task, you might find tabs for ‘Current Faults’, ‘Pending Faults’, and ‘Fault History’.
Furthermore, within each tab, you will typically find specific action buttons located below. These action buttons initiate specific diagnostic functions or data retrieval processes relevant to the selected tab and task. Examples of action buttons might include ‘Read Codes’, ‘Clear Codes’, ‘Start Logging’, or ‘View Graph’.
By exploring the various tasks, tabs, and action buttons within OBDwiz, you can effectively utilize your OBDLink adapter and laptop to perform comprehensive vehicle diagnostics, gain a deeper understanding of your car’s health, and address potential issues proactively.