Connecting your car to your Windows 10 computer via an OBD2 Bluetooth adapter opens up a world of vehicle diagnostics and performance monitoring. Whether you’re a car enthusiast, a DIY mechanic, or simply want to understand your vehicle better, installing an OBD2 Bluetooth adapter on your Windows 10 system is a valuable skill. This guide will walk you through the process step-by-step, ensuring a smooth and successful connection.
Step 1: Plug Bluetooth OBD2 Scanner into Car’s OBD Port
The first step is to physically connect your OBD2 Bluetooth scanner to your vehicle. The OBD-II port, your car’s diagnostic lifeline, is usually located inside the cabin.
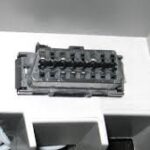
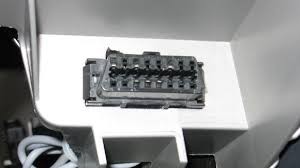
It typically looks like this:
Alt text: Close-up of a standard OBD-II Data Link Connector (DLC) commonly found in vehicles.
And the OBD port in your car is often found under the steering wheel on the driver’s side dashboard area:
If you’re having trouble locating your OBD port, you can use an online resource to help pinpoint its exact location for your car model: Locate your OBD port here.
Step 2: Turn ON Car Ignition
Before your computer can communicate with your car’s computer (ECU) via the OBD2 adapter, you need to provide power to the adapter. Turn your car’s ignition to the “ON” position. This is usually one step before starting the engine. This step powers up the OBD-II system and your newly plugged-in Bluetooth adapter, making it discoverable for pairing.
Step 3: Add and Pair OBD2 Bluetooth Adapter to Windows 10
With the OBD2 adapter plugged in and your car ignition turned on, you can now proceed to pair the Bluetooth device with your Windows 10 computer.
-
Access Bluetooth Settings:
- Click the Action Center icon in your taskbar (usually at the bottom right corner of your screen, it looks like a speech bubble).
- Click on Bluetooth to ensure it’s turned on. If it’s not, click it to toggle it on.
- Right-click on the Bluetooth icon in the notification area of your taskbar and select “Add a Bluetooth device” or “Go to Settings” then “Add Bluetooth or other device”.
-
Select Bluetooth Device Type:
- In the “Add a device” window, click on “Bluetooth”. Windows 10 will now start scanning for nearby Bluetooth devices.
-
Find and Select Your OBD2 Adapter:
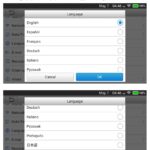
- Your OBD2 Bluetooth device should appear in the list of devices. It might appear under various names such as: OBDII, OBD-II, VLink, Can OBDII, or even ELM327.
- Note: It can sometimes take up to 15-20 seconds for the OBD2 Bluetooth signal to become visible in the device list. Be patient during the scanning process.
Alt text: Windows 10 ‘Add a device’ window displaying a list of discoverable Bluetooth devices, including an OBD2 adapter labeled ‘OBDII’.
-
Pairing and Passkey:
- Click on your OBD2 Bluetooth device from the list to initiate the pairing process.
- Windows 10 might prompt you to enter a pairing code or passkey. Common passkeys for OBD2 Bluetooth adapters are 1234 or 0000. Try 1234 first. If that doesn’t work, try 0000.
- Enter the passkey when prompted and click “Pair” or “Connect”.
Troubleshooting Bluetooth Signal Issues:
If your OBD2 adapter’s signal doesn’t appear in the “Add a device” list, try these troubleshooting steps:
- Rescan: Exit the “Add a device” screen, unplug the OBD2 Bluetooth adapter from your car, wait a few seconds, plug it back in, and try “Add a device” again.
- Restart Computer: If rescanning doesn’t work, restart your Windows 10 computer and repeat the “Add a device” process.
- Check Adapter Power: Ensure the red power light (or any indicator light) is lit on your OBD2 Bluetooth adapter. If there’s no power light, double-check that it’s firmly plugged into the OBD port and that your car ignition is ON.
- Already Paired? If you’ve attempted to pair the adapter before, it might already be paired. In this case, it might not show up in “Add a Device” again. Instead, look for it in “Bluetooth & other devices” settings under “Show Bluetooth devices”. You might need to remove the existing pairing and re-pair it.
-
COM Port Assignment:
- Once successfully paired, Windows 10 will install the necessary drivers for your OBD2 Bluetooth adapter.
- After driver installation, the system will usually display a notification with the assigned COM port numbers. Crucially, note down the number of the “Outgoing” COM port. You will need this COM port number to configure your OBD software to communicate with the adapter.
Alt text: Windows 10 notification displaying successful Bluetooth pairing and listing the assigned COM ports, highlighting the ‘Outgoing’ COM port number.
Step 4: Launch OBD Software and Connect to Vehicle
With the OBD2 Bluetooth adapter paired and the COM port noted, you’re now ready to use OBD-II software to communicate with your car’s computer.
-
Install and Launch OBD Software:
- If you haven’t already, install your preferred OBD-II diagnostic software on your Windows 10 computer. There are many options available, ranging from free to professional-grade software like TOAD software (ensure compatibility with Bluetooth OBD2 adapters).
- Launch the OBD software.
-
Configure Connection Settings:
- Navigate to the software’s settings or connection options.
- Look for a setting to select the connection type. Choose “Bluetooth” or “Serial/COM Port”.
- In the COM port selection, choose the “Outgoing” COM port number that you noted down during the Bluetooth pairing process in Step 3.
-
Connect to Vehicle:
- In your OBD software, find the “Connect” or “Start Communication” button and click it.
- The software should now attempt to connect to your OBD2 Bluetooth adapter and, through it, to your car’s ECU.
Step 5: Troubleshooting Connection Issues
If your OBD software is having trouble connecting to your vehicle, here are some common troubleshooting steps:
-
Incorrect COM Port: Double-check that you have selected the correct “Outgoing” COM port in your OBD software settings.
-
Baud Rate Mismatch: Some older OBD2 adapters or software might have issues with higher baud rates. Try setting the baud rate to a lower value, such as 9600 or even 110, within your OBD software settings if this option is available. Some software like TOAD allows you to force a specific baud rate.
If your software doesn’t have a baud rate setting, you can adjust it through Windows Device Manager:
- Open Device Manager: Right-click on the Start Menu and select “Device Manager”.
- Expand Ports (COM & LPT): Find and expand the “Ports (COM & LPT)” category.
- Find Bluetooth COM Port: Look for an entry that resembles “Standard Serial Bluetooth link” or something similar related to your Bluetooth adapter. The name might vary.
- Properties: Right-click on the relevant COM port entry and select “Properties”.
- Port Settings Tab: Go to the “Port Settings” tab.
- Adjust Bits per second (Baud Rate): Lower the “Bits per second” value to 110 or 9600.
- Click “OK”: Save the changes and close the Device Manager.
- Reconnect in OBD Software: Try reconnecting to your vehicle in your OBD software.
Alt text: Windows Device Manager, Port Settings tab for a Bluetooth COM port, highlighting the ‘Bits per second’ (baud rate) setting set to 110 for troubleshooting connection issues.
-
Software Compatibility: Ensure that your OBD-II software is compatible with Bluetooth OBD2 adapters and Windows 10. Check the software documentation or vendor website for compatibility information.
-
Adapter Compatibility: Verify that your OBD2 Bluetooth adapter is compatible with your vehicle’s OBD-II protocol. Most modern cars use standard OBD-II protocols, but some older or specialized vehicles might have compatibility limitations.
By following these steps, you should be able to successfully install and connect your OBD2 Bluetooth adapter to your Windows 10 computer, unlocking access to valuable vehicle diagnostic data and insights.