Swapping a B-series engine into your Honda Civic or Integra can significantly boost performance. However, navigating the wiring, particularly the OBD2 harness system (OBD2a and OBD2b), can be daunting. This guide provides a detailed breakdown of what you need to know about Integra OBD2 harnesses, OBD2a, OBD2b, and how to manage them during your engine swap.
This guide primarily focuses on 5-speed manual transmission swaps and may have limited information on automatic to 5-speed conversions.
Let’s decode some common acronyms we’ll be using:
- OBD2a: Refers to 1996-1998 Civic and 1996-1999 Integra models.
- OBD2b: Refers to 1999-2000 Civic and 2000-2001 Integra models.
- EWH: Engine Wire Harness
- VTS: VTEC Solenoid
- VTPS: VTEC Pressure Switch
- KS: Knock Sensor
- IACV: Idle Air Control Valve
- Dizzy: Distributor
- PnP: Plug and Play
96-98 Civic Engine Swap Wiring Guide
If you’re working on a 96-98 Civic, here’s a breakdown of engine installation and wiring considerations.
Engine Installation and Mounts
When swapping in a B16, B18, or B20 VTEC engine into your 96-98 Civic, ensure you have the correct engine mounts, shift linkage, and axles for a seamless fit.
For engine mounts and brackets, consider using 99-00 Civic Si engine brackets for optimal fitment:
- Front transmission bracket
- Rear engine “T” bracket (99-00 Si or JDM EK4/9 “T” bracket is recommended over Integra “T” bracket as Integra brackets can push the motor too far forward).
- A/C bracket
- Left side (driver’s side) dual-post engine block mount (required if using a B18 engine, as all B18 engines come with a 3-post right side mount). Alternatively, you can use a B18 3-post mount with a Hasport EK right-side driver replacement mount, which is available in 2 and 3-hole configurations to replace the often-leaking OEM liquid-filled mount.
Alternatively, brackets from a 94-01 Integra can be used:
- Front transmission bracket
- A/C bracket
To retain your A/C compressor, source a “P54” 94-97 Delsol DOHC VTEC A/C bracket or a CRV A/C bracket, both designed to support the smaller Civic A/C compressor.
Reuse these stock Civic brackets, which are compatible with B-series engines:
- Top transmission mount
- Left side (driver’s side) dual-post bracket
Shift Linkage and Axles
For 96-00 EK chassis Civics, a 99-00 Si or JDM EK4/9 shift linkage is highly recommended. 94-01 Integra shift linkages may not center the shift lever correctly in the shift boot area, causing shifting issues.
For axles, any axles from the following vehicles will work: 94-01 Integra (JDM or US) all 5-speed models, 99-00 Si, and 94-97 DOHC Delsol.
Once the engine is mounted, wiring becomes the next crucial step.
Wiring: Part 1 – Engine Wire Harness (EWH)
Depending on whether your 96-98 Civic is a non-VTEC or VTEC model, you can reuse your existing Engine Wire Harness (EWH) or opt for a 96-98 EX 5-speed EWH. Note that OBD1 EWHs are incompatible with OBD2 Civics due to their 2-piece design, while EK Civics utilize a 1-piece EWH design.
A 2-piece harness has a break-off point, typically at the shock tower, while a 1-piece harness runs seamlessly from the ECU plugs through the firewall to the engine.
It’s crucial to understand that OBD2b (99-00 Civic) wire harnesses are not interchangeable with OBD2a (96-98 Civic) harnesses. Despite visual similarities, they are significantly different.
If you have a non-VTEC Civic, modifying your existing EWH to be compatible with an OBD1 VTEC engine requires these steps:
- Add VTEC wiring for the VTEC solenoid (VTS) and VTEC pressure switch (VTPS).
- Wire in the Knock Sensor (KS).
- Perform the IACV mod to convert the 3-wire IACV plug to a 2-wire IACV plug. OBD1 engines and 96-00 5-speed EX Civics/99-00 Si models use a 2-wire IACV.
If you own a VTEC Civic, such as a 5-speed EX model, using its EWH simplifies the process as the modifications mentioned above are already integrated. However, the 2nd 02 sensor wiring is part of the cabin harness in an EX, not the engine harness. If you plan to use a US OBD2 ECU with an OBD1 engine, you will need to manually wire in the 2nd 02 sensor. If using an OBD1 ECU, this step is unnecessary as OBD1 ECUs do not monitor a 2nd 02 sensor.
For non-VTEC Civic owners hesitant about wiring modifications, using a 96-98 5-speed EX EWH is recommended as it is compatible with non-VTEC 96-98 EK chassis. Ensure you obtain a 5-SPEED EX harness, not an automatic EX harness, as automatic harnesses are wired differently and may prevent the car from starting.
Wiring: Part 2 – Distributor, Injectors, Alternator, and IAT
To make an OBD1 engine function in an OBD2 Civic, further wiring adjustments are needed for the distributor, injectors, alternator, IAT (Intake Air Temperature) sensor, and CKF (Crankshaft Fluctuation) sensor.
-
Distributor Plug: Convert to OBD1 distributor plugs by splicing OBD1 dizzy plugs to your OBD2 EWH, matching wire colors. Alternatively, use an OBD2 B-series VTEC distributor (96-00 B-series VTEC dizzy), which is plug-and-play with your 96-98 EWH.
-
Injector Clips: Convert to OBD1 injector plugs by splicing OBD1 injector plugs to your OBD2 EWH, again matching wire colors. Another option is to use OBD2 injectors (any 96-00 injectors, B-series or D-series), which are plug-and-play with your 96-98 EWH.
You can also modify your OBD2 injector clip by removing the blue cap inside and wiggling the clip onto the OBD1 injector. Secure it with a zip tie to prevent vibrations from dislodging it.
-
Alternator Plug: OBD1 alternators use a round plug, while OBD2 alternators use a square plug.
You have several options:
- Splice an OBD1 alternator plug onto your OBD2 EWH.
- Use an OBD2 B-series alternator (96-01 B-series alternator), which is plug-and-play.
- Disassemble the OBD1 alternator and swap in an OBD2 alternator’s inner plug. It may be possible to use your D-series alternator plug in the OBD1 B-series alternator, but this is not fully confirmed.
-
IAT Sensor: The OBD2 IAT sensor plug differs from OBD1 IAT plugs. You can either use your existing OBD2 IAT sensor by drilling a hole in the intake arm or splice the OBD1 IAT plug to your EWH to use the OBD1 IAT sensor located on the intake manifold runner.
-
CKF Sensor: If you plan to use a US OBD2 ECU with an OBD1 engine, you’ll need a workaround for the CKF sensor. US OBD2 ECUs monitor this crankshaft sensor, integrated into the oil pump of US OBD2 engines. OBD1 and JDM OBD2 ECUs do not require this sensor, and thus OBD1 & JDM OBD2 engines lack a CKF sensor on the oil pump.
Instead of upgrading to a US OBD2 oil pump, utilize the CKF BYPASS TRICK. This allows you to bypass the CKF sensor requirement, and can even help pass smog checks in certain situations.
ECU Options
You have three ECU options, ranging from easiest to more complex:
-
JDM OBD2 ECU: Easiest solution as it directly plugs into your EK and does not require a VTPS. However, OBD2 ECU upgrades are limited, it won’t pass smog with US OBD2 scanner tools, and it has a 115-120mph speed limiter.
-
OBD1 ECU Conversion: Convert to OBD1 ECU using an OBD2a to OBD1 jumper harness and use an OBD1 ECU (JDM or US), like a reprogrammed P28. OBD1 ECUs are easily reprogrammable and don’t require a 2nd 02 or CKF sensor. However, it cannot pass smog, and VTPS wiring is necessary.
-
US OBD2 Spec ECU:
- (Option 3a) Use a 96-97 DOHC VTEC Delsol P30 ECU, 96-99 Integra P72/GSR ECU, or 96-98 P73/ITR ECU.
- (Option 3b) Convert to OBD2b spec with an OBD2a to OBD2b jumper harness and use a 99-00 Civic Si ECU. This setup can pass smog if the CKF bypass trick is successful and the 2nd 02 sensor is wired and functional.
99-00 Civic Engine Swap Wiring Guide
Engine installation information for the 96-98 Civic also applies to the 99-00 Civic. Wiring is similar but with slight differences.
Wiring: Part 1
Similar to the 96-98 Civic, if you have a non-VTEC 99-00 Civic, modify your EWH for OBD1 VTEC engine compatibility:
- Add wiring for VTEC (VTS and VTPS).
- Wire in the Knock Sensor (KS), unless using a P28 ECU which doesn’t require it.
- Perform the IACV mod to convert to a 2-wire IACV plug as OBD1 engines use 2-wire IACVs.
- Change your distributor plug to a larger size, such as from a 99-00 Si, 96-98 Civic, or 96-01 Integra.
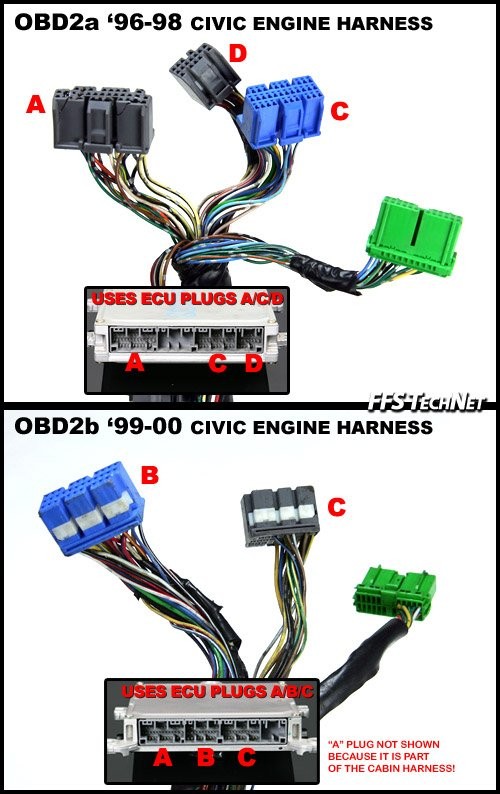
Wiring diagram specific to 99-00 Civic models, highlighting electrical differences from earlier OBD2a systems.
Detailed wiring diagram of the B-plug for 99-00 Civics, essential for understanding ECU connections in OBD2b systems.
Honda switched to a smaller distributor plug on 99-00 SOHC Civics. This plug must be changed if reusing your SOHC EWH with an OBD1 engine. Use a 99-00 Si or 96-98 distributor plug, depinning and mating it to your 99-00 CX/DX EWH.
Switching to a 99-00 Si EWH is highly recommended, similar to using an EX harness in a 96-98 Civic. Again, the 2nd 02 sensor is part of the Si’s cabin harness, requiring manual wiring if using a US OBD2 ECU.
Wiring: Part 2
Wiring information from the 96-98 Civic section applies to the 99-00 Civic as well regarding distributor, injectors, alternator, and IAT sensor modifications.
ECU Options
ECU options for 99-00 Civics include:
-
99-00 Si ECU: Easiest plug-and-play solution for 99-00 EK, but requires the CKF bypass trick. It is compatible with US OBD2 scanner tools and can pass smog depending on variables. However, CKF bypass is needed, OBD2 ECU reprogramming is limited, and a 2nd 02 sensor is required.
-
OBD1 ECU Conversion: Convert to OBD1 ECU using an OBD2b to OBD1 jumper harness and an OBD1 ECU (JDM or US), like a reprogrammed P28. OBD1 ECUs are highly programmable and don’t need 2nd 02 or CKF sensors. However, it cannot pass smog, and VTPS wiring is required.
-
US OBD2b Spec ECU:
- (Option 3a) Use a 99-00 Si ECU or 00-01 Integra GSR or ITR ECU (requires immobilizer removal).
- (Option 3b) Convert to OBD2b spec using an OBD2a to OBD2b jumper harness and a 99-00 Civic Si ECU. This setup can pass smog with a successful CKF bypass and a working 2nd 02 sensor.
-
JDM OBD2 ECU: Use a JDM OBD2 ECU with an OBD2b to OBD2a jumper harness or a JDM CTR (PCT) ECU which is OBD2b spec and plug-and-play. It can pass smog with a successful CKF bypass. However, it requires an OBD2b to OBD2a jumper harness, cannot pass smog checks in some regions, and has a 115-120mph speed limiter.
OBD2a/OBD2b Integra Engine Swap Wiring Guide
For 96-01 Integras (both OBD2a and OBD2b), engine installation is straightforward. Reuse all existing engine brackets, mounts, axles, and shift linkage.
Wiring
Reuse your existing EWH and follow the wiring information for 96-98 Civics for 96-99 Integras (OBD2a) or 99-00 Civics for 00-01 Integras (OBD2b).
Alternatively, you can use a US OBD1 engine wire harness in a 96-01 Integra. 96-01 Integras utilize a 2-piece wire harness design, and Honda made the break-off plugs backward compatible with OBD1 EWHs.
If you can obtain an OBD1 VTEC EWH from:
- 94-95 Integra GSR
- 92-95 Civic Si/EX
- 93-95 DOHC Delsol
You can use it in your Integra. For non-VTEC Integras, ensure VTPS, VTS, and KS are wired in from the ECU plugs to the shock tower plug.
ECU Options
Note: 96-01 OBD2 Integras have the 2nd 02 sensor integrated into the cabin harness, so no additional wiring is needed for the 2nd 02 sensor. 00-01 Integra ECUs are immobilizer-equipped and require immobilizer removal for swapping.
- (96-99 Integra – OBD2a) JDM OBD2 ECU (direct PnP). Same pros and cons as 96-98 Civic with JDM ECU.
- (00-01 Integra – OBD2b) JDM OBD2 ECU (OBD2b to OBD2a jumper harness required). Same pros and cons as 96-98 Civic with JDM ECU.
- (96-01 Integra) OBD1 ECU conversion. Same pros and cons as 96-00 Civic OBD1 conversion.
- (96-99 Integra – OBD2a) OBD2a US ECU (PnP). Same pros and cons as 96-98 Civic.
- (00-01 Integra – OBD2b) OBD2a US ECU. Same pros and cons as 99-00 Civic.
- (96-99 Integra – OBD2a) OBD2b US ECU (OBD2a to OBD2b jumper harness required). 00-01 Integra ECU will need immobilizer removal for 96-98 Integra to run.
- (00-01 Integra – OBD2b) OBD2b US ECU. 99-00 Si ECU will be PnP. Pin A15 needs to be moved to A16 for fuel pump operation if using 00-01 Integra ECU. 00-01 Integra ECU will also need immobilizer removal or bypass chip installation. An IMMO bypass chip can resolve the check engine light issue from factory IMMO chip removal.
This comprehensive guide should help you navigate the intricacies of Integra OBD2 harnesses and wiring for your engine swap. Remember to double-check all connections and consult wiring diagrams for your specific vehicle and engine combination.