Since 1996, if you’re in the US and own a car or light truck, you’re driving an OBD-II compliant vehicle. For our European readers, the OBD situation is a tad more complex, but the underlying principle remains the same: standardized on-board diagnostics. This standardization is a game-changer, especially when you’re looking to understand what’s going on under the hood of your car. And that’s where tools like the Joaruy Mini Obd2 Scan Tool come into play, giving you the power to access and interpret your car’s diagnostic data right at your fingertips.
Understanding OBD-II compliance is the first step to effective car diagnostics. These systems rely on specific communication protocols to transmit data, and standardized diagnostic link connectors (DLCs) to access this information. Let’s break down the essentials to help you navigate the world of OBD-II and see how a tool like the Joaruy mini obd2 scan tool can be your best friend in car maintenance.
Decoding OBD-II Communication Protocols
OBD-II compliant vehicles utilize one of five key communication protocols. These are the languages your car’s computer uses to talk about its health. They include:
- J1850 PWM
- J1850 VPW
- ISO9141-2
- ISO14230-4 (Keyword Protocol 2000)
- ISO15765-4/SAE J2480 (CAN – Controller Area Network)
Initially, US car manufacturers were restricted from using the CAN protocol until the 2003 model year. However, from 2008 onwards, CAN became the universal standard for all vehicles. Knowing these protocols isn’t crucial for using a Joaruy mini obd2 scan tool, as it’s designed to handle them, but it’s good background knowledge for any car enthusiast or DIY mechanic.
Diagnostic Link Connectors (DLCs): Your Access Point
SAE J1962 defines two types of Diagnostic Link Connectors (DLCs): Type A and Type B. The primary difference is the shape of their alignment tab, but both serve the same purpose – providing a standardized port to access your vehicle’s diagnostic system. This standardization is what allows tools like the Joaruy mini obd2 scan tool to work across a wide range of vehicles.
Location Matters: SAE J1962 also dictates where these connectors should be located. Type A DLCs are typically found within the driver or passenger compartment, spanning from the driver’s side of the instrument panel to about 300mm beyond the vehicle’s centerline. The ideal spot is usually between the steering column and the vehicle’s centerline, ensuring easy access from the driver’s seat.
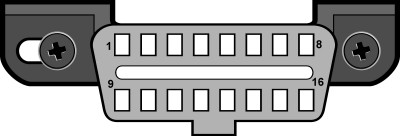
Figure 1 – Type A J1962 Vehicle Connector, commonly found in many vehicles. This standardized port is where you’ll plug in your Joaruy mini obd2 scan tool.
Type B DLCs offer a bit more flexibility in location. They can be placed within the driver or passenger compartment, extending from the driver’s instrument panel edge to approximately 750mm beyond the vehicle centerline. These connectors must be mounted to facilitate easy connection and disconnection, accessible from the driver’s seat, co-driver’s seat, or even from outside the vehicle.
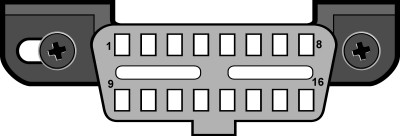
Figure 2 – Type B J1962 Vehicle Connector. While slightly different in shape from Type A, it serves the same function and is compatible with the Joaruy mini obd2 scan tool.
Pinpointing Your Protocol: DLC Pinouts
While your Joaruy mini obd2 scan tool automatically detects your vehicle’s protocol, understanding the DLC pinout can be insightful. By examining the pins present in your DLC, you can manually determine the communication protocol your vehicle uses.
Figure 3 – OBDII connector pinout diagram. This diagram illustrates the function of each pin in the DLC, helping to understand the underlying communication protocols. The Joaruy mini obd2 scan tool utilizes these pins to interface with your vehicle’s computer.
The table below simplifies protocol identification based on pin presence:
| Pin 2 | Pin 6 | Pin 7 | Pin 10 | Pin 14 | Pin 15 | Standard |
|---|---|---|---|---|---|---|
| must have | – | – | must have | – | – | J1850 PWM |
| must have | – | – | – | – | – | J1850 VPW |
| – | – | must have | – | – | may have* | ISO9141/14230 |
| – | must have | – | – | must have | – | ISO15765 (CAN) |

*Pin 15 (L-line) is optional in newer vehicles using ISO9141-2 or ISO14230-4 protocols.
Crucially, pins 4 (Chassis Ground), 5 (Signal Ground), and 16 (Battery Positive) should always be present in the connector, regardless of the protocol. This consistency ensures that your Joaruy mini obd2 scan tool and other diagnostic devices can reliably power up and establish a ground connection.
Here’s a quick summary of essential pins for each protocol:
- PWM: Pins 2, 4, 5, 10, and 16 must be present.
- VPW: Pins 2, 4, 5, and 16 must be present, but pin 10 should be absent.
- ISO: Pins 4, 5, 7, and 16 must be present. Pin 15 may or may not be present.
- CAN: Pins 4, 5, 6, 14, and 16 must be present.
Conclusion: Empowering Car Owners with OBD-II Knowledge and the Joaruy Mini OBD2 Scan Tool
Understanding OBD-II standards, communication protocols, and DLC connectors empowers you to take a more proactive approach to car maintenance. While the technical details might seem complex initially, tools like the Joaruy mini obd2 scan tool simplify the process significantly. By plugging this user-friendly device into your car’s DLC, you can quickly access trouble codes, monitor vehicle parameters, and gain valuable insights into your car’s health. Whether you’re a seasoned mechanic or a car owner wanting to understand those pesky check engine lights, an OBD-II scan tool is an invaluable asset. And with the Joaruy mini obd2 scan tool, you have a compact, efficient, and affordable way to unlock your car’s secrets and stay ahead of potential issues.