Are you diving into the world of car diagnostics with your Renault and an Arduino? You’re on the right track! Accessing your vehicle’s On-Board Diagnostics (OBD2) system is a fantastic way to understand your car’s health, performance, and even troubleshoot issues yourself. Many Renault owners and car enthusiasts are leveraging the power of Arduino, coupled with modules like the MCP2515 CAN bus controller, to tap into this valuable data stream.
However, like any DIY project, you might encounter a few bumps along the road. One common hurdle, as illustrated in the original post, is the dreaded “Error Sending Message…” when trying to request specific Parameter IDs (PIDs) like engine speed.
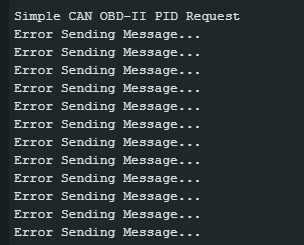 Arduino Serial Monitor showing 'Error Sending Message…' when trying to read OBD2 data from a Renault car
This guide will walk you through understanding how to request engine speed (PID 0C) from your Renault’s OBD2 system using Arduino, and importantly, troubleshoot that frustrating “Error Sending Message” problem. We’ll break down the code, explore potential issues specific to Renault vehicles, and get you on the path to successfully reading your car’s data.
Understanding OBD2 and Renault Compatibility
OBD2 is a standardized system, meaning it’s designed to be universal across most modern vehicles. Renault vehicles, especially those manufactured from the early 2000s onwards, are generally OBD2 compliant. This is excellent news because it means you should be able to use standard OBD2 tools and protocols to communicate with your car’s computer.
However, “standard” doesn’t always mean “simple.” Renault, like other manufacturers, may have specific implementations or nuances in their OBD2 systems. This could involve:
- Specific CAN Bus Protocols: While OBD2 mandates CAN bus, different vehicles might use slightly different CAN protocols or speeds.
- Extended IDs: Renault might utilize extended CAN IDs which require proper handling in your Arduino code.
- PID Support: While PID 0C (Engine Speed) is a standard OBD2 PID, its availability and response might slightly vary across different Renault models and years.
Analyzing the Arduino Code for OBD2 Request
Let’s examine the provided Arduino code snippet to understand how it’s designed to request OBD2 data:
#include <mcp_can.h>
#include <SPI.h>

#define standard 0 // 7E0/8 = Engine ECM // 7E1/9 = Transmission ECM

#if standard == 1
  #define LISTEN_ID 0x7EA
  #define REPLY_ID 0x7E0
  #define FUNCTIONAL_ID 0x7DF
#else
  #define LISTEN_ID 0x98DAF101
  #define REPLY_ID 0x98DA01F1
  #define FUNCTIONAL_ID 0x98DB33F1
#endif

// CAN TX Variables
unsigned long prevTx = 0;
unsigned int invlTx = 1000;
byte txData[] = {0x02, 0x01, 0x0C, 0x55, 0x55, 0x55, 0x55, 0x55}; // Request PID 0C (Engine Speed)

// CAN RX Variables
unsigned long rxID;
byte dlc;
byte rxBuf[8];
char msgString[128];

// CAN Interrupt and Chip Select Pins
#define CAN0_INT 2
MCP_CAN CAN0(10);

void setup(){
  Serial.begin(115200);
  while(!Serial);

  if(CAN0.begin(MCP_STDEXT, CAN_500KBPS, MCP_8MHZ) == CAN_OK)
    Serial.println("MCP2515 Initialized Successfully!");
  else{
    Serial.println("Error Initializing MCP2515... Permanent failure! Check your code & connections");
    while(1);
  }

  // ... (Filters and Masks - important for Renault) ...

#if standard == 1
  // Standard ID Filters (Example for generic OBD2 - might not be Renault specific)
  CAN0.init_Mask(0,0x7F00000);
  CAN0.init_Filt(0,0x7DF0000);
  CAN0.init_Filt(1,0x7E10000);
  CAN0.init_Mask(1,0x7F00000);
  CAN0.init_Filt(2,0x7DF0000);
  CAN0.init_Filt(3,0x7E10000);
  CAN0.init_Filt(4,0x7DF0000);
  CAN0.init_Filt(5,0x7E10000);
#else
  // Extended ID Filters (Potentially more relevant for Renault)
  CAN0.init_Mask(0,0x90FF0000);
  CAN0.init_Filt(0,0x90DA0000);
  CAN0.init_Filt(1,0x90DB0000);
  CAN0.init_Mask(1,0x90FF0000);
  CAN0.init_Filt(2,0x90DA0000);
  CAN0.init_Filt(3,0x90DB0000);
  CAN0.init_Filt(4,0x90DA0000);
  CAN0.init_Filt(5,0x90DB0000);
#endif

  CAN0.setMode(MCP_NORMAL);
  pinMode(CAN0_INT, INPUT);
  Serial.println("Simple CAN OBD-II PID Request");
}

void loop(){
  if(!digitalRead(CAN0_INT)){
    CAN0.readMsgBuf(&rxID, &dlc, rxBuf);

    if((rxID & 0x80000000) == 0x80000000)
      sprintf(msgString, "Extended ID: 0x%.8lX DLC: %1d Data:", (rxID & 0x1FFFFFFF), dlc);
    else
      sprintf(msgString, "Standard ID: 0x%.3lX DLC: %1d Data:", rxID, dlc);
    Serial.print(msgString);

    if((rxID & 0x40000000) == 0x40000000){
      sprintf(msgString, " REMOTE REQUEST FRAME");
      Serial.print(msgString);
    } else {
      for(byte i = 0; i<dlc; i++){
        sprintf(msgString, " 0x%.2X", rxBuf[i]);
        Serial.print(msgString);
      }
    }
    Serial.println();
  }

  if((millis() - prevTx) >= invlTx){
    prevTx = millis();
    if(CAN0.sendMsgBuf(FUNCTIONAL_ID, 8, txData) == CAN_OK){
      Serial.println("Message Sent Successfully!");
    } else {
      Serial.println("Error Sending Message..."); // <--- This is the error you're seeing!
    }
  }
}
Key Code Sections Explained:
#include <mcp_can.h>and#include <SPI.h>: Includes necessary libraries for CAN communication using the MCP2515 module and SPI communication.#define standard 0: This line selects between standard (11-bit) and extended (29-bit) CAN IDs. The code is currently set for0, meaning extended IDs are used. This is potentially more relevant for Renault.txData[] = {0x02, 0x01, 0x0C, ...}: This is the data being transmitted.0x02: Number of data bytes following (Service + PID).0x01: OBD2 Service 01 – “Show current data”.0x0C: PID 0C – “Engine speed”.0x55, 0x55, ...: Padding bytes, often used.
FUNCTIONAL_ID: This is the CAN ID used to send the request. In extended mode (standard 0), it’s set to0x98DB33F1. This ID might need adjustment depending on your Renault model.CAN0.sendMsgBuf(FUNCTIONAL_ID, 8, txData): This function attempts to send the CAN message.CAN_OKindicates success, otherwise, it returns an error, leading to “Error Sending Message…”.- Filters and Masks (
CAN0.init_Mask,CAN0.init_Filt): These are crucial for receiving the correct responses. The code includes filter and mask configurations for both standard and extended IDs. The extended ID filters are likely more relevant for Renault.
Troubleshooting “Error Sending Message…” for Renault OBD2
Now, let’s focus on why you might be getting the “Error Sending Message…” error and how to fix it specifically for your Renault:
-
Wiring Issues: This is the most common culprit. Double-check your wiring between the Arduino, MCP2515 module, and your Renault’s OBD2 port.
- CAN_H and CAN_L: Ensure CAN High (CAN_H) and CAN Low (CAN_L) wires are correctly connected between the MCP2515 and the OBD2 port. Swapping them will prevent communication.
- Ground: Make sure you have a solid ground connection.
- Power: Verify the MCP2515 is getting proper power.
- OBD2 Port Pinout: Confirm the OBD2 port pinout for your Renault model. Pin 6 is typically CAN_H, and Pin 14 is CAN_L, but always verify.
-
CAN Bus Speed Mismatch: The code initializes the CAN bus at
CAN_500KBPS. While 500 kbps is standard for OBD2, some Renault vehicles might use a different speed, or there could be issues with the MCP2515 and Arduino communicating at the desired speed.- Try 250 kbps: In the
CAN0.begin()function, try changingCAN_500KBPStoCAN_250KBPSand see if that resolves the issue. - Check Renault Documentation: If possible, try to find documentation specific to your Renault model that indicates the CAN bus speed.
- Try 250 kbps: In the
-
Incorrect CAN IDs (FUNCTIONAL_ID, Filters, Masks): The CAN IDs used in the code, especially
FUNCTIONAL_ID(0x98DB33F1in extended mode), might not be the correct functional address for your specific Renault ECU. Similarly, the filters and masks might be too restrictive or not aligned with Renault’s CAN ID ranges.- Experiment with
FUNCTIONAL_ID: Try using the standard OBD2 functional address0x7DF(in standard ID mode,#define standard 1). If you switch to standard ID mode, remember to adjust the filters and masks accordingly (use the#if standard == 1block). - Research Renault Specific CAN IDs: Online forums and Renault enthusiast communities might have information about specific CAN IDs used in different Renault models. Searching for “[Your Renault Model] OBD2 CAN IDs” could be helpful.
- Less Restrictive Filters: As a troubleshooting step, you could temporarily make the filters and masks less restrictive (or even comment them out initially to see if any CAN traffic is received). However, for reliable operation, proper filtering is essential.
- Experiment with
-
MCP2515 Initialization Issues: While the code checks for successful MCP2515 initialization (
CAN0.begin() == CAN_OK), there could still be underlying issues.- Module Quality: Ensure you are using a reputable MCP2515 module. Poor quality modules can be unreliable.
- SPI Communication: Verify the SPI communication between the Arduino and MCP2515. Check your SPI wiring and ensure no other SPI devices are conflicting.
-
Renault ECU Not Responding to PID 0C: While PID 0C (Engine Speed) is a standard PID, it’s possible that for some reason, your specific Renault ECU might not respond to it in the way expected, or might require a slightly different request format.
- Try Other Standard PIDs: Before assuming PID 0C is the issue, try requesting other common OBD2 PIDs like PID 0D (Vehicle Speed) or PID 05 (Engine Coolant Temperature) to see if you get a response. This will help determine if the issue is specific to PID 0C or a broader communication problem.
- Check OBD2 Compatibility Lists: Some online resources list OBD2 PIDs supported by different vehicle makes and models. While Renault is generally OBD2 compliant, these lists might offer hints if there are known quirks.
Steps to Debug Your Renault OBD2 Arduino Setup
- Start with Basic Wiring Checks: Meticulously re-examine your wiring. This is the most frequent source of problems.
- Simplify Code (Initial Test): For initial testing, you could simplify the code by:
- Using Standard IDs: Set
#define standard 1to use standard CAN IDs and the corresponding filters. This is often simpler to start with. - Less Restrictive Filters (Temporarily): Comment out the
CAN0.init_MaskandCAN0.init_Filtlines temporarily just to see if you can receive any CAN traffic. If you start receiving messages (even if they aren’t the exact responses you expect), it indicates basic CAN communication is working.
- Using Standard IDs: Set
- Test with a Known Working OBD2 Scanner: If you have access to a generic OBD2 scanner, try connecting it to your Renault to confirm that the OBD2 port itself is functional and responding.
- Serial Monitor Debugging: Use
Serial.println()statements in your Arduino code to print out:- The value of
CAN_OKor error codes returned byCAN0.begin()andCAN0.sendMsgBuf(). - The CAN IDs and data you are receiving (even if it’s not what you expect initially).
- The value of
- Incrementally Add Complexity: Once you have basic communication working, gradually add back filters, experiment with extended IDs (if needed for your Renault), and refine your PID requests.
Getting Engine Speed Data (PID 0C) from Your Renault
Once you’ve overcome the “Error Sending Message…” hurdle, successfully requesting and interpreting engine speed (PID 0C) data should be straightforward.
-
Correct
txData: Ensure yourtxDataarray is correctly configured to request PID 0C:byte txData[] = {0x02, 0x01, 0x0C, 0x55, 0x55, 0x55, 0x55, 0x55}; -
Service 01 Response: For Service 01 requests, the response from the ECU will typically be in the following format:
- Byte 1: Number of bytes following (typically 3 for PID 0C).
- Byte 2:
0x41(Service 01 response code). - Byte 3:
0x0C(The PID you requested – echoed back). - Byte 4 & 5: Engine Speed Data (2 bytes).
-
Interpreting Engine Speed Bytes: Engine speed is usually represented by two bytes. The formula to calculate RPM from these two bytes is:
RPM = ((Byte 4 * 256) + Byte 5) / 4You’ll need to extract Byte 4 and Byte 5 from the
rxBufarray in your code and apply this formula to get the RPM value.
Conclusion
Reading OBD2 data from your Renault with Arduino is a rewarding project. While encountering “Error Sending Message…” can be frustrating, systematically troubleshooting wiring, CAN bus settings, and CAN IDs will likely lead you to a solution. By understanding the code, the OBD2 protocol, and potential Renault-specific nuances, you can unlock a wealth of information from your car and gain valuable insights into its operation. Happy tinkering and data decoding!