The appearance of a check engine light can be unsettling for any car owner. It signals that your vehicle’s onboard diagnostic system has detected a potential issue. While it’s crucial to address the root cause of the problem, sometimes you need to reset the check engine light after repairs or for diagnostic purposes. This is where an Obd2 Scanner With Reset functionality becomes invaluable.
This guide, brought to you by the car repair experts at carparteu.com, will walk you through the process of using an OBD2 scanner to reset your check engine light. We’ll explain why this tool is essential, how to use it effectively, and what to consider before and after resetting your vehicle’s computer.
What is an OBD2 Scanner and Why Do You Need One with Reset Capabilities?
An OBD2 scanner, or On-Board Diagnostics II scanner, is a device used to interface with your vehicle’s computer system. Modern cars are equipped with this system to monitor various aspects of their performance and emissions. When a problem is detected, the system generates diagnostic trouble codes (DTCs) and often illuminates the check engine light on your dashboard.
While basic code readers can only retrieve these error codes, an OBD2 scanner with reset capability allows you to do more. It empowers you to:
- Diagnose Issues: Read and understand the error codes causing the check engine light.
- Verify Repairs: After performing a repair, reset the check engine light to see if the issue is truly resolved. If the light returns, the problem may persist or be related.
- Maintain Your Vehicle: Regularly check for potential issues and monitor your car’s health.
- Save Time and Money: Avoid unnecessary trips to the mechanic for simple diagnostics and resets.
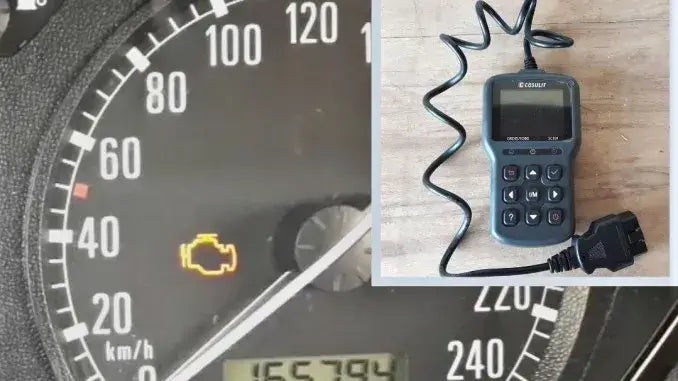
For effective check engine light management, choosing an OBD2 scanner that includes a reset function is crucial. A model like the CGSULIT SC301 is a great example of a user-friendly and capable scanner that offers both code reading and reset features.
Step-by-Step Guide: Resetting Your Check Engine Light with an OBD2 Scanner
Before proceeding, remember that resetting the check engine light without addressing the underlying issue is only a temporary solution. The light will likely reappear if the problem persists. Always prioritize diagnosing and fixing the root cause.
Here’s how to use your OBD2 scanner with reset function to turn off the check engine light:
1. Locate the OBD2 Port
The OBD2 port is typically located within the passenger compartment of your vehicle. Common locations include under the dashboard on the driver’s side, near the steering column, or in the center console area. Refer to your vehicle’s owner’s manual if you are unsure of its exact location.
2. Connect the OBD2 Scanner
With your vehicle turned off, firmly plug the OBD2 scanner connector into the OBD2 port. Ensure it is securely connected for proper communication.
3. Turn On the Ignition (Accessory Mode)
Turn your ignition key to the “Accessory” or “ON” position. This powers up your car’s electrical systems without starting the engine. This step is necessary for the OBD2 scanner to communicate with your vehicle’s computer.
4. Allow the OBD2 Scanner to Scan for Codes
Once connected and powered, your OBD2 scanner will typically power on automatically. Follow the scanner’s prompts to initiate a scan. This process allows the scanner to retrieve any stored diagnostic trouble codes from your vehicle’s computer.
5. Read and Interpret the Error Codes
After the scan, the OBD2 scanner will display a list of error codes. Note down these codes. It’s crucial to understand what these codes mean before proceeding with a reset. Consult your vehicle’s repair manual, online databases, or the code library often built into your OBD2 scanner to interpret each code. Understanding the codes will help you determine the severity and nature of the problem.
6. Navigate to the Reset Function and Clear the Check Engine Light
Using your OBD2 scanner’s menu, navigate to the “Clear Codes,” “Erase Codes,” or similarly named function. The exact wording may vary depending on your scanner model. Select this option and confirm your choice when prompted. The scanner will then send a command to your vehicle’s computer to reset the check engine light and clear the stored error codes.
7. Return to the Main Menu
After successfully clearing the codes, navigate back to the main menu or starting screen of your OBD2 scanner. This prepares the scanner for disconnection.
8. Disconnect the OBD2 Scanner
Carefully disconnect the OBD2 scanner from the OBD2 port. If your scanner has a power button, turn it off before disconnecting.
9. Turn Off the Ignition
Turn the ignition key back to the “OFF” position, completely powering down your vehicle.
10. Start Your Engine and Check the Check Engine Light
Start your engine normally. Check your dashboard to see if the check engine light is off. If the reset was successful and the underlying issue is resolved (or was minor and intermittent), the light should remain off.
Conclusion: Empowering Yourself with an OBD2 Scanner and Resetting the Check Engine Light
Using an OBD2 scanner with reset functionality is a straightforward process that can save you time and provide valuable insights into your vehicle’s health. It allows you to take a proactive approach to car maintenance and understand potential issues before they escalate.
However, it’s crucial to reiterate that resetting the check engine light is not a substitute for proper diagnosis and repair. Always investigate the error codes, address the underlying problems, and use the reset function responsibly. By doing so, you can effectively utilize your OBD2 scanner to maintain your vehicle and ensure its optimal performance. Investing in an OBD2 scanner with reset capability is a smart move for any car owner looking to become more involved in their vehicle’s care and maintenance.