Trying to diagnose a check engine light or understand your vehicle’s health can be incredibly frustrating when your OBD2 scanner refuses to connect. An OBD2 scanner is an invaluable tool for car owners and mechanics alike, providing direct insights into your vehicle’s Engine Control Unit (ECU). However, encountering a connection failure is a common roadblock. This article will delve into the most frequent reasons behind OBD2 connection problems and equip you with effective troubleshooting steps to get your scanner communicating with your car again.
Alt text: Foxwell NT909 all system diagnostic scanner displaying comprehensive vehicle health data, highlighting its capability for in-depth car analysis.
Understanding why your OBD2 scanner is not connecting is the first step towards resolving the issue. The On-Board Diagnostics II (OBD2) system is designed to monitor your vehicle’s performance and relay diagnostic data through a standardized port, typically located under your dashboard. When this connection fails, it disrupts your ability to read error codes, monitor live data, and perform essential diagnostics. Here are the primary culprits behind OBD2 connection failures:
- Power Delivery Problems: The OBD2 port needs power to function. If your car battery is weak, discharged, or if there’s an issue with the power supply to the OBD2 port itself, the scanner won’t be able to establish a connection.
- OBD2 Port Malfunctions: Physical damage to the OBD2 port, or blockages from dirt and debris, can prevent the scanner from making a proper electrical connection. Bent or corroded pins within the port can also be significant factors.
- Scanner Incompatibility Issues: While OBD2 is a standardized system, not all scanners are universally compatible with every vehicle. Compatibility problems, especially with older or specific vehicle makes and models, can lead to connection failures.
- Blown Fuses Impacting OBD2 Port: The OBD2 port is often protected by a fuse. A blown fuse in the circuit powering the OBD2 port will cut off power, rendering the port and your scanner useless.
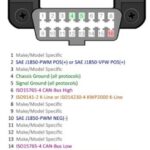
- Incorrect Communication Protocols: Modern vehicles use various communication protocols for diagnostics (like CAN, ISO 9141, KWP2000). If your scanner is not set to the correct protocol for your vehicle, or if it doesn’t automatically detect it, a connection will fail.
- Scanner Software Glitches: Outdated or corrupted software within your OBD2 scanner can also be the root cause of connection problems. Software issues can prevent the scanner from properly initiating communication with the ECU.
Pinpointing Common Causes of OBD2 Connection Issues
Let’s explore each of these potential causes in more detail to help you diagnose and fix your OBD2 connection problem.
Power Supply Deficiencies
The first and simplest check is to ensure your vehicle’s battery is healthy and sufficiently charged. A weak battery can cause a multitude of electrical issues, including preventing the OBD2 port from receiving adequate power. Use a multimeter to test the voltage at the OBD2 port itself. You should be reading approximately 12 volts. If the voltage is significantly lower, investigate battery health and charging system issues.
OBD2 Port Integrity
A physical inspection of the OBD2 port is crucial. Look for any visible damage to the port housing. Check for obstructions like dirt, dust, or foreign objects lodged inside the port. Carefully examine the pins inside the port. Are they straight, undamaged, and free from corrosion? Bent or corroded pins can disrupt the electrical connection required for communication.
Scanner and Vehicle Compatibility
Before assuming a fault, double-check that your OBD2 scanner is actually compatible with your vehicle’s make, model, and year. Consult your scanner’s user manual or the manufacturer’s website for compatibility information. Some vehicles, particularly those with advanced systems or specific manufacturer protocols, may require specialized scanners or adapters.
Fuse Box Inspection for Blown Fuses
A blown fuse is a common reason for a non-functional OBD2 port. Locate your vehicle’s fuse box (refer to your owner’s manual for its location). Identify the fuse associated with the OBD2 system or auxiliary power outlets (as they are often on the same circuit). Check the fuse for any signs of being blown – the wire inside will be broken. Replace any blown fuse with a new fuse of the correct amperage rating.
Communication Protocol Mismatches
Modern vehicles utilize different OBD2 communication protocols. While many scanners automatically detect the correct protocol, some may require manual selection. Consult your vehicle’s repair manual or online resources to determine the correct protocol for your car (CAN, ISO 9141, KWP2000 are common examples). Ensure your scanner is set to the appropriate protocol if manual selection is needed. Advanced scanners like the Foxwell NT series are designed for broad compatibility and automatic protocol detection, minimizing this issue.
Software and Scanner Glitches
Outdated or buggy scanner software can also lead to connection problems. Try restarting your OBD2 scanner. If that doesn’t work, check for software updates from the scanner manufacturer. Updating to the latest firmware can resolve known bugs and improve compatibility. In some cases, a factory reset of the scanner might be necessary to clear corrupted data.
Step-by-Step Guide to Troubleshooting OBD2 Scanner Connection Problems
A systematic approach is key to effectively troubleshooting OBD2 scanner connection issues. Using a reliable diagnostic tool like the Foxwell NT809 or similar models can greatly simplify this process. Here’s a step-by-step guide:
Step 1: Power Supply Verification
Begin by turning your car’s ignition to the “Accessory” position (just before starting the engine). This provides power to the electrical systems without starting the car. Use a multimeter, or the voltage testing feature available on some advanced scanners like the Foxwell NT809, to test for power at the OBD2 port. Ensure you are getting a reading of approximately 12 volts. If there’s no power, or significantly low voltage, investigate battery and vehicle electrical system issues further.
Step 2: OBD2 Port Physical Inspection
Carefully examine the OBD2 port for any physical damage or obstructions. Use a flashlight to get a clear view. If you see dust or debris, gently use compressed air to clean the port. The robust connector design of scanners like the Foxwell NT809 is generally more forgiving with slightly worn ports, but a clean and undamaged port is essential for a reliable connection.
Step 3: Scanner Compatibility Confirmation
Reconfirm that your OBD2 scanner is compatible with your specific vehicle. Visit the scanner manufacturer’s website and look for compatibility checkers or lists. Input your vehicle’s make, model, and year to verify compatibility. Scanners like the Foxwell NT809 boast extensive vehicle coverage, reducing compatibility concerns.
Step 4: Fuse Box Examination
Locate your vehicle’s fuse box, typically found in the engine bay or under the dashboard. Consult your owner’s manual for a fuse box diagram to identify the fuse related to the OBD2 port or auxiliary power. Inspect the fuse visually for a broken filament. Replace any blown fuse with a new one of the same amperage rating. Using a scanner like the NT809 with built-in diagnostic functions can sometimes help pinpoint electrical issues related to fuses.
Step 5: Protocol Setting Verification
Refer to your vehicle’s service manual or online resources to determine the correct OBD2 communication protocol for your car. Access your scanner’s settings menu and ensure the correct protocol is selected, if manual selection is required. Again, scanners like the Foxwell NT809 often automatically detect and set the correct protocol, simplifying this step.
Step 6: Scanner Software Update
Connect your OBD2 scanner to a computer with internet access. Visit the scanner manufacturer’s website and check for available software updates. Download and install any updates following the manufacturer’s instructions. The Foxwell NT809, for example, supports convenient Wi-Fi updates, making this process straightforward. Keeping your scanner software up-to-date is crucial for optimal performance and compatibility.
Step 7: Scanner Reset Procedure
Sometimes, a simple reset can resolve temporary software glitches. Turn off your OBD2 scanner, disconnect it from the OBD2 port, and wait for a few minutes. Then, reconnect the scanner and try again. The user-friendly interface of tools like the NT809 makes this reset process quick and easy.
Advanced Tips for Resolving OBD2 Scanner Connection Issues
Beyond the basic troubleshooting steps, consider these additional tips and best practices for maximizing your chances of successful OBD2 scanner connections:
Secure Connection Check
Always double-check that the OBD2 scanner connector is firmly and correctly plugged into your vehicle’s OBD2 port. A loose or partially connected scanner can lead to intermittent or complete communication failure. Ensure you feel a positive click or secure engagement when connecting the scanner.
Wiring Harness Inspection
Inspect the wiring harness leading to the OBD2 port for any signs of damage. Look for frayed wires, cuts, or loose connections. Damage to this wiring can disrupt the communication pathway between the scanner and the ECU. Damaged wiring may require professional repair.
OBD2 Port Cleaning
Use an electrical contact cleaner to carefully clean the pins and internal components of the OBD2 port. Over time, dirt, corrosion, and oxidation can build up on the pins, hindering proper electrical contact. A clean port ensures a reliable connection.
Cross-Vehicle Scanner Testing
To isolate whether the problem lies with your scanner or your vehicle, try connecting your scanner to a different vehicle (that you know is OBD2 compliant). If the scanner connects successfully to another car, the issue is likely with your original vehicle’s OBD2 system, not the scanner itself.
Backup Scanner Verification
If you have access to a second OBD2 scanner, try using it on your vehicle. This can help confirm whether the problem is with your primary scanner or with your vehicle’s OBD2 port or system.
Hidden Fuse Location
Some vehicles may have hidden or secondary fuse boxes that protect the OBD2 port circuit. Consult your vehicle’s service manual or a professional mechanic to check for any hidden fuses that might be blown and affecting the OBD2 port.
Software Update Vigilance
Regularly check your scanner manufacturer’s website for software updates. Updates often include bug fixes, expanded vehicle compatibility, and performance improvements that can resolve connection issues and enhance overall functionality.
Automotive Community Engagement
Join online automotive forums and communities dedicated to car diagnostics. Sharing your specific OBD2 connection problem with experienced users can provide valuable insights and solutions. Others may have encountered similar issues and found effective fixes.
Vehicle-Specific Procedures Awareness
Be aware that some vehicles, particularly certain makes or models, might have specific procedures or requirements for OBD2 scanner connections. Consult your vehicle’s service manual for any specific instructions or nuances related to OBD2 diagnostics. Professional-grade diagnostic tools are often better equipped to handle vehicle-specific protocols and complexities.
Battery Health Maintenance
Ensure your vehicle’s battery is in good health and properly charged. A weak or failing battery can cause voltage drops that interfere with the OBD2 scanner’s ability to communicate with the ECU reliably.
Professional Calibration and Reprogramming
In rare cases, OBD2 port or ECU issues might require professional calibration or reprogramming. This typically necessitates specialized equipment and expertise and should be handled by a qualified mechanic or automotive technician.
By following these comprehensive troubleshooting steps and advanced tips, you significantly increase your chances of diagnosing and resolving why your OBD2 scanner is not connecting. Remember that a methodical approach and careful checks are key to pinpointing the root cause and getting your diagnostic tool back online.
Alt text: Foxwell bidirectional car scanner showcasing its two-way communication capabilities, essential for advanced diagnostic functions and vehicle system control.
Conclusion: Restoring Your OBD2 Connection
Resolving OBD2 scanner connection issues often requires a systematic and patient approach. However, by working through the troubleshooting steps outlined in this guide, most connection problems can be effectively resolved.
From ensuring secure connections and checking for physical damage to updating software and considering advanced diagnostic tools, you have a wide range of strategies at your disposal. If, after thorough troubleshooting, you are still facing connection difficulties, seeking assistance from a professional mechanic is always a prudent next step.
By implementing these strategies, you can ensure reliable and accurate vehicle diagnostics, contributing to proactive vehicle maintenance and timely issue resolution. A functioning OBD2 connection is essential for understanding your vehicle’s health and keeping it running smoothly.
FAQs:
Why won’t my OBD2 scanner establish a connection with the ECU?
Common reasons include loose connections, scanner incompatibility with your vehicle, a faulty OBD2 port, or issues with the ECU itself.
What are effective troubleshooting steps for OBD2 scanner connection problems?
Start by checking all connections, verifying scanner compatibility, inspecting fuses, and trying to restart both your vehicle and the OBD2 scanner.
Can updating the software on my OBD2 scanner resolve connection issues?
Yes, in many cases, updating your scanner’s software or firmware can fix compatibility and communication problems by addressing software bugs or adding support for newer vehicle protocols.